Imagine this: you’ve just changed the light bulb, expecting to bask in the glow of a well-lit room, but the switch refuses to cooperate. Frustrating, isn’t it?
You’re left wondering what went wrong. It’s a scenario many of us face, often leading to a cascade of questions and concerns. Why isn’t it working? Did you miss a step? Is there a deeper issue lurking behind the wall?
You’re not alone, and that’s why you’re here. We will unravel the mystery behind a stubborn light switch that won’t work after a bulb change. By the end, you’ll not only understand the possible reasons but also feel empowered to tackle this common household hiccup. So, if you’re ready to shed light on this puzzling situation, keep reading. Your solution might be simpler than you think!

Credit: www.wikihow.com
Common Causes
Changing a light switch might seem simple, yet problems can arise. Many homeowners find their light switch doesn’t work after replacement. Understanding common causes helps in troubleshooting.
Loose Connections
A loose connection can disrupt power flow. Ensure all wires are tightly connected. Loose wires may cause flickering or complete failure.
Inspect wire nuts and screws. They should be secure. If they’re not, tighten them carefully. This might solve the issue.
Faulty Wiring
Old or damaged wiring can be a culprit. Wires might be frayed or broken. This prevents electricity from reaching the bulb.
Check for visible damage. If wires look worn, consider replacing them. Faulty wiring often needs professional attention.
Defective Switch
Sometimes, the switch itself is defective. Even new switches can be faulty. If everything else checks out, the switch might be the problem.
Test the switch with a multimeter. It ensures the switch is functional. If it fails the test, replace it.
Safety Precautions
Ensure safety by turning off the power supply before fixing a malfunctioning light switch. Double-check connections and use insulated tools to avoid electric shocks. If unsure, consult a professional electrician to handle the issue safely.
Ensuring safety when dealing with electrical issues is paramount. If your light switch isn’t working after changing it, understanding the right safety precautions can prevent accidents. You might be eager to get the lights back on, but taking the time to follow safety measures can save you from potential hazards. Let’s explore some crucial steps to keep you safe during this process.Turn Off Power
Before you even think about touching the switch, make sure the power is turned off. Head to your electrical panel and switch off the circuit breaker controlling the light switch. This simple step is your first line of defense against electrical shock. Sometimes, people rely on just flipping the switch off, but that’s not enough. The circuit breaker ensures there’s no power running through the wires. Always double-check by testing with a voltage detector. Your safety is worth the extra minute.Use Insulated Tools
When working with electrical components, using insulated tools is essential. These tools are designed to protect you from electric shocks. Look for pliers and screwdrivers with rubber handles. They might seem like small details, but they make a big difference. Imagine your screwdriver slips and makes contact with a live wire. With insulated tools, you’re protected from potential harm. This precaution is not just for professionals; it’s a smart choice for anyone working with electricity. Have you ever wondered why electricians have a toolkit full of insulated tools? It’s because they understand the risks involved and prioritize safety. You should do the same. After all, handling electricity is no child’s play. By following these precautions, you minimize risks and ensure a safer process. What other safety tips have you found helpful when dealing with electrical repairs? Share your thoughts below and let’s keep the conversation going.Check Connections
Experiencing a light switch that stops working after replacement can be frustrating. The issue often relates to the connections. Poor connections can disrupt the flow of electricity. This can prevent the light from turning on. Checking the connections can help solve this issue. Begin by examining key connection points to ensure everything is secure.
Inspect Wire Nuts
Wire nuts connect the wires in the switch box. They ensure a secure connection. Check if the wire nuts are loose. Tighten them if needed. Loose wire nuts can cause the light switch to malfunction. Twist them firmly to ensure a strong connection.
Look for any exposed wires. Exposed wires can be dangerous. They can also cause the switch to stop working. Cover any exposed wires with electrical tape. This keeps them safe and secure.
Verify Terminal Screws
Terminal screws hold the wires to the switch. They need to be tight and secure. Use a screwdriver to check them. Tighten any loose terminal screws. Loose screws can break the electrical circuit.
Also, ensure the wires are under the screw heads. This ensures a good connection. If wires slip out, the switch will not work. Double-check the position of each wire. Position them correctly for a secure connection.
Test The Switch
Experiencing issues after changing a light switch can be frustrating. Ensure wires are connected properly and check for any loose connections. Testing the switch with a multimeter can help identify any electrical faults.
Testing the switch is a crucial step when your light switch stops working after you’ve changed it. It’s not just about flipping it on and off; there’s a method to it that can save you time and frustration. Understanding this process can help you determine whether the issue lies within the switch itself or if it’s a symptom of a larger electrical problem.Use A Multimeter
A multimeter is your best friend in diagnosing electrical issues. It’s a handy tool that can measure voltage, current, and resistance. To test the switch, first ensure the power is off at the circuit breaker to avoid any risk of electric shock. Set the multimeter to measure voltage and attach the probes to the switch terminals. If there’s no reading when the switch is flipped on, there’s a problem. This step can confirm whether the issue is with the switch or elsewhere.Check For Continuity
Continuity testing is another effective way to check if your switch is functioning. This test checks if electricity can flow through the switch. Set your multimeter to the continuity setting, which often looks like a soundwave icon. Place one probe on each terminal of the switch. If the multimeter beeps when the switch is on, then electricity is flowing correctly. No beep means there’s a break in the circuit, indicating a faulty switch. Have you ever thought about how often we overlook the basics, like checking if a switch is faulty? Testing the switch might seem simple, but it’s a vital step that can prevent unnecessary headaches. By taking these steps, you can diagnose the problem efficiently and decide if a simple replacement is needed. Or, if you should call in a professional. This methodical approach ensures you’re not just guessing, but making informed decisions about your home’s electrical health.Inspect Wiring
Inspecting the wiring is crucial when a light switch stops working. Changing a switch may seem simple. But, hidden wiring issues can cause problems. These issues can lead to safety hazards. Or, they can just be annoying. By taking the time to check the wiring, you might find the root of the problem. This can save time and ensure everything works safely.
Look For Damage
First, check the wires for any visible damage. Frayed wires are a common issue. They can stop the light switch from working. Sometimes, wires can be broken or burnt. Check the wire insulation too. Insulation should be intact and undamaged. Damaged insulation can cause short circuits. It might even lead to electrical fires.
Assess Wire Gauge
Next, examine the wire gauge. It must match the switch’s requirements. Using the wrong gauge can cause problems. Too thin, and it may overheat. Too thick, and connections might be loose. Check the switch manual. It usually mentions the right wire gauge. Following this ensures safety and functionality.

Credit: www.reddit.com
Replace The Switch
Light switch problems after replacement often stem from improper wiring or faulty components. Double-check connections to ensure wires are securely fastened. Consider hiring a professional if issues persist, as handling electrical tasks requires expertise for safety.
If you’ve recently changed a light bulb and found that the light switch isn’t working, it might be time to replace the switch itself. This task can seem daunting, especially if you’re not familiar with electrical work. However, with the right guidance, you can tackle this home improvement project with confidence. Replacing a light switch can be a straightforward process, but it requires attention to detail and safety precautions.Choose The Right Type
When selecting a new light switch, it’s important to choose the right type for your needs. Consider whether you need a single-pole switch, which is the most common type for simple on-off functions. Alternatively, if your light is controlled from two locations, a three-way switch might be necessary. Assess the style and color of the switch to match your room’s decor. Modern options include dimmer switches, which allow you to adjust the brightness of your lights. Take a moment to think about how you use your lights daily and choose a switch that enhances your lifestyle.Installation Tips
Before you start the installation, ensure the power is turned off at the circuit breaker to avoid any electrical hazards. Use a voltage tester to confirm that the power is indeed off. This step is crucial for your safety. Once you’re ready to install, carefully remove the old switch by unscrewing it from the wall. Pay attention to how the wires are connected. You might find it helpful to take a picture to reference when connecting the new switch. Tighten all connections securely to prevent any loose wires. Finally, after installing the new switch, restore power and test it to ensure it works correctly. If everything lights up as expected, you’ve successfully tackled the problem. If not, consider consulting a professional to ensure everything is safe and functional. Have you ever replaced a light switch before? What tips or tricks did you find most helpful in the process?Consider Professional Help
Finding a light switch not working after changing can be frustrating. It might seem like a minor issue, but it often signals deeper problems. DIY fixes may not always suffice, especially if the fault lies in the wiring. When simple solutions don’t work, consider professional help. Electricians can assess and resolve complex electrical issues safely and efficiently.
When To Call An Electrician
If your light switch doesn’t work after changing, there might be hidden issues. Flickering lights, sparking switches, or buzzing noises are serious concerns. These signs often mean electrical components are failing. Call an electrician to diagnose and fix the problem. They use specialized tools and knowledge to ensure safety. Attempting complex repairs alone can be dangerous.
Benefits Of Expert Assistance
Hiring an electrician offers numerous benefits. They ensure your home’s wiring is safe. Professionals prevent potential hazards like electrical fires. Their expertise leads to effective solutions quickly. Electricians have access to high-quality tools and equipment. They guarantee long-lasting repairs, saving you time and money. With expert help, you avoid future electrical issues.
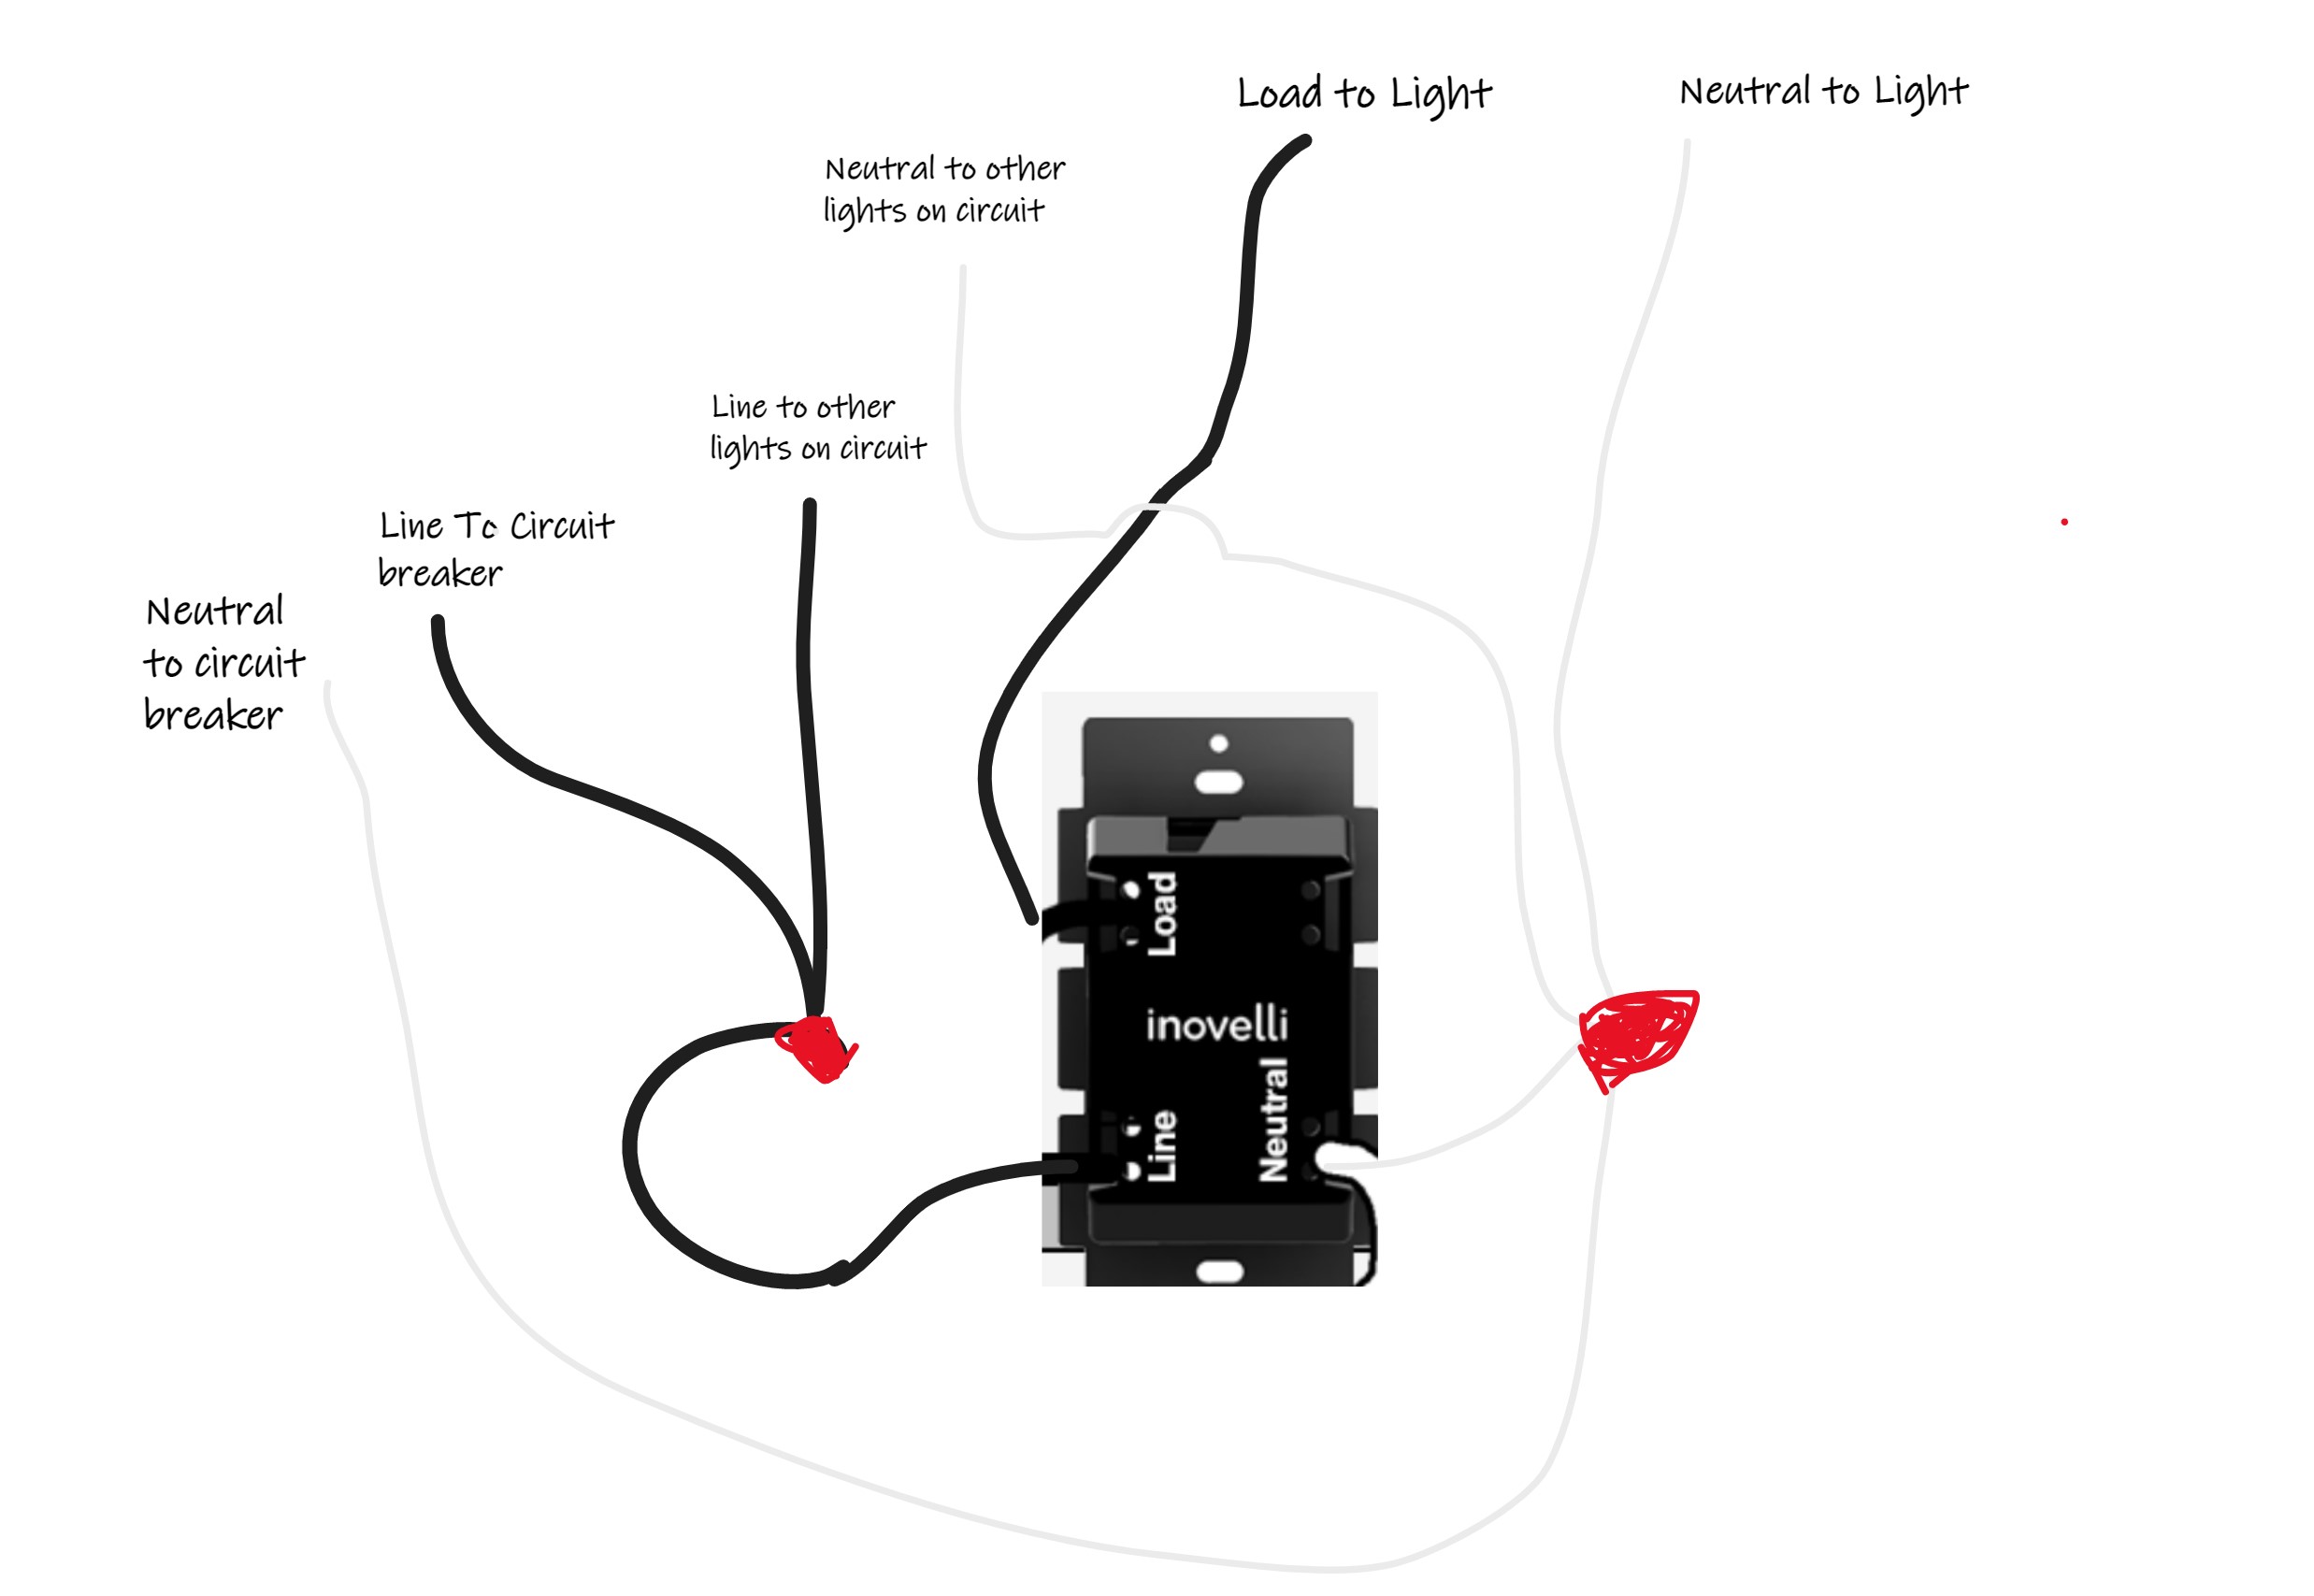
Credit: community.inovelli.com
Frequently Asked Questions
Why Is My Light Switch Not Working?
Check for loose wires or a faulty switch. Electrical issues might be the cause.
Could A Bad Bulb Affect The Switch?
Yes, a burnt-out bulb may seem like a switch issue. Replace the bulb first.
Do I Need An Electrician For A Broken Switch?
If unsure about electrical safety, call a professional. It’s safer and ensures proper repair.
Can A Fuse Cause Switch Problems?
Yes, a blown fuse disrupts power flow. Check your fuse box for any problems.
Is The New Switch Compatible With My Setup?
Ensure switch matches voltage and type. Compatibility prevents malfunctions and ensures smooth operation.
Conclusion
Solving light switch issues doesn’t have to be hard. Start by checking connections. Ensure wires are tight and secure. Look for damaged wires or faulty switches. Sometimes, the circuit breaker might need attention. Reset it if necessary. Still facing problems?
It might be time to call an electrician. Professional help ensures safety and peace of mind. Remember, handling electrical tasks requires caution. Always prioritize safety first. With these steps, your light switch should work again soon. Happy fixing!