Is your Coleman RV air conditioner giving you trouble? Don’t worry.
You’re not alone. Many RV owners face issues with their air conditioners. It’s crucial to understand how to troubleshoot these problems. In this guide, we’ll explore common issues and their solutions. Whether it’s a lack of cooling, unusual noises, or water leaks, we’ve got you covered.
Fixing your air conditioner might seem daunting, but with the right approach, you can resolve most problems on your own. Let’s dive into the basics of Coleman RV air conditioner troubleshooting and get your unit back to running smoothly.
Credit: bryantrv.com
Common Issues
Experiencing issues with your Coleman RV air conditioner can be frustrating. Knowing the common problems can help. This section covers the typical issues you might face.
Unit Not Cooling
A common problem with Coleman RV air conditioners is the unit not cooling. First, check if the thermostat is set to the correct temperature. Sometimes, the thermostat may need recalibration. Ensure that the air filters are clean. Dirty filters block airflow, reducing cooling efficiency. Inspect the condenser coils for dirt or debris. Clean coils function better and improve cooling performance. Lastly, check the refrigerant levels. Low refrigerant can cause the unit to blow warm air.
Strange Noises
Strange noises can signal a problem with your Coleman RV air conditioner. Listen for rattling sounds. Loose parts or debris inside the unit could be the cause. Tighten any loose screws or bolts. Remove any foreign objects. Grinding noises often indicate a problem with the fan motor or bearings. Lubricate the bearings. If the noise persists, the motor may need replacement. A hissing sound usually points to a refrigerant leak. Seek professional assistance to fix leaks and recharge the refrigerant.

Credit: foxrvtravel.com
Basic Checks
Before diving into advanced troubleshooting, start with some basic checks. These steps can often solve common issues with your Coleman RV air conditioner. Simple problems sometimes have simple solutions.
Power Supply
First, check the power supply. Ensure your RV is connected to a stable power source. Inspect the circuit breaker and fuses. A tripped breaker or blown fuse can cut off power. Reset the breaker if needed.
- Verify the RV is properly plugged in
- Inspect the circuit breaker and fuses
- Reset the breaker if it is tripped
- Replace any blown fuses
If the air conditioner still doesn’t work, move on to the next step.
Thermostat Settings
Next, check the thermostat settings. Incorrect settings can prevent the unit from turning on or cooling properly. Set the thermostat to the desired temperature.
- Ensure the thermostat is on the “Cool” setting
- Adjust the temperature to a lower setting
- Check for any error messages or codes
If the air conditioner responds, it means the problem was with the settings. If not, further troubleshooting may be required.
Cleaning Filters
The filters in your Coleman RV air conditioner play a critical role. They trap dust, dirt, and other particles. This keeps the air inside your RV clean. Over time, these filters can become clogged. This reduces the efficiency of your air conditioner. Regular cleaning is essential.
Filter Removal
To begin, locate the air filter. The filter is usually behind the front grille. Remove the grille carefully. This will expose the filter. Slide the filter out gently. Be careful not to damage it.
Cleaning Process
Once you remove the filter, inspect it. If it is dusty or dirty, it needs cleaning. Use a vacuum cleaner. This will remove loose dirt and dust. If the filter is very dirty, wash it. Use mild soap and warm water. Rinse thoroughly. Ensure the filter is completely dry before reinstalling it.
For best results, clean the filter every two weeks. This ensures optimal performance. A clean filter helps your air conditioner run efficiently.
Inspecting Coils
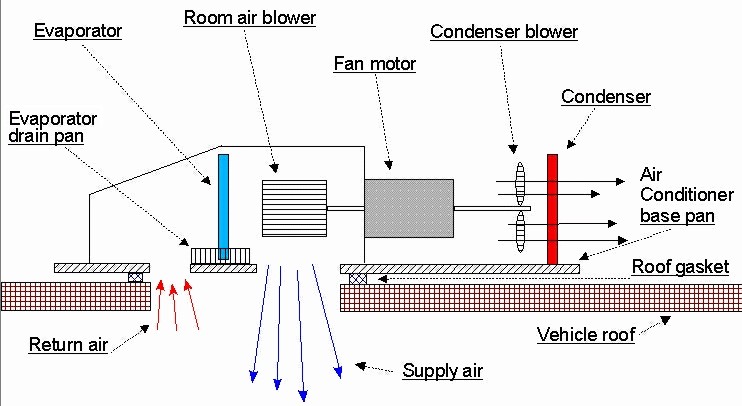
Inspecting the coils in your Coleman RV air conditioner is essential for maintaining its efficiency. Dirty or damaged coils can reduce cooling performance. This section will guide you through inspecting the evaporator and condenser coils.
Evaporator Coil
The evaporator coil is inside the air conditioner’s interior unit. It absorbs heat from the RV’s air. To inspect the evaporator coil, first, ensure the unit is off and unplugged. Remove the cover of the interior unit. Look for dirt, dust, or ice buildup on the coils. Clean the coil using a soft brush or a vacuum with a brush attachment. Avoid using sharp objects to prevent damage. If the coil is frozen, let it thaw completely before cleaning.
Condenser Coil
The condenser coil is located in the exterior unit of the air conditioner. It releases the heat absorbed by the evaporator coil. Check the condenser coil for dirt, leaves, or other debris. Clean it using a garden hose with a gentle spray. Avoid high-pressure water to prevent damage. Make sure the unit is off and disconnected from power before cleaning. Also, inspect the fins of the condenser coil. If they are bent, use a fin comb to straighten them. Clean and straight fins ensure proper airflow and efficiency.
Checking Refrigerant Levels
Checking refrigerant levels is vital for Coleman RV air conditioner troubleshooting. Low refrigerant can impact cooling efficiency. Regular checks help maintain performance. Here’s how to check and manage refrigerant levels.
Signs Of Low Refrigerant
Low refrigerant levels show through various signs. One common sign is the air conditioner not cooling effectively. Another sign is the unit running longer than usual. You may also notice ice forming on the refrigerant lines. Warm air blowing from the vents is another indicator. These signs mean the refrigerant needs checking.
Recharging Refrigerant
Recharging refrigerant is a delicate process. First, ensure you have the correct type of refrigerant. Attach the gauge to the service port. Read the pressure levels on the gauge. If low, add refrigerant slowly. Monitor the gauge to avoid overcharging. Stop once the levels are within the recommended range. This process restores the air conditioner’s efficiency.
Examining Electrical Components
Examining the electrical components of a Coleman RV air conditioner is crucial. Electrical issues can be the root cause of many problems. By checking each part, you can identify and fix issues quickly. In this section, we’ll focus on the capacitors and wiring issues.
Capacitors
Capacitors store and release energy to power the air conditioner. If your AC is not working, the capacitor might be faulty. Check for any bulging or leaking capacitors. Use a multimeter to test the capacitor’s charge. Replace it if it’s not holding a charge. A faulty capacitor can prevent the AC from starting or cause it to run poorly.
Wiring Issues
Wiring issues can cause many problems with your RV air conditioner. Inspect all wires for damage or wear. Look for loose or disconnected wires. Use a multimeter to check for continuity. Ensure all connections are secure and free of corrosion. Damaged wires can cause short circuits or power loss.
Addressing Airflow Problems
Experiencing airflow issues with your Coleman RV air conditioner can be frustrating. Proper airflow ensures your RV stays cool and comfortable. Let’s explore common causes and solutions for airflow problems.
Blocked Vents
Blocked vents can severely affect your air conditioner’s performance. Dust, debris, or objects can obstruct the vents. Regularly check and clean the vents to maintain optimal airflow. Use a vacuum or soft brush to remove dirt and dust. Also, ensure no furniture or items block the vents.
Blower Motor Issues
The blower motor is crucial for moving air through the system. If the motor is faulty, it can lead to poor airflow. Listen for strange noises or inspect the motor for signs of damage. If necessary, consult a professional to replace the blower motor. Regular maintenance helps prevent blower motor issues.
When To Seek Professional Help
Dealing with an RV air conditioner can be tricky. While some issues are easy to fix, others need expert attention. Knowing when to seek professional help can save time and prevent further damage.
Persistent Problems
If your air conditioner keeps having issues, it’s time to call a professional. Constant cycling, strange noises, or weak airflow can signal deeper problems. Experts can diagnose and fix these issues correctly.
Major Repairs
Major repairs require a professional touch. Issues with the compressor, refrigerant leaks, or electrical faults can be complex. These repairs need specialized tools and knowledge. Don’t attempt them yourself. Call an expert to ensure safety and efficiency.

Credit: www.youtube.com
Frequently Asked Questions
What Causes My Coleman Rv Ac To Stop Cooling?
Dirty filters or low refrigerant levels often cause cooling problems. Check and clean filters first.
How Do I Reset My Coleman Rv Air Conditioner?
Turn off the unit and unplug it for 5 minutes. Plug back in and restart.
Why Is My Coleman Ac Making Noise?
Noises usually come from loose parts or debris. Inspect and tighten screws and clean the unit.
How Often Should I Service My Coleman Rv Ac?
Service it annually. Clean filters, check refrigerant, and inspect components to ensure efficient operation.
Can I Clean Coleman Rv Ac Filters Myself?
Yes, remove and wash filters with mild soap and water. Dry completely before reinstalling.
Conclusion
Fixing a Coleman RV air conditioner can be straightforward with the right steps. First, identify the problem. Clean or replace filters regularly. Check for any loose connections. Ensure the thermostat works properly. Simple fixes often solve common issues. For complex problems, seek professional help.
Regular maintenance prevents future headaches. Enjoy cool, comfortable travels with a well-functioning AC. Your RV adventures will be more enjoyable with a reliable air conditioner. Stay cool, and happy camping!