Is your toilet tank giving you trouble with an unexpected leak? If you’ve noticed your Sloan Flushmate leaking water in the tank, you’re not alone.
This common issue can lead to higher water bills and a whole lot of frustration. But don’t worry—you’re about to uncover the simple solutions to fix it. Imagine the relief of knowing your toilet is running efficiently, saving you money and the environment.
Stick with us, and you’ll learn how to tackle this problem head-on, ensuring your bathroom stays in tip-top shape. Let’s dive into the details and put an end to that pesky leak once and for all.

Credit: www.youtube.com
Common Causes Of Flushmate Leaks
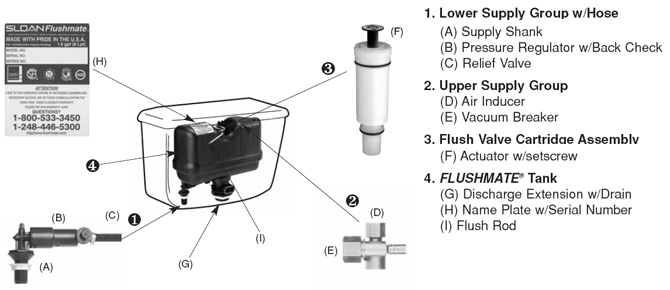
Flushmate toilets offer power and efficiency. Yet, they sometimes leak. Identifying common causes helps solve the issue quickly. Leaks may result from seal issues, valve malfunctions, or installation errors.
Seal Issues
Seals keep the water tight. A worn or damaged seal can cause leaks. Over time, seals may crack. This allows water to seep out. Regular checks can spot seal problems early. Replacing them might fix the leak.
Valve Malfunctions
Valves control water flow in the tank. Faulty valves may lead to leaks. They might not close properly. This lets water escape. Dirt can clog valves too. Cleaning or replacing them often resolves leaks.
Installation Errors
Proper installation is crucial for Flushmate systems. Incorrect setup can cause leaks. Bolts might be loose or misaligned. Follow the manual carefully when installing. Double-check connections to prevent future leaks.
Credit: www.flushmaterepairparts.com
Tools And Materials Needed
Fixing a Sloan Flushmate that leaks water in the tank can feel like an overwhelming task, especially if you’re not familiar with plumbing repairs. However, with the right tools and materials, you can tackle this problem effectively and save yourself from costly repairs. Preparing well is half the battle won, and ensuring you have the necessary items on hand can make the process smoother and quicker.
Basic plumbing tools
Start with the essentials. A wrench is crucial for loosening and tightening nuts and bolts. Make sure you have different sizes to handle various parts. A screwdriver will also be handy for removing screws from the flushmate system. A towel or sponge is useful to soak up water spills, while a bucket can catch any excess water when you disconnect parts. Do you have a flashlight? It’s a lifesaver when working in dimly lit areas.
Replacement Parts
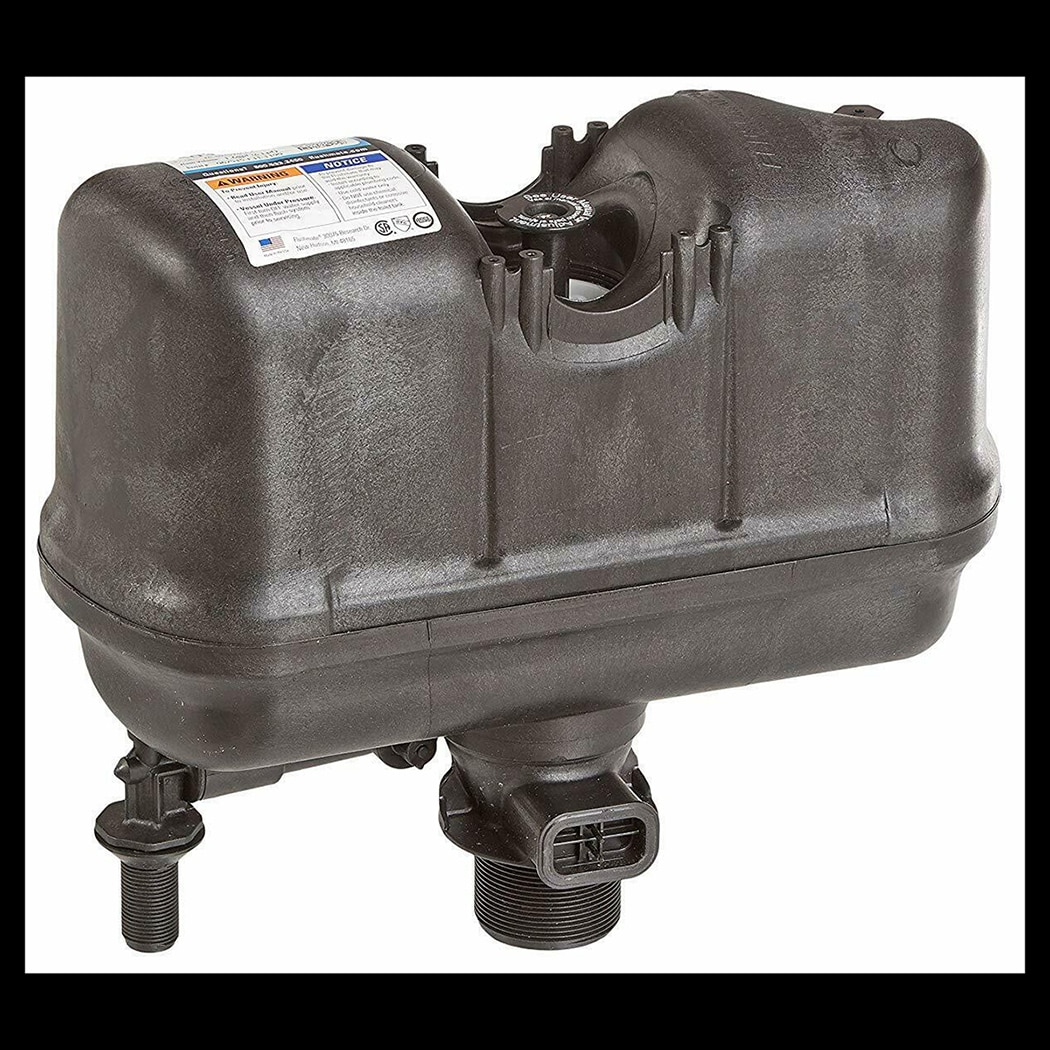
Identifying and gathering the right replacement parts is vital. You might need a new pressure vessel if the old one is damaged. Sometimes, a simple flush valve kit is all you need to fix the leak. Always check the model number of your flushmate system to ensure compatibility with replacement parts. Imagine avoiding a trip back to the store just because you missed checking this detail!
Safety Equipment
Your safety is paramount. Wearing gloves protects your hands from sharp edges and grime. safety goggles shield your eyes from splashes and debris. If you’re working in a small space, ensure proper ventilation to avoid inhaling fumes from cleaning agents. Think about how much safer and more confident you’ll feel once you’re geared up correctly.
Having all tools and materials ready not only saves time but also makes the repair process less stressful. What’s your go-to strategy for gathering tools before starting a home repair project? Share your tips, and let’s make DIY plumbing a breeze!
Step-by-step Repair Process
Fixing a Sloan Flushmate leaking water in the tank can seem daunting. But with a clear step-by-step repair process, you can tackle the issue yourself. By following these straightforward instructions, you can save time and avoid costly repairs. Let’s dive into the repair process.
Shutting Off Water Supply
First, turn off the water supply to the toilet. This prevents any water from entering the tank during the repair. Locate the shut-off valve behind the toilet. Turn it clockwise to stop the water flow. Flush the toilet to empty the tank.
Removing The Flushmate Unit
Now, remove the Flushmate unit from the tank. Begin by unscrewing the nuts holding it in place. Carefully lift the unit out of the tank. Set it aside on a clean, dry surface for inspection.
Inspecting Components
With the unit out, inspect all components thoroughly. Look for cracks, worn-out seals, or any visible damage. Pay special attention to the pressure vessel and gasket areas. Identifying the faulty parts is crucial for effective repair.
Replacing Faulty Parts
Once you identify damaged parts, replace them with new ones. Ensure you have compatible parts for your Flushmate model. Install new seals, gaskets, or the pressure vessel as needed. Tighten all components securely to prevent future leaks.
Reassembling The Unit
Finally, reassemble the Flushmate unit and place it back in the tank. Secure it with the nuts you previously removed. Turn the water supply back on slowly. Check for any leaks by flushing the toilet a few times. Ensure the unit functions properly before use.
Preventive Measures
Regularly inspect the Sloan Flushmate for leaks in the tank. Tighten loose connections and replace worn-out parts. Check for cracks or damage to prevent water wastage.
Preventive MeasuresLeaking water in the tank of your Sloan Flushmate can be a nuisance, not to mention a waste of resources. But did you know that with some simple preventive measures, you can avoid such issues altogether? Let’s dive into some actionable tips to keep your Flushmate functioning smoothly.
Regular Maintenance Tips
Regular maintenance is key to preventing leaks. Begin by inspecting the tank for any signs of wear or damage. A quick monthly check can save you from major issues later. Look for cracks or worn-out seals. If you spot any, replace them immediately. This small step can prevent a significant leak. Don’t forget to clean the flush system regularly. Mineral deposits can build up over time, causing obstructions and potential leaks.
Proper Installation Practices
Proper installation is your first line of defense against leaks. Ensure that your Sloan Flushmate is installed by a professional or follow the manufacturer’s instructions carefully if you’re doing it yourself. Double-check that all components are tightened properly. Loose fittings can lead to leaks, which are often overlooked until it’s too late. Use quality parts for installation. Cheaper alternatives might save you money upfront, but they can cost more in repairs down the line. Have you ever installed something only to find it malfunctioning soon after? Often, it’s due to improper installation. Paying attention to details during setup can save you from future headaches. Are there preventive measures you swear by? Share your thoughts in the comments! Engaging with fellow readers can provide new insights and solutions.
When To Call A Professional
Fixing a Sloan Flushmate leak might seem simple. Yet, some issues require expert help. Knowing when to call a professional can save time and money. It also ensures your toilet works properly.
Some problems can be complex. A professional can handle these with ease. Let’s explore when to seek expert help.
Complex Issues
Some leaks are hard to diagnose. They may involve hidden parts or connections. These require special tools and knowledge. A professional plumber can identify the exact cause. They also have the right tools to fix it.
Complicated leaks might involve the pressure tank. Only experts should handle this. Incorrect repairs can cause more damage. This might lead to costly repairs or replacements.
Persistent Leaks
If a leak keeps returning, call a professional. Persistent leaks can indicate bigger problems. They might suggest a faulty part or installation.
Professionals can provide a long-term solution. They can ensure all parts are working well together. This prevents future issues and maintains efficiency.
A persistent leak can also increase water bills. Fixing it quickly saves water and money. An expert can help find and fix the root problem.
Credit: arerofast.com
Frequently Asked Questions
Why Is My Sloan Flushmate Leaking Water?
A faulty gasket or a cracked tank can cause leaks. Check for visible damage or loose connections.
How Do I Fix A Flushmate Leak?
Turn off the water. Tighten connections. Replace worn parts like gaskets. Contact a plumber if needed.
Can A Leaking Flushmate Waste Water?
Yes, leaks can cause continuous water flow. This leads to higher bills and environmental waste.
Is It Safe To Use A Leaking Flushmate?
Leaking Flushmates can damage your bathroom floor. Fix leaks promptly to avoid costly repairs.
How Often Should I Inspect My Flushmate?
Check your Flushmate every 6 months. Regular inspections help spot issues early and prevent leaks.
Conclusion
Fixing a Sloan Flushmate leak can seem daunting. But it’s manageable. First, identify the problem. Check seals and connections. Tighten or replace parts as needed. Regular maintenance helps avoid future issues. Don’t ignore small leaks. They can lead to bigger problems.
Saving water is important. It reduces your water bill and helps the environment. If unsure, seek professional help. Remember, a well-maintained toilet lasts longer. It ensures a clean and efficient bathroom. Tackling the leak today means fewer headaches tomorrow. Keep your toilet in top shape.
Your wallet and the planet will thank you.