Are you struggling with your RV air conditioner? It can be frustrating when it stops working.
In this blog post, we’ll guide you through troubleshooting common RV air conditioner problems. From strange noises to poor cooling, we’ll cover the issues you might face. Owning an RV brings freedom, but it also comes with its own set of challenges.
One of the most common issues is a malfunctioning air conditioner. These problems can range from simple fixes to more complex repairs. Understanding the root cause can save you time and money. So, let’s dive into the world of RV air conditioner troubleshooting and help you stay cool on your adventures.
Common Cooling Issues
RV air conditioners are vital for comfort during hot weather. But, they can sometimes face cooling issues. Understanding common problems can help you stay cool on the road. Let’s dive into some typical cooling challenges you might encounter.
Weak Airflow
Weak airflow often means there’s a blockage. Check the air filter first. A dirty filter can restrict airflow. Clean or replace it if needed. Next, inspect the vents. Ensure nothing is blocking them. Furniture or other items can obstruct airflow. Finally, check the fan. It should spin freely. If not, it may need repair or replacement.
Inconsistent Temperature
Inconsistent temperature can be frustrating. Start by checking the thermostat. Make sure it’s set correctly. Sometimes, the thermostat needs calibration. Follow the manual’s instructions to adjust it. Also, inspect the refrigerant levels. Low refrigerant can cause temperature swings. A professional can check and refill it. Lastly, ensure the unit is clean. Dirt and debris can affect its performance.
Basic Checks
An RV air conditioner can sometimes stop working, causing discomfort. Before calling a professional, try some basic checks. These simple steps might fix the issue without spending money on repairs.
Power Supply
First, check the power supply. Ensure your RV is connected to a reliable power source. Inspect the power cord for any visible damage. Make sure the plug fits snugly into the outlet.
Next, check the circuit breaker. Sometimes, a tripped breaker can cut the power to your air conditioner. Reset the breaker if needed.
If these steps don’t work, use a voltmeter to check the outlet’s voltage. The outlet should provide the correct voltage for your air conditioner to run properly. You can find the voltage requirement in the RV manual.
Thermostat Settings
After ensuring the power supply is fine, check the thermostat settings. Set the thermostat to the desired temperature. Make sure it is on the “cool” mode.
Sometimes, the thermostat might be set too high. Lower the temperature setting and see if the air conditioner starts cooling.
If the thermostat uses batteries, replace them. Weak batteries can cause the thermostat to malfunction. Regularly check and replace the batteries to ensure proper operation.
By following these basic checks, you might fix your RV air conditioner without professional help. If these steps do not solve the problem, you may need to seek expert assistance.
Cleaning The Unit
Maintaining your RV air conditioner is vital for efficient cooling. One key aspect is cleaning the unit regularly. This keeps it running smoothly and extends its life. Let’s dive into the important parts to clean.
Air Filters
Start with the air filters. These catch dust and debris. A clogged filter reduces airflow and cooling efficiency. First, turn off the unit. Remove the filter. Clean it with warm, soapy water. Rinse well and let it dry completely. Reinstall the filter. This simple step can boost performance.
Coils And Fins
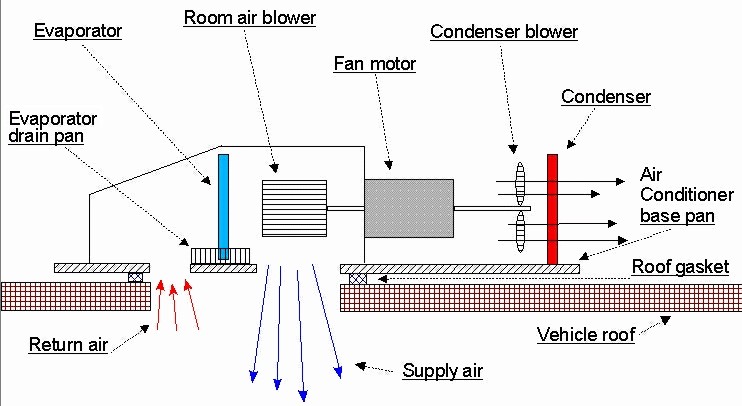
Next, check the coils and fins. These parts help transfer heat. Dust and dirt can build up here. This reduces cooling. Use a soft brush to gently clean the coils. Be careful not to bend the fins. You can also use a fin comb. This keeps the fins straight. Clean coils and fins ensure better heat transfer. This results in a cooler RV.

Credit: bryantrv.com
Inspecting The Ductwork
Inspecting the ductwork in your RV air conditioner is essential for ensuring efficient cooling. Proper ductwork helps in maintaining consistent airflow. This helps to keep the RV comfortable. Let’s explore two critical aspects: blockages and leaks.
Blockages
Blockages in the ductwork can reduce the air conditioner’s efficiency. Here’s how to check for blockages:
- Turn off the air conditioner.
- Remove the vent covers.
- Use a flashlight to inspect the ducts.
- Look for any debris, dust, or foreign objects.
If you find blockages, use a vacuum to clean the ducts. A clean duct ensures smooth airflow. This helps in maintaining optimal cooling in your RV.
Leaks
Leaks in the ductwork can cause cool air to escape. This reduces the air conditioner’s efficiency. Follow these steps to detect leaks:
- Turn on the air conditioner.
- Feel along the ducts for any cool air escaping.
- Use a smoke pencil or incense stick to detect smaller leaks.
If you find any leaks, use HVAC tape to seal them. Properly sealed ducts improve cooling efficiency. This helps in reducing energy consumption.
For a quick reference, see the table below:
| Issue | Signs | Action |
|---|---|---|
| Blockages | Reduced airflow | Clean ducts |
| Leaks | Air escaping | Seal with HVAC tape |
Inspecting the ductwork regularly ensures your RV air conditioner works efficiently. This provides a comfortable environment during your travels.
Refrigerant Levels
Maintaining proper refrigerant levels is crucial for an efficient RV air conditioner. Without the right amount of refrigerant, the cooling system may struggle. This can lead to uncomfortable temperatures inside your RV. Understanding how to check and adjust refrigerant levels can save you time and money.
Low Refrigerant
Low refrigerant can cause your air conditioner to underperform. Signs include weak airflow and warm air from the vents. You may also notice the unit running longer than usual. Leaks are a common cause of low refrigerant. Regular checks can help spot these issues early.
Recharging Refrigerant
Recharging refrigerant can improve your air conditioner’s performance. First, locate the service port on your unit. You will need a refrigerant gauge and the correct type of refrigerant. Attach the gauge to the service port. Follow the manufacturer’s instructions carefully.
Slowly add refrigerant and monitor the gauge. Stop once the levels reach the recommended range. Overcharging can damage your system. Always ensure you use the correct type of refrigerant for your unit.

Credit: www.etrailer.com
Electrical Components
Understanding the electrical components of your RV air conditioner is crucial. It helps in effective troubleshooting and ensures smooth operation. Two key components to focus on are the capacitors and the wiring. These parts play a significant role in the functionality of your RV air conditioner.
Capacitors
Capacitors are essential for starting the air conditioner’s motor. They store electrical energy and release it when needed. There are two main types:
- Start Capacitors: Help start the compressor and fan motor.
- Run Capacitors: Keep the motor running efficiently.
Signs of a bad capacitor include:
- Humming noise from the unit.
- The unit struggles to start.
- Reduced cooling performance.
To test a capacitor:
- Turn off the power to the air conditioner.
- Remove the capacitor carefully.
- Use a multimeter to check the capacitance.
If the readings are off, replace the capacitor. This simple check can save you from costly repairs.
Wiring
Proper wiring is crucial for the safe operation of your RV air conditioner. Faulty wiring can lead to malfunctions or even fires. Regularly inspect the wiring for any signs of damage. Look for:
- Frayed wires.
- Loose connections.
- Burn marks or melted insulation.
To inspect the wiring:
- Turn off the power supply.
- Open the access panel of the air conditioner.
- Visually inspect all wires and connections.
If you find any issues, repair or replace the damaged wires. Always ensure connections are tight and secure.
Maintaining the electrical components of your RV air conditioner is key. It ensures your unit works efficiently and safely. Regular checks and timely repairs can prevent major issues.
Mechanical Parts
The mechanical parts of your RV air conditioner are crucial for its performance. Understanding these components can help you identify and fix problems quickly. Let’s explore the two main mechanical parts: the fan motor and the compressor.
Fan Motor
The fan motor is responsible for circulating air through the RV. If the fan motor fails, you may notice weak airflow or no airflow at all. Here are some common issues:
- Loose or broken belts: Check for any belts that may be loose or broken.
- Burnt-out motor: A burnt-out motor will need to be replaced.
- Dirty or clogged fan blades: Clean the fan blades to ensure they move freely.
To troubleshoot, start by turning off the power. Inspect the fan motor and its components. Replace any damaged parts. Clean the blades and ensure they can spin easily.
Compressor
The compressor is the heart of the cooling system. It compresses the refrigerant and circulates it through the system. If the compressor isn’t working, you won’t get cold air. Common issues include:
- Electrical issues: Check the wiring and fuses.
- Overheating: Ensure the compressor has proper ventilation.
- Low refrigerant levels: Low refrigerant can cause the compressor to fail.
To troubleshoot the compressor, first, check the electrical connections. Ensure there are no loose or burnt wires. Next, verify the refrigerant levels. If they are low, you may need to recharge the system. Finally, make sure the compressor is not overheating by ensuring proper airflow around it.

Credit: www.youtube.com
When To Seek Professional Help
Experiencing inconsistent cooling or strange noises from your RV air conditioner? It may be time to consult a professional technician. Addressing these issues early can prevent costly repairs and ensure comfort during your travels.
Sometimes, troubleshooting an RV air conditioner can be tricky. You might feel confident fixing minor issues. But certain situations require professional help. Knowing when to call a pro can save you time and frustration. Here are some scenarios where you should consider expert assistance.
Persistent Issues
If your RV air conditioner has recurring problems, it’s time to call a professional. Maybe the unit cools unevenly. Or it shuts off without warning. Constant problems indicate deeper issues. A professional can diagnose and fix these hidden faults. Don’t ignore persistent issues. They can worsen over time.
Complex Repairs
Some repairs are beyond DIY fixes. If the air conditioner has electrical problems, seek professional help. Electrical repairs can be dangerous. Incorrect wiring can cause fires. Complex components also require expert knowledge. This includes the compressor and refrigerant lines. Professionals have the tools and experience. They ensure repairs are safe and effective.
“`
Frequently Asked Questions
Why Is My Rv Air Conditioner Not Cooling?
Your RV air conditioner may not cool due to low refrigerant, dirty filters, or electrical issues.
How Do I Clean Rv Ac Filters?
Remove the filters, rinse with water, let them dry, and then reinstall them.
What Should I Check If My Rv Ac Won’t Turn On?
Check the power supply, circuit breakers, and thermostat settings to ensure they are working properly.
Can I Run My Rv Air Conditioner On Battery Power?
No, RV air conditioners require more power than a battery can provide. Use a generator or shore power.
Why Does My Rv Ac Make A Loud Noise?
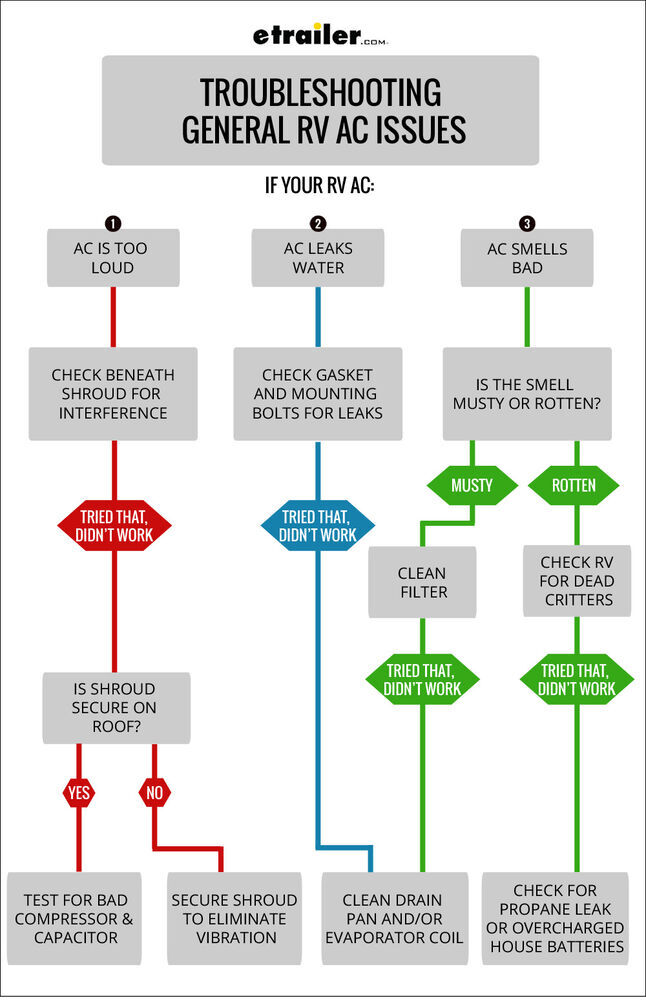
Loud noises can be caused by loose parts, debris in the unit, or a failing motor. Inspect and tighten as needed.
Conclusion
Troubleshooting your RV air conditioner can seem daunting. But it’s manageable. Follow the steps outlined in this guide. Check filters, vents, and connections regularly. Simple maintenance can prevent many issues. Don’t hesitate to consult a professional when needed. Your RV trips will be more comfortable.
And your air conditioner will run efficiently. Keep this guide handy for future reference. Enjoy your travels with a cool, well-maintained RV!


