Dealing with poor print quality on your HP LaserJet P1102 can be frustrating. Faded text, streaks, or smudges can ruin important documents.
The HP LaserJet P1102 is known for its reliable performance. But like any printer, it can face issues over time. Poor print quality can stem from various factors, such as low toner, dirty components, or incorrect settings. Understanding these causes is crucial for maintaining your printer’s output.
In this blog post, we will explore common reasons for poor print quality and provide practical solutions. Whether you’re printing for work or personal use, these tips will help ensure your documents look sharp and professional. Let’s dive in and fix those print quality issues!
Common Print Quality Issues
Dealing with poor print quality on your Hp Laserjet P1102? It can be frustrating. Let’s explore some common issues and how to tackle them. These problems can range from faded prints to streaks and lines. Understanding these issues helps in finding quick solutions.
Faded Print
Faded print is a common issue. This happens when the toner is low or the cartridge is old. To fix this, first check the toner levels. Replace the cartridge if it’s almost empty. Sometimes, cleaning the cartridge can help too.
Here are some steps to resolve faded print:
- Check toner levels.
- Replace the cartridge if necessary.
- Clean the cartridge.
Streaks And Lines
Streaks and lines on your prints can ruin your documents. This usually happens due to dirty rollers or a damaged drum unit. Regular maintenance can prevent these issues. Clean the rollers and check the drum unit for damage.
To fix streaks and lines:
- Clean the rollers.
- Check the drum unit.
- Replace the drum unit if damaged.
Regular maintenance helps in keeping your printer in good condition. Addressing these common print quality issues ensures smooth printing.

Credit: support.hp.com
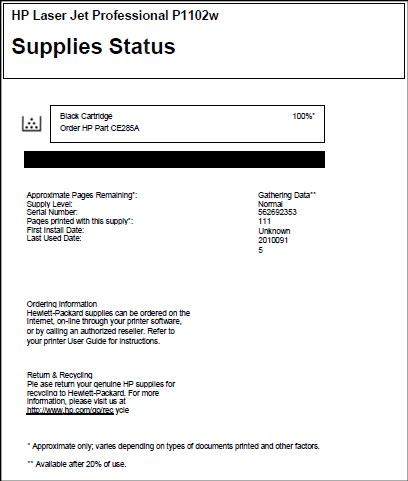
Checking Toner Levels
One common cause of poor print quality in the HP LaserJet P1102 is low toner levels. Regularly checking toner levels can help ensure your printer is always ready to produce crisp, clear prints.
Low Toner Symptoms
Low toner levels can cause several issues. Here are some common symptoms:
- Faded prints
- Streaks or lines on the paper
- Blotchy or uneven print areas
If you notice any of these issues, it might be time to check your toner levels.
Replacing Toner Cartridge
Replacing the toner cartridge is simple. Follow these steps:
- Turn off the printer and unplug it.
- Open the printer cover.
- Remove the old toner cartridge.
- Unpack the new toner cartridge.
- Insert the new cartridge into the printer.
- Close the printer cover.
- Plug in the printer and turn it on.
Here is a quick reference table for your convenience:
| Step | Action |
|---|---|
| 1 | Turn off and unplug the printer |
| 2 | Open the printer cover |
| 3 | Remove the old toner cartridge |
| 4 | Unpack the new toner cartridge |
| 5 | Insert the new cartridge |
| 6 | Close the printer cover |
| 7 | Plug in and turn on the printer |
Ensuring your toner levels are adequate can significantly improve your print quality. Regular maintenance and checks can help keep your HP LaserJet P1102 functioning well.
Cleaning The Printer
Having issues with poor print quality on your HP Laserjet P1102? Cleaning the printer might help. Regular maintenance ensures clear and sharp prints. In this section, we will cover cleaning the exterior and cleaning the interior of your HP Laserjet P1102. Follow these simple steps to keep your printer in top condition.
Cleaning The Exterior
First, turn off the printer and unplug it. This ensures safety. Use a soft, lint-free cloth to wipe the exterior. Avoid using water or liquid cleaners. Gently remove dust and dirt from the surface.
Focus on the areas around the paper tray and control panel. These spots collect dust easily. Keeping the exterior clean prevents dust from entering the printer.
Cleaning The Interior
Cleaning the interior is crucial for maintaining print quality. Open the printer’s top cover and remove the toner cartridge. Place the toner on a clean, dry surface.
Use a soft brush to remove any dust or debris inside the printer. Pay attention to the paper path. Dust and debris in this area can cause paper jams and affect print quality.
You can use a can of compressed air to blow out any remaining dust. Be gentle to avoid damaging internal components. Once done, carefully reinsert the toner cartridge. Close the top cover and plug the printer back in.
Regularly cleaning your HP Laserjet P1102 ensures high-quality prints and a longer printer life. Follow these steps to keep your printer clean and efficient.
Adjusting Print Settings
Adjusting print settings can help improve the print quality of your HP LaserJet P1102. By fine-tuning specific settings, you can ensure sharper text and clearer images. This section will guide you through key settings adjustments.
Resolution Settings
Resolution settings determine the clarity of your prints. Higher resolution settings produce sharper prints. Go to the printer’s settings menu. Select “Print Quality” or “Resolution”. Choose the highest setting available. This might be 600 dpi or 1200 dpi. Higher dpi means better print quality but uses more toner.
Paper Type Settings
Paper type settings are crucial for optimal print quality. Different papers need different settings. Access the settings menu on your printer. Find the “Paper Type” option. Select the type of paper you are using. If you are using plain paper, select “Plain Paper”. For glossy paper, select “Glossy”. This ensures the printer adjusts its settings for the paper type.
Performing A Test Print
HP Laserjet P1102 users often face poor print quality. Performing a test print helps to identify and resolve these issues. Let’s dive into the steps involved.
Running A Test Page
Running a test page is straightforward. Follow these steps:
- Ensure the printer is on and connected to the computer.
- Open the printer software on your computer.
- Select the option to print a test page.
The printer will produce a test page. This page helps to identify print quality issues.
Analyzing Test Results
After printing, analyze the test page for any defects. Look for:
- Streaks or lines: Check for unwanted lines or streaks across the page.
- Faded areas: Look for areas where the print is lighter than expected.
- Blurry print: Ensure the text and images are sharp and clear.
Each of these issues can indicate different problems with the printer.
Comparing the test page with a good print sample can be helpful. This will make it easier to spot the defects.

Credit: www.youtube.com
Updating Firmware
Updating the firmware of your HP Laserjet P1102 can significantly improve print quality. Firmware updates often fix bugs and add new features. This can enhance your printer’s performance. Below are steps to check and install firmware updates for your printer.
Checking For Updates
First, you need to check if a firmware update is available. Visit the official HP website. Navigate to the support section. Enter your printer model number, HP Laserjet P1102. Look for available firmware updates. Make sure your printer is connected to your computer. This ensures the update process goes smoothly.
Installing Updates
Once you find the update, download it to your computer. Open the downloaded file. Follow the on-screen instructions. Ensure your printer stays connected during this process. Do not turn off your printer or computer. This can cause issues. Wait for the update to finish. Your printer may restart automatically.
After the update, test your printer. Print a few pages to check the quality. If the print quality improves, the update was successful. Regularly check for new firmware updates. This keeps your printer running efficiently.
Handling Paper Issues
Handling paper issues is crucial for maintaining your HP LaserJet P1102 printer’s print quality. Paper problems can lead to poor prints, jams, or even damage to the printer. To ensure smooth printing, address common paper-related issues.
Paper Jams
Paper jams are a frequent problem that can disrupt your printing tasks. To avoid jams, use only compatible paper types and sizes. Make sure the paper is not wrinkled or folded. Load the paper correctly by adjusting the paper guides in the tray. Always remove any stuck paper gently to prevent damage to the printer.
Incorrect Paper Size
Using incorrect paper sizes can lead to misfeeds and print errors. Always check that the paper size matches the settings on your printer. Adjust the paper guides to fit the paper snugly. Ensure the paper is flat and properly aligned in the tray. This prevents the printer from pulling multiple sheets at once.

Credit: support.hp.com
Seeking Professional Help
Sometimes, fixing print quality issues with your HP Laserjet P1102 on your own can be difficult. In such cases, seeking professional help is a wise decision. Experts can diagnose and resolve problems quickly. They have the right tools and knowledge. This can save you time and frustration.
When To Contact Support
There are clear signs that you need expert help. If your printer makes strange noises, contact support. If prints are consistently poor, seek assistance. Unresolved error messages also indicate a need for professional help. Do not ignore recurring paper jams. They can signal deeper issues. Trust an expert to handle these problems.
Choosing A Service Provider
Pick a reliable service provider for the best results. Check their experience with HP printers. Read reviews from other customers. Ensure they use genuine parts. Verify their certification and training. This guarantees quality service. Compare prices from different providers. Choose one that fits your budget. Always ask about warranties on repairs.
Frequently Asked Questions
Why Is My Hp Laserjet P1102 Printing Blurry?
Blurry prints can be due to dirty printheads, incorrect settings, or low toner levels. Clean and check.
How Do I Fix Faded Print On Hp Laserjet P1102?
Replace the toner cartridge and ensure the paper type is correct. Clean the printer regularly.
What Causes Streaks On Printed Pages?
Streaks are usually caused by dirty or damaged print rollers. Clean or replace them as needed.
How Can I Improve My Printer’s Print Quality?
Use high-quality paper, update printer drivers, and regularly clean the printer components.
Why Are My Prints Coming Out Too Light?
Light prints can result from low toner, incorrect print density settings, or dirty print heads. Check and adjust.
Conclusion
Fixing the print quality of your HP LaserJet P1102 is possible. Follow the steps mentioned above. Regular maintenance helps prevent future issues. Clean the printer regularly. Replace toner cartridges when needed. Adjust print settings for better results. Ensure paper quality is good.
These simple steps can improve your print quality. Avoid frustration with consistent care. Your printer can perform well with little effort. Enjoy clear, crisp prints every time.


