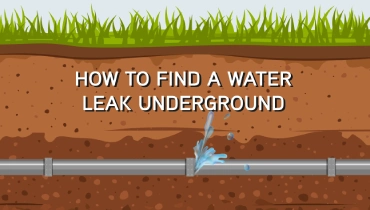
To determine if a yard hydrant is leaking underground, observe if water leaks from below ground level when the hydrant is turned on. Additionally, check for any small leaks at the drain hole, which may indicate a problem.
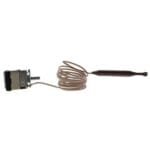
If the plunger is old and worn, it may need to be replaced. Tightening the brass packing nut, located at the stem packing, in small increments using a ¾” open end wrench can also help resolve leakage issues. Avoid over-tightening the packing nut to prevent damage to the O-Rings.
By following these steps, you can identify and address any underground leaks in your yard hydrant.
Credit: www.mrrooter.com
Signs Of A Leaking Yard Hydrant
Sudden Increase In Water Bill
If you notice a sudden spike in your water bill without any change in your usage habits, it could be a sign of a leaking yard hydrant. Leakages underground can cause a continuous flow of water, which can lead to a higher water bill.
Unexplained Wet Areas
Another indication of a leaking yard hydrant is the presence of unexplained wet areas in your yard, particularly around the location of the hydrant. If you notice muddy or soggy patches, it could be a sign that the hydrant is leaking underground. This can also lead to unsightly and unusable areas in your yard, affecting the overall aesthetics and functionality of your outdoor space.
Credit: terrylove.com
Common Causes Of Underground Leaks
When it comes to yard hydrants, underground leaks can be a common issue that may lead to water wastage and potential damage to the surrounding area. Identifying the causes of these leaks is crucial for prompt and effective repairs.
Worn Out Seals And Plungers
Worn out seals and plungers are a frequent culprit for underground leaks in yard hydrants. Over time, the seals and plungers can degrade, leading to water seepage into the surrounding soil. This can result in a loss of water pressure and potential damage to the underground infrastructure.
Cracked Pipes Or Joints
Cracked pipes or joints are another common cause of underground leaks in yard hydrants. The presence of cracks in the pipes or joints can allow water to escape and accumulate underground, leading to water wastage and potential damage to the surrounding area.
Initial Inspection Steps
To determine if a yard hydrant is leaking underground, start with an initial inspection. Turn on the hydrant and observe for any water leaks below ground level. Check for any small leaks at the drain hole and inspect the plunger for wear and tear.
Additionally, tighten the brass packing nut to stop leakage at the stem packing.
Visual Examination Of The Hydrant
When inspecting a yard hydrant for underground leaks, the first step is to visually examine the hydrant for any visible signs of leakage. Take note of any pooling water or wet spots around the base of the hydrant, as this could indicate an underground leak. Look for any cracks, damage, or corrosion on the hydrant itself, as these could also be potential sources of leaks.
Listening For Hissing Sounds
Another initial inspection step is to listen for hissing sounds near the hydrant. This can be done by placing your ear close to the hydrant and carefully listening for any unusual noises. A hissing sound could indicate the presence of a leak, especially if it is coming from the base of the hydrant or the surrounding soil. Pay close attention to any continuous or repetitive hissing sounds, as they may indicate an ongoing leak.
If you suspect a leak but are unsure of its location, you can also try using a stethoscope or a listening device specifically designed for detecting underground leaks. These tools can help amplify the sound of a leak, making it easier to pinpoint its exact location.
It’s important to note that listening for hissing sounds should be done in a quiet environment, as background noise can interfere with your ability to detect leaks. Try to conduct this inspection step during a time when there is minimal surrounding noise, such as early in the morning or late at night.
By visually examining the hydrant and listening for hissing sounds, you can gather valuable information about the possibility of an underground leak. These initial inspection steps will help you determine if further investigation or repairs are necessary.
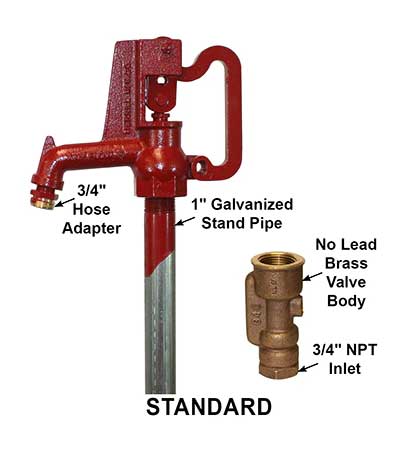
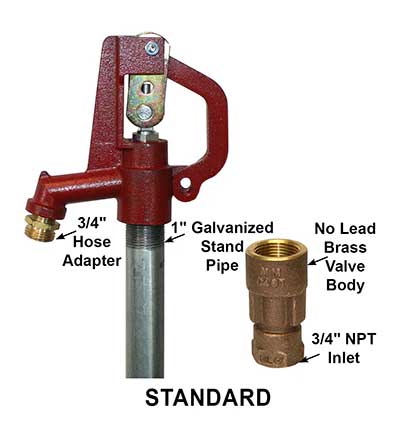
The Weep Hole’s Role In Leak Detection
The weep hole in a yard hydrant plays a crucial role in leak detection, especially for underground leaks. When water leaks from below ground level while the hydrant is in use, it may indicate a problem with the weep hole or the plunger.
Regular inspection and maintenance of the weep hole can help prevent underground leaks and ensure the proper functioning of the yard hydrant.
Function Of The Weep Hole
The weep hole plays a crucial role in leak detection for yard hydrants. Located at the bottom of the hydrant’s brass valve body, the weep hole allows the hydrant to drain when it is shut off. Its purpose is to prevent the water inside the hydrant from freezing during cold weather, which could lead to costly damage. When the hydrant is turned off, any remaining water in the pipe drains out through the weep hole, ensuring that the hydrant remains freeze-proof.
Signs Of A Clogged Weep Hole
A clogged weep hole can significantly impact the effectiveness of a yard hydrant and may cause leaks underground. It is important to inspect and clean the weep hole regularly to prevent any issues. Here are some signs that indicate a clogged weep hole:
- Water pooling around the hydrant base: If you notice water accumulating around the base of the hydrant, it may be a sign that the weep hole is clogged. The water has nowhere to drain, causing it to collect near the hydrant.
- Reduced water flow: A clogged weep hole can restrict the flow of water through the hydrant. If you experience a decrease in water pressure or notice that the water flow is weaker than usual, it may be due to a clogged weep hole.
- Freezing issues: During colder months, a clogged weep hole can prevent the proper drainage of water from the hydrant. This can lead to freezing and potential damage to the hydrant and underground pipes.
Regular maintenance and cleaning of the weep hole can help prevent these issues. By ensuring that the weep hole remains clear and free from debris, you can maintain the functionality of your yard hydrant and detect any leaks underground.
Non-invasive Leak Detection Techniques
Non-invasive leak detection techniques can help determine if a yard hydrant is leaking underground. Water leaks from below ground level when the hydrant is on, and a small leak may be the result of a leak at the drain hole.
Tightening the brass packing nut or replacing the plunger may solve the problem.
Non-Invasive Leak Detection Techniques
Yard hydrants are essential for outdoor water usage and maintenance, but they can become a hassle when they start leaking underground. Not only can it waste water, but it can also damage your property and increase your water bill. Luckily, there are non-invasive leak detection techniques that can help you find the source of the leak without digging up your yard.
Using sound amplification devices
One of the most popular non-invasive leak detection techniques is using sound amplification devices. These devices can detect the sound of water flowing underground and pinpoint the exact location of the leak. Sound amplification devices work by attaching a microphone to the hydrant and listening for any sounds that indicate a leak. Once the device detects the sound, it amplifies it and helps identify the location of the leak.
Employing leak detection fluids
Another effective technique for detecting underground leaks in yard hydrants is using leak detection fluids. These fluids are specifically designed to detect leaks in water pipes and hydrants. They work by pouring the fluid into the hydrant and letting it flow through the pipes. If there is a leak, the fluid will start to bubble up and indicate the location of the leak. This method is effective, affordable, and non-invasive, making it a popular choice for homeowners.
In conclusion, if you suspect that your yard hydrant is leaking underground, using non-invasive leak detection techniques like sound amplification devices or employing leak detection fluids can help you locate the leak without causing any damage to your property. It’s important to address the issue as soon as possible to prevent any further damage or increase in water bills.
Credit: terrylove.com
Digging Safely To Find A Leak
When it comes to finding a leak in an underground yard hydrant, it’s important to dig safely and follow proper procedures. Look for water leaks from below ground level or check for a small leak at the drain hole. If necessary, replace the plunger or tighten the brass packing nut to stop the leakage.
Digging Safely to Find a Leak
If you suspect that your yard hydrant is leaking underground, it’s important to locate the source of the leak quickly before it causes significant damage. Digging safely to find a leak requires following certain precautions to avoid accidents and injuries. Here are some key things to keep in mind before and during the excavation process.
Pre-digging Precautions
Before you begin digging, it’s essential to take some precautions to ensure your safety and avoid damaging the hydrant or other underground utilities. Here are some tips to keep in mind:
- Call 811 or your local utility company to have them mark the location of any underground utilities in the area.
- Wear protective gear, such as gloves, safety glasses, and a hard hat.
- Make sure you have the right tools for the job, including a shovel, pickaxe, and digging bar.
- Check the weather forecast to avoid digging during heavy rain or thunderstorms.
Strategic Excavation Methods
Once you’ve taken the necessary precautions, it’s time to start digging. Strategic excavation methods can help you locate the source of the leak quickly and efficiently. Here are some tips to keep in mind:
- Start digging around the hydrant in a circular pattern, gradually widening the hole as you go.
- Use a shovel to remove the soil around the hydrant carefully, taking care not to damage the hydrant or any underground utilities.
- If you’re having trouble locating the leak, try using a garden hose to spray water around the hydrant. The water should help you identify the source of the leak.
- Once you’ve located the leak, turn off the water supply to the hydrant before attempting any repairs.
By following these pre-digging precautions and strategic excavation methods, you can safely locate and repair any leaks in your yard hydrant. Remember to always prioritize safety and take your time to avoid causing any damage or injuries during the excavation process.
Repairing Common Hydrant Leaks
When it comes to repairing common hydrant leaks, it’s important to know how to tell if a yard hydrant is leaking underground. Water leaks from below ground level when the hydrant is on, which may indicate a leak at the drain hole.
By replacing the plunger if it’s old and worn, you can fix the issue and prevent further leaks.
Repairing Common Hydrant Leaks
Hydrants are an essential component of any yard irrigation system, providing water access for various outdoor tasks. However, over time, these hydrants may develop leaks, especially underground, which can lead to water wastage and potential damage to the surrounding area. In this section, we will discuss two common methods for repairing hydrant leaks: tightening packing nuts and replacing worn-out parts.
Tightening packing nuts
One of the primary causes of leaks in yard hydrants is loose packing nuts. These nuts are responsible for creating a watertight seal around the hydrant’s stem, preventing water from escaping. Over time, these nuts may become loose due to regular usage or changes in temperature. Here’s how you can tighten them:
1. Locate the packing nut: The packing nut is typically located just below the handle of the hydrant.
2. Use the right tool: To tighten the packing nut, you will need a ¾” open-end wrench.
3. Turn the nut clockwise: Using the wrench, turn the packing nut clockwise in small increments. Be careful not to over-tighten, as excessive compression can cause damage to the O-rings.
4. Check for leaks: After tightening the packing nut, turn on the hydrant and check for any signs of leakage. If the leakage persists, you may need to consider replacing worn-out parts.
Replacing worn-out parts
If tightening the packing nut doesn’t resolve the leak issue, the next step is to inspect and replace any worn-out parts. The most commonly replaced part in a yard hydrant is the plunger. Here’s how you can do it:
1. Turn off the water supply: Before replacing any parts, make sure to shut off the water supply to the hydrant.
2. Remove the old plunger: Unscrew the plunger assembly from the hydrant and carefully remove the old plunger.
3. Install the new plunger: Insert the new plunger into the hydrant, making sure it fits securely.
4. Reassemble the hydrant: Screw the plunger assembly back into place, ensuring it is tight enough to prevent leaks.
5. Test for leaks: Turn on the water supply and check for any signs of leakage. If the hydrant is no longer leaking, you have successfully repaired the issue.
By tightening packing nuts and replacing worn-out parts, you can effectively repair common leaks in yard hydrants. Regular maintenance and prompt repairs are essential to ensure the efficient functioning of your irrigation system and prevent any water wastage. Remember to consult a professional if you encounter any difficulties or if the issue persists.
Preventive Maintenance For Yard Hydrants
Regular maintenance of yard hydrants is crucial to ensure their proper functioning and prevent any potential leaks or underground damages. By following a preventive maintenance routine, you can identify and address any issues before they become major problems. Here are some essential tips for preventive maintenance:
Regular Cleaning Schedules
Regular cleaning is an important part of yard hydrant maintenance. Over time, debris and dirt can accumulate around the hydrant, potentially causing clogs or hindering its performance. Cleaning the hydrant periodically helps to keep it free from obstructions and ensures smooth operation.
When cleaning the yard hydrant, make sure to:
- Remove any dirt or debris around the hydrant
- Inspect the hydrant’s components for any signs of damage or wear
- Wash the hydrant with water to remove any remaining dirt or residue
Seasonal Inspection Tips
Performing seasonal inspections is crucial for detecting any potential leaks or underground damages in your yard hydrant. By inspecting the hydrant regularly, you can address issues promptly and prevent further damage.
Here are some tips for conducting seasonal inspections:
- Check for any visible signs of leaks, such as water pooling around the hydrant or damp areas in the surrounding soil
- Inspect the hydrant’s components, including the stem, packing nut, and plunger, for any signs of wear or damage
- Verify that the weep hole is clear and functioning properly to ensure the hydrant remains freeze-proof
- Test the functionality of the hydrant by turning it on and off to ensure smooth operation
By following these preventive maintenance tips, you can ensure the longevity and efficiency of your yard hydrant while minimizing the risk of underground leaks. Remember, regular cleaning and seasonal inspections are key to identifying and addressing any issues early on.
When To Call A Professional
If you suspect a yard hydrant is leaking underground, it’s best to call a professional to assess the situation. Water leaks from the drain hole may indicate a worn plunger that needs replacing, but a larger leak could require excavation to fix the issue.
A qualified plumber can help determine the extent of the problem and recommend the appropriate solution.
Recognizing the signs of an underground yard hydrant leak is crucial for preventing water wastage and costly damage. While some minor leaks can be fixed with basic adjustments, there are instances when it’s best to seek the expertise of a professional. Here are the key situations when calling a professional becomes necessary:
Complex Leaks And Repairs
If you notice persistent or substantial leaking around the yard hydrant, especially below ground level, it could indicate a complex issue that requires professional attention. Complex leaks often stem from deep-seated problems that demand specialized equipment and skills to diagnose and repair effectively.
Ensuring Proper Installation
When dealing with yard hydrants, ensuring proper installation is paramount to prevent future leaks and performance issues. If you’re uncertain about the initial installation or suspect improper setup, it’s advisable to consult a professional to inspect and rectify any installation shortcomings.
Frequently Asked Questions
Do Yard Hydrants Leak Underground?
Yes, yard hydrants can leak underground, especially when water is seen leaking from below ground level when the hydrant is turned on. This may be due to a leak at the drain hole, and replacing the plunger can help resolve the issue.
Regular maintenance is important for preventing underground leaks.
How To Fix A Leaking Yard Hydrant?
To fix a leaking yard hydrant, tighten the brass packing nut in small increments using a ¾” open end wrench. Avoid over-tightening to prevent damage. If water leaks from below ground when the hydrant is on, it may indicate a need to replace the plunger.
How Deep Are Yard Hydrants Buried?
Yard hydrants are typically buried around 3 to 4 feet underground for proper installation.
What Is The Weep Hole On A Yard Hydrant?
The weep hole on a yard hydrant is a small opening located at the bottom of the hydrant. It allows the hydrant to drain when it is shut off, ensuring that no water remains inside and preventing freezing. If the weep hole is blocked, the hydrant may no longer be freeze-proof.
How Deep Are Yard Hydrants Buried?
Yard hydrants are typically buried at a depth of 4 feet to protect them from freezing.
Conclusion
To conclude, identifying a leaking underground yard hydrant can be tricky, but not impossible. By observing the signs of water leakage and performing simple tests, you can determine if your yard hydrant is leaking or not. Remember to take safety precautions while dealing with a yard hydrant and seek professional help if required.
Regular maintenance and timely repairs can keep your yard hydrant in good condition and prevent major damage. By following the tips mentioned in this blog post, you can ensure the proper functioning of your yard hydrant and avoid unnecessary expenses.