To repair scratches on leather car seats, you can use a leather repair kit that includes tools and instructions for the repair process. These kits are available in various types, such as gel, paint, or dye, and can be used to fix scratches, scuffs, and tears on leather surfaces.
With a little bit of patience and attention to detail, you can restore your leather car seats to their former glory and save money on costly repairs or replacements. If you’re looking for a cost-effective way to fix scratches on your leather car seats, a leather repair kit may be just what you need.
These kits come in various types and can be used to restore leather surfaces to their original condition. We’ll take a closer look at some of the best leather repair kits available on the market and provide tips on how to use them effectively. Whether you’re dealing with minor scratches or more severe damage, we’ve got you covered. So, let’s get started!
Introduction To Leather Seat Care
When it comes to maintaining the luxurious look and feel of your car’s interior, proper care for the leather seats is essential. From routine cleaning to addressing minor scratches, understanding the nuances of leather seat care can help preserve their quality and appearance for years to come.
Importance Of Maintaining Leather Seats
Regular maintenance of leather seats is crucial to uphold their durability and aesthetic appeal. By implementing a consistent care routine, you can prevent premature wear and maintain the luxurious look of your car’s interior.
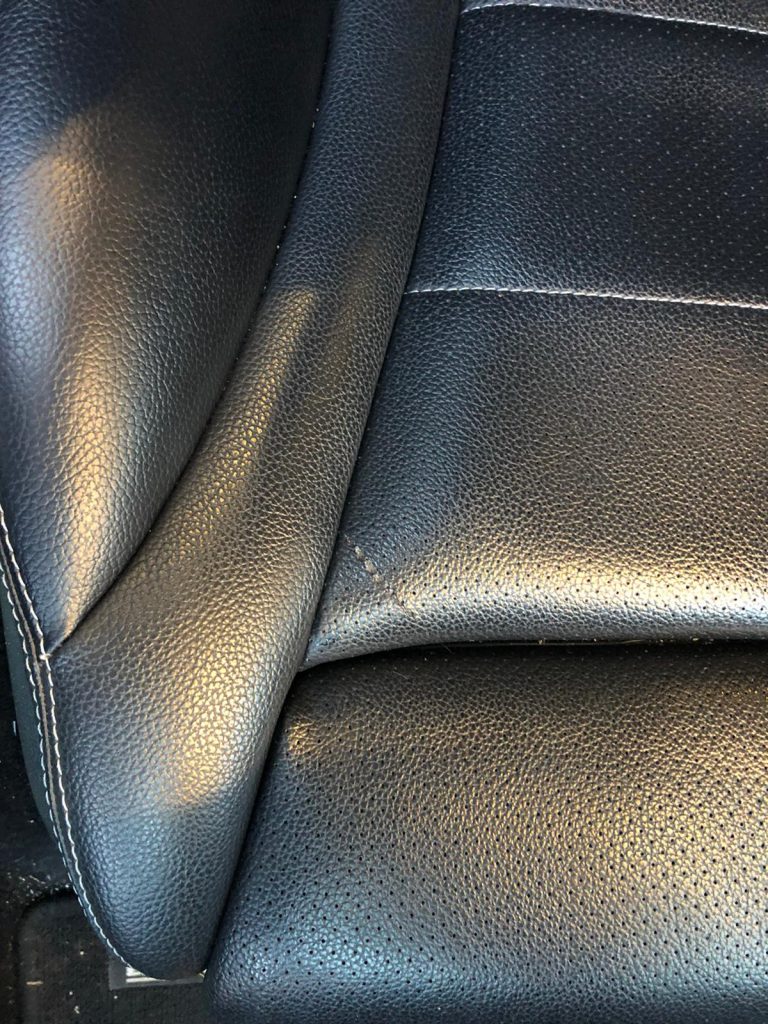
Common Types Of Leather Seat Damage
Leather seats are susceptible to various types of damage, including scratches, scuffs, and color fading. Understanding these common issues can help you effectively address them and extend the lifespan of your leather seats.
Assessing The Scratch
Before diving into the repair process, it’s crucial to assess the scratch on your leather car seats. This step will help you determine the appropriate course of action to effectively restore the leather to its former glory.
Determining The Depth Of Scratches
Start by closely examining the scratch to determine its depth. Light surface scratches may only affect the top layer of the leather, while deeper scratches can penetrate the entire thickness of the leather.
When To Opt For Professional Repair
If you’re dealing with extensive or deep scratches, it’s advisable to seek professional repair services. Professional leather repair technicians have the expertise and tools to effectively address severe damage and ensure a seamless restoration of your car seats.
Basic Cleaning
Learn how to repair scratches on leather car seats with these easy steps. Start by cleaning the area thoroughly, then apply a leather repair kit to match the color and restore the material. With simple instructions, you can easily fix any scratches and keep your car seats looking brand new.
Choosing The Right Leather Cleaner
When it comes to repairing scratches on your leather car seats, the first step is to choose the right leather cleaner. This is crucial as using the wrong product can potentially damage the leather further. It’s important to opt for a cleaner specifically designed for leather to ensure the best results.
Step-by-step Cleaning Process
Now that you have the right leather cleaner, let’s dive into the step-by-step cleaning process to repair scratches on your car seats.
- Start by thoroughly vacuuming the seats to remove any loose dirt and debris. This step is essential to prevent further scratching during the cleaning process.
- Next, using a soft, lint-free cloth, dampen it with water and gently wipe the surface of the leather seats. This will help remove any surface dirt and grime.
- Once the seats are clean and dry, apply a small amount of the chosen leather cleaner onto a clean cloth. Remember to follow the manufacturer’s instructions for the specific product you are using.
- Using circular motions, gently rub the cleaner onto the affected areas, focusing on the scratches. Be sure to apply gentle pressure and avoid scrubbing too vigorously, as this can cause further damage.
- After applying the cleaner, allow it to sit on the leather for a few minutes to penetrate and lift any dirt or stains.
- Using a separate clean cloth, dampen it with water and wipe away the excess cleaner from the seats.
- Finally, allow the seats to air dry completely before using them again.
By following these simple steps and using the right leather cleaner, you can effectively clean and repair scratches on your car seats, restoring them to their former glory. Remember to always test the cleaner on a small, inconspicuous area of the seat first to ensure compatibility and avoid any unwanted discoloration.
With the basic cleaning process complete, you’re now ready to move on to the next step in the repair process.
Credit: m.youtube.com
Preparation For Repair
Before repairing scratches on your leather car seats, it’s important to prepare the area. Begin by cleaning the surface with a mild leather cleaner and allowing it to dry completely. Next, apply a leather repair kit that matches the color of your seats and follow the instructions carefully to restore your car’s interior to its original condition.
Gathering Necessary Materials
Before you begin the repair process, it’s important to gather all the necessary materials. Having everything you need on hand will ensure a smooth and efficient repair. Here are the materials you’ll need:
- Leather repair kit
- Color-matched leather dye
- Clean microfiber cloth
- Mild leather cleaner
- Leather conditioner
- Sandpaper (fine-grit)
- Masking tape
- Scissors
Preparing The Area Around The Scratch
Before you start repairing the scratch on your leather car seat, it’s important to prepare the area properly. This will ensure that the repair is seamless and long-lasting. Follow these steps to prepare the area:
- Clean the leather surface around the scratch using a mild leather cleaner and a clean microfiber cloth. This will remove any dirt, oils, or residues that could interfere with the repair process.
- Use masking tape to protect the surrounding area of the scratch. This will prevent any accidental damage to the unaffected parts of the leather seat.
- If the scratch is deep or has rough edges, gently sand the area using fine-grit sandpaper. This will smooth out the surface and create a better bonding surface for the leather repair compound.
- Trim any loose threads or fibers around the scratch using a pair of scissors. This will ensure a clean and neat repair.
By following these steps, you’ll be well-prepared to repair the scratches on your leather car seats. Remember to have all the necessary materials ready and to properly prepare the area around the scratch for a successful repair.
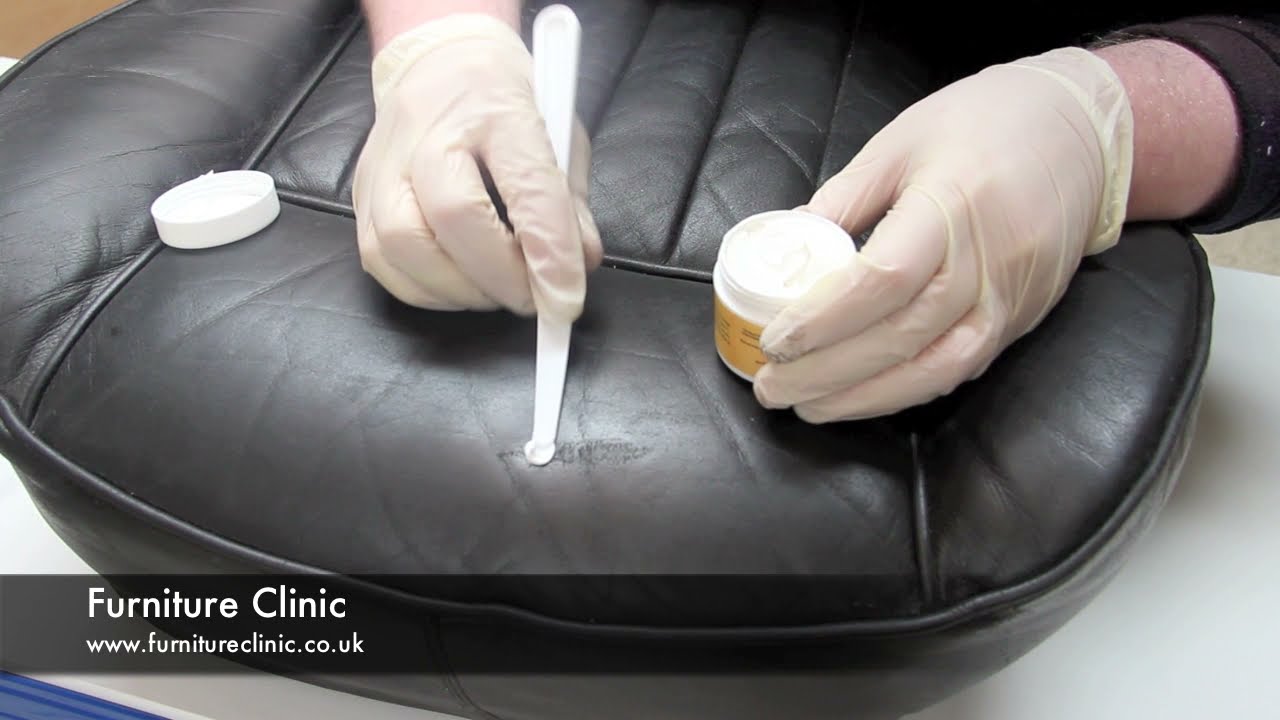
Using Leather Repair Kits
Repairing scratches on leather car seats can be done using a leather repair kit. These kits are widely available and come with easy-to-follow instructions. They can restore any type of leather and make your car seats look brand new again.
Types Of Leather Repair Kits Available
There are several types of leather repair kits available in the market. Some of the most common types include leather dye kits, leather patch kits, leather recoloring kits, and leather repair kits. Leather dye kits are used to restore the color of faded or discolored leather. Leather patch kits are used to repair small holes, tears or cracks in the leather. Leather recoloring kits are used to restore the color of the leather to its original state. Leather repair kits, on the other hand, are used to repair scratches, scuffs, and other types of damage to the leather surface.
Step-by-step Guide To Using A Repair Kit
If you have a leather repair kit, here is a step-by-step guide on how to use it:
- Clean the damaged area using a leather cleaner and allow it to dry completely.
- If the kit comes with a filler, apply it to the damaged area and smooth it out using a spatula or plastic card.
- Allow the filler to dry completely before sanding it down using sandpaper.
- If the kit comes with a colorant, apply it to the damaged area using a sponge or brush.
- Allow the colorant to dry completely before applying a second or third coat if necessary.
- Apply a leather sealant to protect the repaired area from future damage.
It is important to follow the instructions provided with the leather repair kit to ensure that you achieve the best results. Additionally, it is important to note that while leather repair kits can be effective in repairing minor damage to the leather surface, they may not be able to repair major damage or tears. In such cases, it may be best to seek the services of a professional leather repair specialist.
Alternative Repair Methods
To repair scratches on leather car seats, there are alternative repair methods available. These methods include using leather repair kits, applying leather scratch repair creams, and utilizing leather touch-up kits. These options provide effective solutions to restore the appearance of your leather car seats.
Diy Fixes With Household Products
If you’re looking for a quick and easy way to repair minor scratches on your leather car seats, you can use some household products that you probably already have on hand. Some of the most effective DIY fixes include using a pencil eraser, toothpaste, or vinegar. Simply apply a small amount of the product to the scratch, rub gently with a soft cloth, and then wipe away any excess.
Using Leather Glue For Deeper Scratches
If you have deeper scratches on your leather car seats, you may need to use a leather glue to repair them. Before you begin, make sure that the area is clean and dry. Apply a small amount of the glue to the scratch and use a toothpick or other small tool to spread it evenly. Be sure to apply the glue in thin layers and allow each layer to dry completely before applying the next. Once the glue has dried, use a fine-grit sandpaper to sand down any excess and then wipe the area clean.
Consider Professional Repair Services
If you’re not comfortable repairing the scratches on your leather car seats yourself, or if the damage is extensive, you may want to consider professional repair services. A professional repair service will be able to assess the damage and provide you with the best possible solution for repairing your seats. They may use specialized tools and techniques to repair the damage, and they may also be able to match the color of your seats to ensure a seamless repair.
In conclusion, repairing scratches on your leather car seats doesn’t have to be difficult or expensive. With a few simple household products or some leather glue, you can repair minor scratches yourself. For deeper scratches, or if you’re not comfortable repairing the damage yourself, consider contacting a professional repair service. With the right tools and techniques, you can restore your leather car seats to their former glory and enjoy a comfortable and stylish ride once again.
Dyeing And Color Matching
Repair scratches on leather car seats by using a leather repair kit to dye and color match the damaged area. Clean the leather, sand the scratches, apply the color, and finish with a protective coating for a seamless repair. Follow the easy instructions to restore your leather car seats to their former glory.
Selecting The Right Leather Dye
When it comes to repairing scratches on leather car seats, selecting the right leather dye is crucial. You want to choose a dye that matches the color of your car seats as closely as possible. This will ensure a seamless and natural-looking repair.
Before purchasing a leather dye, it’s important to know the exact color of your car seats. Look for the manufacturer’s label or consult your car’s manual for this information. Once you have the color code or name, you can search for a dye that specifically matches it.
When selecting a leather dye, make sure it is suitable for automotive use and is designed to work with leather materials. There are many leather dye options available in the market, ranging from spray dyes to liquid dyes. Consider the application method that suits you best and choose a dye that provides good coverage and colorfastness.
Applying Dye To Blend With Existing Color
Once you have selected the right leather dye, it’s time to apply it to blend with the existing color of your car seats. Here’s a step-by-step guide on how to do it:
- Clean the leather seats thoroughly to remove any dirt, dust, or oils. Use a mild leather cleaner or a leather cleaning spirit to ensure a clean surface for the dye to adhere to.
- Sand the scratched area gently using fine-grit sandpaper. This will help smooth out the surface and prepare it for the dye application.
- Apply a small amount of dye onto a clean cloth or sponge. Start by dabbing the dye onto the scratched area, gradually blending it with the surrounding leather. Use a light touch and work in small sections to ensure an even application.
- Allow the dye to dry completely before assessing the color match. If the color is slightly off, you can apply additional layers of dye to achieve a better blend. Remember to let each layer dry before applying the next one.
- Once you are satisfied with the color match, apply a leather protector or finish to seal the dye and protect the repaired area.
It’s important to note that dyeing leather requires precision and patience. Take your time during the application process to ensure a seamless repair. If you are unsure about the process or have deep or extensive scratches, it’s recommended to seek professional help for the best results.
Finishing Touches
Repair scratches on leather car seats with these finishing touches. Use a leather repair kit to match the color, restore the material, and apply a leather scratch repair cream for a flawless finish. Follow easy instructions to fix scuffs and wear, achieving a professional result.
Applying Finish To The Repair
After successfully repairing the scratches on your leather car seats, it’s time to apply a finish to ensure a seamless and polished look. Applying a finish will not only enhance the appearance of the repaired area but also provide protection against future damage.
To apply the finish, you will need a leather finish product that matches the color and sheen of your car seats. Choose a high-quality finish that is specifically designed for leather repair.
Here’s how you can apply the finish to the repaired area:
1. Clean the repaired area: Before applying the finish, make sure the repaired area is clean and free from any dust or debris. Use a mild leather cleaner and a soft cloth to gently clean the area.
2. Apply the finish: Take a small amount of the leather finish on a clean, lint-free cloth. Start by applying a thin and even layer of the finish to the repaired area. Use gentle circular motions to ensure proper coverage.
3. Allow it to dry: Let the finish dry completely according to the manufacturer’s instructions. This usually takes a few hours. Avoid sitting or touching the repaired area until it is completely dry.
4. Assess the result: Once the finish is dry, assess the result. If you are satisfied with the appearance, proceed to the next step. If necessary, you can apply an additional coat of finish for better coverage and durability.
Polishing And Buffing The Seat
Polishing and buffing the leather car seat is the final step to achieve a smooth and luxurious finish. This step will help blend the repaired area with the rest of the seat and give it a professional look.
Follow these steps to polish and buff the seat:
1. Choose a leather polish: Select a high-quality leather polish that is suitable for your car seats. Look for a product that provides conditioning and protection to the leather surface.
2. Apply the polish: Take a small amount of the polish on a clean, soft cloth. Gently rub the polish onto the leather in circular motions. Make sure to cover the entire seat, including the repaired area. Apply the polish evenly and avoid applying too much pressure.
3. Buff the seat: After applying the polish, use a separate clean cloth to buff the seat. Buffing helps to remove any excess polish and brings out the shine. Use gentle circular motions and continue buffing until the seat feels smooth and glossy.
4. Repeat if necessary: If you feel that the seat could benefit from an additional layer of polish, repeat the process. However, be cautious not to overdo it, as too much polish can leave a greasy residue.
By following these steps, you can achieve a professional and flawless finish on your leather car seats. Remember to always read and follow the instructions provided by the manufacturer of the leather repair products to ensure the best results.
Leather Conditioning
Leather conditioning is a crucial step in maintaining the appearance and longevity of your car’s leather seats. Conditioning helps to nourish the leather, keeping it supple and preventing cracks and tears. Additionally, it provides a protective barrier against spills and stains, making it easier to clean and maintain your seats.
Benefits Of Leather Conditioning
- Prevents cracks and tears
- Nourishes and maintains suppleness
- Protects against spills and stains
- Facilitates easier cleaning and maintenance
How To Condition Your Leather Seats Post-repair
- Clean the seats with a mild leather cleaner to remove any dirt and residue.
- Apply a small amount of leather conditioner to a clean, soft cloth.
- Gently rub the conditioner into the leather using circular motions, ensuring full coverage.
- Allow the conditioner to penetrate the leather for the recommended time as per the product instructions.
- Buff the seats with a separate clean cloth to remove any excess conditioner and achieve a smooth finish.
- Repeat the conditioning process every 3-6 months to maintain the leather’s quality.
Prevention And Maintenance
When it comes to maintaining the pristine condition of your leather car seats, prevention and regular maintenance are key. By taking proactive measures and adhering to a consistent upkeep routine, you can prevent future scratches and prolong the lifespan of your leather seats.
Tips To Prevent Future Scratches
Preventing scratches on your leather car seats is essential to keep them looking new. Here are some tips to help you avoid scratches:
- Place a seat cover or cushion to protect the leather from direct contact with sharp objects.
- Encourage passengers to avoid wearing sharp accessories or clothing that could potentially scratch the seats.
- Avoid placing heavy or sharp-edged items on the seats to prevent accidental damage.
- Regularly inspect the seats for any signs of wear and tear, and address any issues promptly.
Regular Maintenance Routine For Leather Seats
Maintaining a regular cleaning and conditioning routine is vital for preserving the quality of your leather car seats. Here’s a simple maintenance routine to follow:
- Use a soft brush or vacuum to remove any debris or dirt from the seats.
- Apply a leather cleaner using a soft cloth to gently remove any stains or grime from the surface.
- After cleaning, use a leather conditioner to keep the seats moisturized and prevent them from drying out and cracking.
- Regularly inspect the seats for any scratches or imperfections, and address them using suitable leather repair products.
When To Call A Professional
Signs That Professional Help Is Needed
If you notice extensive damage such as deep cuts, severe discoloration, or large areas of wear and tear on your leather car seats, it’s a clear sign that professional assistance is necessary. Additionally, if you have attempted DIY repairs with little success, it’s best to seek the expertise of a professional leather repair service.
Finding Reputable Leather Repair Services
It’s crucial to entrust your leather car seat repairs to a reputable and experienced professional. Consider seeking recommendations from friends, family, or car enthusiasts who have previously used leather repair services. Additionally, conduct thorough online research to identify reputable leather repair specialists in your area. Look for customer reviews, ratings, and examples of their previous work to ensure the quality and reliability of the service provider.
Credit: www.reddit.com
Credit: www.mobileleatherrepairs.mobi
Frequently Asked Questions
Can You Fix Scratched Leather Seats?
Yes, you can fix scratched leather seats using a leather repair kit with various tools.
How To Repair Leather Scratches From Dogs?
Yes, you can fix scratched leather seats using a leather repair kit. These kits come with tools and instructions to help you repair the scratches on your leather. You can find a variety of leather repair kits online or at your local auto parts store.
How To Get Scratches Out Of Car Seats?
To fix scratches on car seats, use a leather repair kit. These kits include tools and instructions to help you restore your leather seats. You can find a variety of kits online, such as on Amazon or Walmart. Follow the instructions provided to achieve the best results.
How To Fix Wear Marks On Leather Car Seats?
To fix wear marks on leather car seats, you can use a leather repair kit. These kits come with various tools and instructions to match any color and restore any material. Start by cleaning the leather with alcohol, sanding the area, and applying the color and filler.
Let it dry and finish with a satin or leather protector. You can also find helpful tutorials on YouTube.
How Can I Repair Scratches On My Leather Car Seats?
To repair scratches on leather car seats, you can start by cleaning the area with a leather cleaner. Then, apply a leather repair compound to fill in the scratches. Finally, use a leather conditioner to restore the color and texture.
Conclusion
Repairing scratches on leather car seats is a straightforward process that can be done using a leather repair kit. These kits provide the necessary tools and instructions to restore your seats to their former glory. By following the steps outlined in this blog post, you can easily fix any damage and extend the lifespan of your car seats.
Remember to choose a kit that matches the color of your leather and follow the manufacturer’s instructions carefully. With a little time and effort, your car seats will look as good as new.