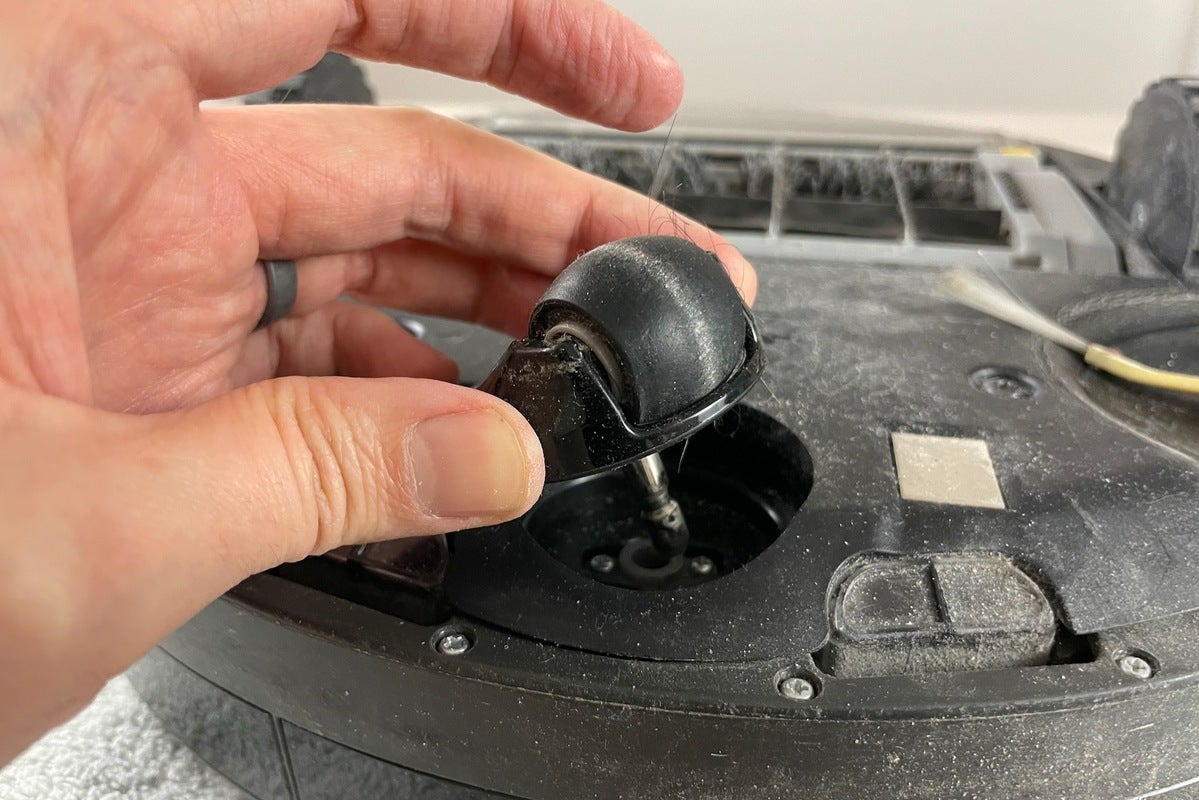
To remove the Roomba front wheel, simply press firmly on the wheel assembly and pull it out. Ensure the robot is turned off before starting.
Navigating the maintenance of a Roomba can seem daunting to many users, especially when it comes to parts like the front wheel, which is crucial for smooth operation. Regular cleaning and occasional replacement of the Roomba front wheel are essential for keeping your robot vacuum running efficiently.
Dirt, hair, and other debris can accumulate around the wheel, causing it to jam or move erratically. Understanding how to properly remove the wheel not only aids in cleaning but also ensures you can quickly replace it if necessary. This guide aims to demystify the process, offering clear, straightforward instructions to help you maintain your Roomba’s performance and extend its lifespan.
Credit: www.techhive.com
Introduction To Roomba Maintenance
Maintaining your Roomba ensures it cleans efficiently. Today, we dive into Roomba care, focusing on the front wheel. This small part plays a big role in your Roomba’s performance.
Importance Of Regular Cleaning
Regular cleaning keeps your Roomba in top shape. Dirt and debris can hinder your vacuum’s movement and cleaning power. A clean Roomba means a clean home.
- Prevents wheel jams
- Extends Roomba’s life
- Enhances suction and efficiency
Role Of The Front Wheel
The front wheel guides your Roomba. It turns and pivots for smooth navigation. Over time, dirt can build up, causing issues. A clean wheel ensures trouble-free cleaning.
| Part | Function | Maintenance Needed |
|---|---|---|
| Front Wheel | Navigation | Cleaning, checking for wear |
Follow simple steps to remove and clean the wheel. Your Roomba will thank you with better cleaning sessions. Stay tuned for our guide on removing the Roomba front wheel.
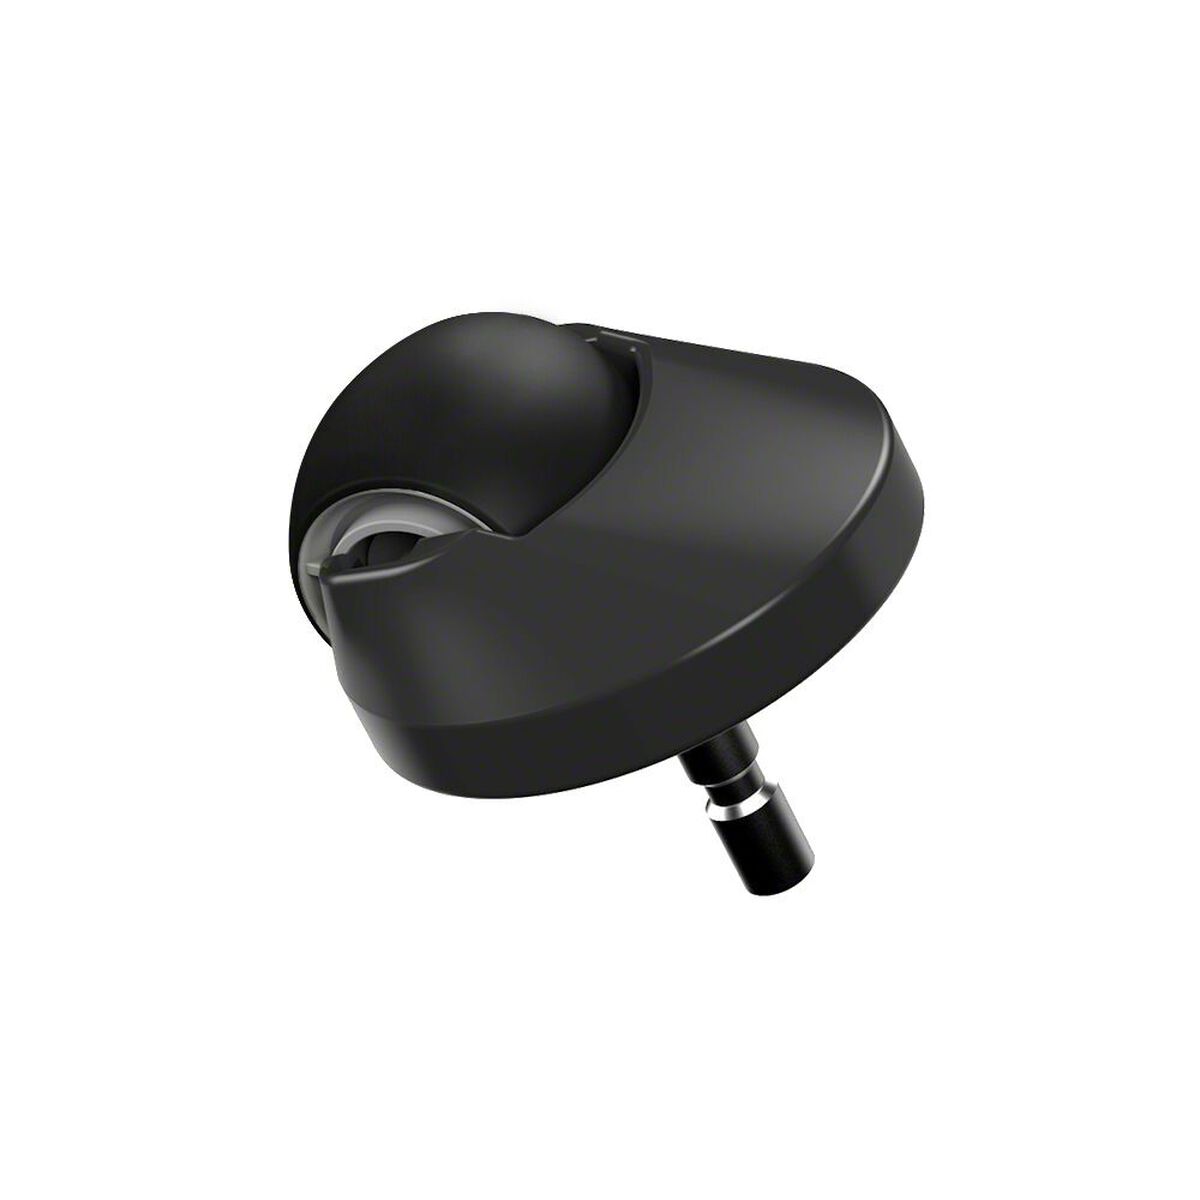
Identifying The Front Wheel Assembly
Roomba vacuums glide smoothly thanks to a crucial piece: the front wheel assembly. This small but essential component ensures your Roomba navigates your home’s terrain with ease. Spotting the front wheel module is simple. Look for the single wheel located at your Roomba’s front section. It pivots for optimal maneuverability. Understanding the front wheel’s design is key before attempting any maintenance.
Components Of The Wheel Module
The front wheel module consists of several parts. These include the wheel itself, the housing, and the axle. The housing protects the wheel and connects to the vacuum’s body. The wheel rotates on the axle, allowing smooth movement. Together, these components allow the Roomba to turn and pivot as it cleans.
- Wheel: The round part that touches the floor.
- Housing: Encases the wheel, attaching to the body.
- Axle: A rod that lets the wheel spin freely.
When To Consider Removal
Removing the front wheel may be necessary at times. Common signs include reduced mobility, unusual noises, or visible debris. Regular cleaning prevents issues, but sometimes removal is the only fix. If your Roomba struggles to move or makes scraping sounds, check the front wheel.
- Decreased movement efficiency.
- Scraping or grinding sounds.
- Visible dirt or hair on the wheel.
Cleaning or replacing the front wheel restores your Roomba’s performance. Follow these signs to keep your vacuum running smoothly.
Preparation For Wheel Removal
Before removing the Roomba front wheel, proper preparation is crucial. This ensures a smooth and safe process. Gather the tools required and follow safety precautions.
Tools Needed
Having the right tools on hand is essential. Here’s what you’ll need:
- Small Phillips head screwdriver: For unscrewing the wheel module.
- Flathead screwdriver: To pry off the wheel cap gently.
- Cleaning brush or compressed air: To clear out debris.
- Soft cloth: For cleaning the wheel and surrounding area.
Safety Precautions
Protect the Roomba and yourself by following these tips:
- Power off the Roomba to prevent accidents.
- Work on a clean, flat surface to avoid losing parts.
- Handle the wheel and tools with care.
- Keep screws and small parts away from children and pets.
Step-by-step Wheel Removal
Navigating through the process of removing the front wheel from your Roomba can seem daunting at first. Yet, with the right steps, it’s a breeze. This guide walks you through each phase, ensuring a smooth operation. Let’s dive into the step-by-step wheel removal process.
Powering Down The Roomba
The first crucial step is to ensure your Roomba is completely powered down. This prevents any unexpected movements and makes the process safer. Follow these simple steps:
- Press and hold the clean button on your Roomba for a few seconds.
- Wait for the light to turn off, indicating the device is off.
- Flip the Roomba over to access the wheel more easily.
Accessing The Wheel Module
With your Roomba powered down, you’re ready to access the wheel. Here’s how:
- Locate the front wheel module on the underside of your Roomba.
- Use a small screwdriver or a similar tool to gently pry the wheel module out.
- Be careful not to apply too much force to avoid damaging the wheel or the Roomba.
Once removed, you can clean or replace the wheel as needed. Reinstalling the wheel follows the reverse process. Simply align the wheel module with the slot and press firmly until it snaps into place.
Cleaning The Wheel And Housing
Cleaning the Wheel and Housing of your Roomba is crucial. It helps your robot vacuum perform better. Over time, dirt and debris can clog the front wheel. This can slow down your Roomba. Let’s learn how to clean it properly.
Removing Debris And Buildup
First, you need to remove the front wheel from your Roomba. Gently pull it out. You might see hair, dust, and other particles stuck there. Use tweezers or a small brush to clean these out. Make sure to get all the dirt off both the wheel and the area it sits in.
- Take out the wheel gently.
- Use tweezers or a small brush.
- Remove all the dirt and debris.
Sanitizing The Components
After removing the debris, it’s time to sanitize. Mix some mild soap with water. Use a cloth dipped in this mixture to wipe the wheel and housing. This will kill germs and remove any remaining dirt. Let them dry completely before putting the wheel back.
- Mix mild soap with water.
- Wipe the wheel and housing with a damp cloth.
- Let them dry completely before reassembly.
Cleaning and sanitizing your Roomba’s front wheel extends its life. It also ensures your Roomba runs smoothly. Make sure to clean regularly for best performance.
Inspecting For Wear And Damage
Regular maintenance keeps your Roomba running smoothly. The front wheel needs attention too. It’s time to inspect for wear and damage.
Identifying Common Issues
Common wheel problems include jamming, wobbling, and unusual noise. Dirt and hair often cause these issues. Check the wheel for these signs.
- Stiff or immobile wheel
- Excessive play or wobble
- Grinding or squeaking sounds
Deciding On Repair Or Replacement
Assess the wheel’s condition. Minor issues may need simple cleaning. More serious damage may require a new wheel.
| Problem | Solution |
|---|---|
| Dirty wheel | Clean thoroughly |
| Worn-out tread | Replace wheel |
| Broken parts | Replace wheel |
Reassembling The Front Wheel
After cleaning or replacing your Roomba’s front wheel, putting it back is easy. Let’s guide you through the steps to reassemble the front wheel of your Roomba. Follow these tips to ensure your Roomba runs smoothly again.
Aligning The Wheel Properly
Proper alignment is key for smooth operation. Start by placing the wheel into the housing. Make sure it sits flat and even. The wheel should not wobble or tilt. Check for any obstructions in the wheel cavity. Remove debris to avoid future issues. Once aligned, the wheel should rotate freely.
Testing The Wheel Function
Before completing the assembly, test the wheel. Gently spin the wheel by hand. It should move smoothly without resistance. Listen for any unusual noises. Grinding or clicking sounds may indicate a problem. If the wheel does not turn easily, recheck alignment. Once satisfied with the movement, secure any fasteners or covers. Your Roomba is now ready to navigate your home with ease.
- Ensure the wheel is clean before reassembly.
- Align the wheel with the housing carefully.
- Check for smooth rotation without noise.
- Secure all parts firmly to avoid dislodgement.
Credit: www.irobot.com
Maintenance Tips And Tricks
Keeping your Roomba running smoothly requires regular maintenance. The front wheel is crucial for navigation. It needs attention to prevent issues.
Preventive Care For Longevity
Clean the wheel weekly to remove dirt and hair. A dirty wheel can hinder movement. Use a damp cloth for effective cleaning. Check for wear and tear monthly. Replace the wheel if it shows significant damage.
- Avoid water exposure to the wheel well.
- Use a dry brush for stuck debris.
- Inspect for obstructions regularly.
Troubleshooting Common Problems
Stuck wheels can cause errors. Gently remove obstructions. If the wheel does not turn, check for blockages beneath the cap.
- Press the wheel gently to release it.
- Examine for trapped items.
- Clean the wheel housing thoroughly.
If issues persist, contact Roomba support. They can guide you through more complex fixes. Always refer to the manual before attempting repairs.

Credit: www.youtube.com
Frequently Asked Questions
Can A Roomba Front Wheel Be Replaced?
Yes, the Roomba front wheel can be replaced easily with a compatible new wheel.
What Tools Are Needed For Roomba Wheel Removal?
No tools are required; the wheel assembly is designed to be removed by hand.
How Do I Clean A Stuck Roomba Wheel?
Gently pull the wheel out, remove debris, and wipe with a clean cloth to clean it.
Is Roomba Front Wheel Removal Safe?
Absolutely, as long as you handle the Roomba gently and follow the correct procedure.
Does Removing The Roomba Wheel Void Warranty?
Removing the wheel as directed by Roomba’s instructions does not void the warranty.
Conclusion
Maintaining your Roomba’s agility is key for optimal performance. With the steps outlined, removing the front wheel is simple. Tackle this task confidently and keep your helpful robot in top shape. Remember, regular maintenance ensures a longer life for your Roomba.
Ready, set, maintain!