To insulate garage walls already drywalled, inject foam insulation or install rigid foam panels directly onto the walls. Proper insulation in a garage is crucial for maintaining comfortable temperatures, reducing energy bills, and preventing moisture buildup.
Insulating walls that are already finished with drywall poses unique challenges, but it’s a manageable project with the right approach. Many homeowners overlook the importance of a well-insulated garage, considering it just a place for cars and storage. Yet, this space holds potential for various uses, from workshops to home gyms, making insulation a key factor in its versatility.
By choosing the correct insulation method, you can transform your garage into a more energy-efficient and functional area of your home.
Introduction To Garage Insulation
Many homeowners overlook the garage when insulating their homes. Yet, this space holds great potential for energy savings and comfort. Insulating garage walls already finished with drywall is possible. This guide will show how to do it effectively.
Benefits Of Insulating Your Garage
- Energy Efficiency: Insulation keeps your garage warmer in winter and cooler in summer.
- Comfort: A well-insulated garage creates a more comfortable workspace or storage area.
- Noise Reduction: Insulation acts as a sound barrier, reducing noise from outside.
- Increased Home Value: Insulation can boost your property’s market value.
Challenges With Existing Drywall
Insulating walls with existing drywall poses unique challenges. The drywall must stay intact. Plus, the insulation process should avoid moisture issues. Proper techniques ensure your insulated garage performs well.
Pre-insulation Considerations
Before adding insulation to garage walls, important steps must be taken. These ensure energy efficiency and safety. Let’s explore these pre-insulation considerations.
Assessing The Current State
Understanding your garage’s current condition is crucial. Look for gaps, cracks, and moisture issues. These can affect insulation performance.
- Check for air leaks: Seal them to improve insulation.
- Inspect for damage: Repair any wall damage first.
- Review existing insulation: Determine if additional material is needed.
Choosing The Right Insulation Material
Selecting the best insulation is key for energy savings. Consider material types and R-values.
| Material | Pros | Cons | R-Value |
|---|---|---|---|
| Fiberglass | Cost-effective, easy to install | Less effective if wet | 2.2 – 2.7 per inch |
| Cellulose | Eco-friendly, good soundproofing | Can settle over time | 3.1 – 3.8 per inch |
| Spray Foam | Great air sealant, high R-value | More expensive | Up to 6.5 per inch |
Match the insulation to your climate and garage use. Ensure it meets local building codes.
Tools And Materials Needed
Insulating garage walls with existing drywall requires the right tools and materials. This guide lists essentials to ensure a smooth and safe installation process. Gather these items before starting your project.
Essential Tools For The Job
- Stud Finder – Locates wooden studs behind drywall
- Insulation Material – Choose from fiberglass, foam, or cellulose
- Drywall Saw – Cuts drywall for insulation placement
- Utility Knife – Trims insulation to fit wall cavities
- Tape Measure – Ensures accurate insulation cuts
- Construction Adhesive – Secures insulation in place
- Caulking Gun – Applies adhesive smoothly
- Expanding Foam – Seals gaps and cracks
Safety Gear And Precautions
- Safety Glasses – Protects eyes from dust and debris
- Dust Mask or Respirator – Filters airborne particles
- Work Gloves – Guards hands against sharp objects
- Long Sleeve Shirt – Prevents skin irritation from insulation
- Headlamp or Flashlight – Provides visibility in dark spaces
- Ladder – Accesses high areas safely
Prepare your workspace by clearing clutter. Ensure adequate ventilation. Follow insulation product guidelines for a secure fit. Your garage will soon be energy efficient and comfortable.

Credit: jmkcontractor.com
Step-by-step Insulation Process
Improving your garage’s comfort starts with insulation. Let’s explore the step-by-step insulation process. This guide helps keep your garage warm in winter and cool in summer.
Removing The Drywall (if Necessary)
Sometimes, removing drywall is needed. Here’s how to do it safely:
- Clear the area. Move tools and cars out.
- Turn off electricity. Safety first.
- Use a utility knife to cut sections. Keep cuts neat.
- Pull the drywall off. Do it gently to avoid damage.
- Dispose of old drywall properly. Recycle if possible.
Adding Insulation Without Removing Drywall
No need to remove drywall? Great! Here’s how to add insulation:
- Identify wall cavities. Use a stud finder.
- Drill small holes. Do this at the top of the wall.
- Fill with loose-fill or blown-in insulation. Use a machine.
- Seal the holes. Use a patching compound.
- Paint over the patches. Match the wall color.
Both methods improve your garage’s insulation. Choose based on your needs.
Blown-in Insulation Method
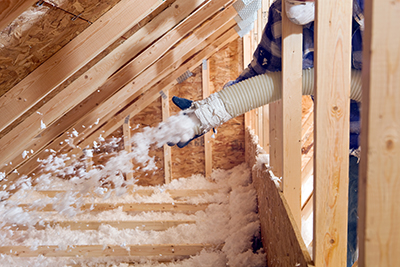
Let’s talk about the Blown-In Insulation Method for garage walls. This method adds insulation without removing drywall. It is quick and mess-free. Perfect for improving your garage’s energy efficiency.
Preparing For Blown-in Insulation
Before adding insulation, some steps are necessary:
- Check for any existing wall damage.
- Seal leaks or cracks in the walls.
- Find the best spots for insulation holes.
- Gather the right tools and materials.
Preparation ensures a smooth insulation process. Always wear safety gear.
The Blowing Process
The process of blowing in insulation is straightforward but requires care:
- Drill small holes in the drywall.
- Insert the insulation hose into the holes.
- Fill the cavities with insulation material.
- Close the holes and paint over them.
This method fills nooks and crannies, making your garage warmer.
Credit: blog.acmetools.com
Finishing Touches
After insulating garage walls, adding finishing touches is crucial. This step seals in the benefits of your hard work. It also restores the garage’s aesthetic appeal. Let’s explore the key final steps to ensure a professional outcome.
Sealing And Patching
First, address any gaps or holes. Use a high-quality sealant for this purpose. Start by inspecting the wall surface thoroughly. Look for cracks or openings around windows and fixtures. Apply sealant to these areas. This step is essential for maintaining insulation efficiency and preventing drafts.
- Identify all gaps and holes
- Choose an appropriate sealant
- Carefully apply to targeted areas
- Allow for adequate drying time
Drywall Restoration Techniques
Next, focus on the drywall’s appearance. Use joint compound to fill any indentations or screw holes. Smooth the compound with a drywall knife for an even surface. Allow the compound to dry. Sand it down to match the surrounding wall texture. This process ensures a seamless look across the garage walls.
- Fill holes with joint compound
- Smooth out with a drywall knife
- Let the compound dry completely
- Sand for a uniform texture
Finally, consider painting the walls. A fresh coat of paint provides a clean, finished look. Choose a paint that suits your garage’s conditions. Remember to cover the floor and any fixtures before painting.
| Step | Action | Tools/Supplies |
|---|---|---|
| 1 | Fill holes | Joint compound, drywall knife |
| 2 | Smooth surface | Drywall knife |
| 3 | Dry and sand | Sandpaper |
| 4 | Paint walls | Paint, brushes/rollers |
These finishing touches will enhance your garage’s functionality and style. They ensure your insulation effort is not in vain. Proper sealing, patching, and restoration give you a space that is both energy-efficient and pleasing to the eye.
Additional Insulation Strategies
Improving your garage’s insulation goes beyond the walls. You can enhance your garage’s energy efficiency with a few additional strategies. These tips keep warmth in and cold out. They also cut energy costs.
Weather Stripping And Caulking
Weather stripping seals gaps around doors. Apply it on door perimeters for a tight seal. Caulking fills cracks in walls and joints. Use it on stationary garage parts for best results.
- Check door frames for gaps or damage.
- Replace old or worn weather stripping.
- Seal cracks with caulk to prevent air leaks.
Insulating Garage Doors And Windows
Garage doors and windows are potential heat loss areas. Insulate them well to save energy. Use insulation kits for garage doors. They are easy to install. For windows, consider thermal curtains or double glazing. These reduce heat transfer.
| Area | Insulation Method |
|---|---|
| Garage Doors | Insulation kits, weather stripping |
| Windows | Thermal curtains, double-glazed glass |

Credit: diy.stackexchange.com
Maintenance And Energy Efficiency
Keeping your garage comfortable and energy-efficient is key. Insulating walls already drywalled requires a careful approach. Maintenance is crucial for long-term benefits. Energy savings hinge on how well the insulation performs over time. Learn how to maintain and maximize efficiency with these tips.
Regular Maintenance Tips
- Inspect seals: Check for gaps in the insulation annually.
- Clean surfaces: Dust can affect insulation’s effectiveness.
- Look for damage: Water or pests can harm insulation.
- Update as needed: Replace old or worn insulation material.
Maximizing Energy Savings
| Action | Benefit |
|---|---|
| Use quality insulation | Keeps heat in, lowers bills |
| Add weather-stripping | Seals gaps, reduces drafts |
| Install a garage door sweep | Blocks out moisture and cold |
| Use energy-efficient heaters | Heats space without waste |
Frequently Asked Questions
Can Insulation Be Added To Existing Walls?
Insulation can be added to existing walls by injecting loose-fill or foam insulation through small holes drilled into the drywall.
What Is The Cost To Insulate Drywalled Garage Walls?
The cost varies depending on insulation type and garage size, but typically ranges from $1 to $2 per square foot.
Is It Necessary To Remove Drywall For Insulation?
No, it is not necessary to remove drywall; insulation can be blown in or injected without removing existing wall surfaces.
How Does Insulating Garage Walls Improve Energy Efficiency?
Insulating garage walls reduces heat transfer, maintaining more consistent temperatures and potentially lowering energy bills.
What Types Of Insulation Are Best For Drywalled Garages?
Fiberglass batts, blown-in cellulose, and spray foam are commonly used and effective for insulating drywalled garage walls.
Conclusion
Wrapping up, properly insulating your garage walls is a step towards energy efficiency and comfort. By following the guidance outlined, you can enhance your space without removing drywall. Remember, a well-insulated garage can save money and boost your home’s value.
Ready to tackle the project? Your cozier, more functional garage awaits.

