To attach shelves to metal wall studs, start by leveling and marking the center of the stud, then drill pilot holes. Use recommended steel stud anchors and drill them into the pilot holes through the stud.
After that, attach the shelf with a female bracket and tighten set screws. It’s important to note that because of the properties of metal/steel studs, the only way to secure something heavy is using toggle bolts. Titanium or cobalt drill bits are best suited for boring through metal studs.
Once you’ve drilled your pilot holes, use a toggle bolt to safely secure heavy items to the metal stud. Attaching shelves to metal wall studs can be challenging, but with the right tools and techniques, it can be done successfully. This guide provides step-by-step instructions for attaching shelves to metal wall studs, including tips on how to drill through metal studs and how to use toggle bolts to secure heavy items. Whether you’re looking to add storage space to your home or office, these tips will help you get the job done right.
Credit: www.amnesta.net
Introduction To Metal Wall Studs
Metal wall studs are gaining popularity in construction due to their strength, durability, and resistance to mold and pests. These studs, made from galvanized steel, provide a sturdy framework for attaching shelves and other heavy items to the wall. In this section, we’ll explore the benefits of using metal studs and compare them to wooden studs.
Benefits Of Using Metal Studs
Metal studs offer several advantages over traditional wooden studs. They are lightweight, easy to handle, and resistant to fire, rot, and insect damage. Additionally, metal studs are consistently straight and do not warp, ensuring a level surface for attaching shelves. Their uniform shape and size make them ideal for precise installations.
Comparing Metal Studs To Wooden Studs
When comparing metal studs to wooden studs, metal studs have a higher strength-to-weight ratio, making them capable of supporting heavier loads. Unlike wooden studs, metal studs are not susceptible to moisture absorption, reducing the risk of warping and mold growth. Furthermore, metal studs are eco-friendly, as they are often made from recycled steel and are fully recyclable at the end of their lifespan.
Tools And Materials Required
Before attaching shelves to metal wall studs, it’s essential to gather the right tools and materials. Here’s a list of what you’ll need:
Choosing The Right Drilling Bits
- Power drill
- Titanium or cobalt drill bits
- Stud finder
Selecting Anchors And Screws
- Toggle bolts
- Metal stud anchors
- Screws suitable for metal studs
- Level
- Marker
When it comes to drilling into metal wall studs, using the correct drill bits is crucial. Titanium or cobalt drill bits are best suited for boring through metal. Once you’ve drilled your pilot holes, you’ll want to use toggle bolts to safely secure heavy items to the metal stud. Additionally, when selecting anchors and screws, ensure they are suitable for metal studs to ensure a secure attachment.
Preparation Steps
To attach shelves to metal wall studs, start by using a stud finder to locate the studs. Once you’ve found the studs, mark their positions and drill pilot holes. Then, use steel stud anchors to secure the shelves to the wall, ensuring a sturdy and reliable attachment.
Locating The Metal Studs
Before attaching shelves to metal wall studs, it is important to locate the studs on your wall. Metal studs can be found using a stud finder, which is a handheld device that detects the presence of metal behind the wall surface. Start by placing the stud finder against the wall and slowly moving it horizontally until it indicates the presence of a stud. Make note of the stud’s location to ensure accurate shelf placement.
Marking The Drill Points
Once you have located the metal studs, the next step is to mark the drill points on the wall. This will ensure that the shelves are properly aligned and securely attached to the studs. Using a pencil or marker, make small marks on the wall where the drill holes will be. It is recommended to mark the center of each stud to ensure even weight distribution and stability.
When marking the drill points, consider the size and weight of the shelves. If you are planning to install heavy-duty shelves, it is advisable to use multiple drill points per stud for added support. This will help distribute the weight evenly and prevent the shelves from sagging or falling.
Remember to double-check your measurements and markings before proceeding to the drilling stage. Accuracy is key to ensure a successful installation and avoid any unnecessary damage to the wall or shelves.
By following these preparation steps of locating the metal studs and marking the drill points, you are setting yourself up for a smooth and secure installation of shelves on metal wall studs. These steps provide a solid foundation for attaching shelves that will be sturdy and reliable, allowing you to display your items with confidence.
Drilling Pilot Holes
To attach shelves to metal wall studs, start by leveling and marking holes at the center of the stud. Then, drill pilot holes and use steel stud anchors to secure the shelf. Finally, attach the shelf with female brackets and tighten set screws to ensure stability.
This method provides a secure and reliable way to hang shelves on metal studs.
Safety Tips For Drilling Metal
When it comes to drilling pilot holes into metal wall studs, safety should always be a top priority. Follow these important safety tips to ensure a smooth and accident-free drilling process:
- Wear protective goggles to shield your eyes from any flying debris.
- Use ear protection to prevent hearing damage from the noise of the drill.
- Wear gloves to protect your hands from sharp edges and to provide a better grip on the drill.
- Make sure the area is well-ventilated to avoid inhaling any harmful fumes.
Ensuring Straight And Accurate Holes
Drilling straight and accurate holes is crucial when attaching shelves to metal wall studs. Follow these steps to ensure your pilot holes are perfectly aligned:
- Start by marking the center of the stud where you want to drill the hole.
- Use a level to ensure that the mark is perfectly straight.
- Choose the appropriate drill bit for metal, such as titanium or cobalt bits.
- Insert the drill bit into the drill and position it on the marked spot.
- Apply gentle pressure and start drilling at a slow speed to prevent the bit from slipping.
- Keep the drill steady and continue drilling until the pilot hole is complete.
- Remove the drill bit and clean any metal shavings or debris from the hole.
By following these steps, you can ensure that your pilot holes are straight, accurate, and ready for the next step of attaching shelves to metal wall studs.
Installing Anchors
To attach shelves to metal wall studs, start by using a stud finder to locate the studs. Then, mark the position for the shelves and drill pilot holes into the studs. Use steel stud anchors to secure the shelves to the metal studs, ensuring a strong and stable attachment.
Types Of Anchors For Metal Studs
When attaching shelves to metal wall studs, it’s important to use the correct type of anchor to ensure that the shelves are secure and won’t come loose. There are a few different types of anchors that can be used for metal studs, including toggle bolts, self-drilling anchors, and steel stud anchors. Toggle bolts are a popular choice because they are easy to install and can support a lot of weight, while self-drilling anchors and steel stud anchors are designed specifically for use with metal studs and provide added stability.
Step-by-step Anchor Installation
To install anchors for metal wall studs, follow these simple steps:
- Level and mark the holes in the center of the stud where you want to attach the shelf.
- Using a drill, create pilot holes in the marked spots.
- Insert the recommended steel stud anchor into the pilot holes and through the stud.
- Use the recommended screws to secure the anchor to the stud.
- Attach the shelf with a female bracket and tighten set screws.
It’s important to note that when installing anchors for metal wall studs, it’s recommended to use a stud finder to ensure that you are drilling into the center of the stud. Also, make sure to use the recommended size and type of anchor for the weight of the shelf you are installing.
With these simple steps and the right type of anchor, you can easily attach shelves to metal wall studs and enjoy sturdy, secure storage.
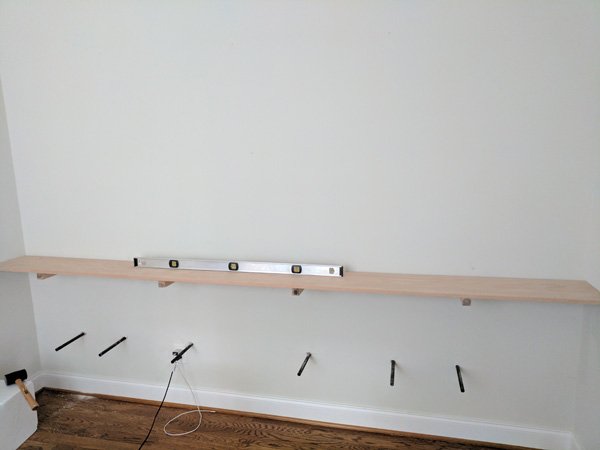
Attaching The Shelf Brackets
To attach shelves to metal wall studs, start by leveling and marking the holes at the center of the stud. Drill pilot holes and use steel stud anchors for added support. Then, drill anchors into the pilot holes through the stud and attach the shelf with a female bracket.
Finally, tighten the set screws to secure the shelf in place. Consider using toggle bolts for heavy items.
Attaching the Shelf Brackets:
Once you have located the metal wall studs and marked the spots where you want to attach the shelf brackets, it’s time to attach them to the studs. Follow these steps to ensure a secure and sturdy attachment.
H3: Aligning Brackets to Studs
Align the shelf bracket with the marks on the wall where you want to attach it. Make sure that the bracket is level and straight, using a level to confirm. Once you have confirmed that the bracket is level and straight, mark the holes on the wall where you will need to drill for the screws.
H3: Securing Brackets with Screws
Use a drill to create pilot holes in the marked spots on the metal wall studs. Be sure to use a drill bit that is appropriate for drilling into metal. Once the pilot holes have been drilled, insert steel stud anchors into the holes, making sure that they are flush with the wall.
Next, attach the shelf bracket to the metal wall stud by screwing in the recommended screws through the bracket and into the steel stud anchors. Tighten the screws until the bracket is securely attached to the metal wall stud.
H3: Attaching the Shelf
Once the brackets are securely attached to the metal wall studs, it’s time to attach the shelf itself. Slide the shelf onto the female bracket on the wall and make sure that it is level. Then, tighten the set screws on the bracket to secure the shelf in place.
Congratulations! You have successfully attached shelves to metal wall studs. Now you can enjoy your new storage space without worrying about wobbly shelves.
Mounting The Shelves
To attach shelves to metal wall studs, you will need to locate the studs using a stud finder. Once you have located the studs, mark the center of the stud and drill pilot holes. Then, use recommended steel stud anchors and screws to attach the shelves to the stud.
For heavy items, toggle bolts work best to securely anchor the shelves to the metal stud.
Ensuring Level And Stability
Before attaching shelves to metal wall studs, it is important to ensure that they are level and stable. This will prevent any wobbling or potential damage to the shelves and the items placed on them. Here are a few steps to follow:
- Using a level, check the vertical alignment of the metal wall studs. Adjust if necessary to ensure they are plumb.
- Measure and mark the desired height for the shelves on the wall studs.
- Double-check the levelness of the marked lines to ensure accuracy.
- Using a stud finder, locate the metal wall studs within the marked areas. Mark their centers with a pencil.
Attaching Shelves To Brackets
Once the metal wall studs are properly aligned and marked, it is time to attach the shelves to brackets. Follow these steps:
- Pre-drill pilot holes into the metal wall studs at the marked center points. This will make it easier to insert the screws later.
- Choose steel stud anchors that are recommended for use with metal wall studs. These anchors provide secure support for heavy shelves.
- Insert the steel stud anchors into the pre-drilled pilot holes, making sure they are flush with the wall.
- Using the appropriate screws, attach the brackets to the steel stud anchors. Make sure the brackets are level and securely fastened.
- Place the shelves onto the brackets, ensuring they are properly aligned and stable.
- If the shelves have female brackets, tighten the set screws to secure them firmly in place.
By following these steps, you can successfully attach shelves to metal wall studs, ensuring levelness and stability for your shelving units. Remember to use the recommended steel stud anchors and properly secure the brackets to ensure the shelves can support the desired weight.
Final Touches And Tips
When it comes to attaching shelves to metal wall studs, there are a few final touches and tips that can help ensure a successful installation. Checking for strength and support is crucial to ensure the stability of your shelves. Additionally, decorating tips specific to metal stud shelves can help you make the most of your space. Let’s explore these final touches and tips in more detail.
Checking For Strength And Support
Before attaching shelves to metal wall studs, it’s important to check for strength and support. Metal studs may not provide the same level of support as traditional wooden studs, so it’s essential to use appropriate anchors and hardware. Here are a few steps to follow:
- Start by using a stud finder to locate the metal studs in your wall.
- Once you’ve located the studs, check their strength by tapping on them. A solid, sturdy sound indicates a strong stud.
- If the studs feel weak or hollow, it’s best to reinforce them with additional support, such as using steel stud anchors or installing a backing board.
Decorating Tips For Metal Stud Shelves
When it comes to decorating metal stud shelves, there are a few considerations to keep in mind:
- Choose lightweight decor items: Since metal studs may not support heavy loads, opt for lightweight decor items such as small plants, books, or decorative accessories.
- Use shelf liners or mats: To prevent items from slipping or scratching the metal shelves, consider using shelf liners or mats. These can add a touch of style while protecting your shelves.
- Create a cohesive look: Coordinate the colors and materials of your decor items to create a cohesive and visually appealing display on your metal stud shelves.
By following these final touches and tips, you can ensure a strong and stylish installation of shelves on metal wall studs. Remember to always prioritize safety and choose appropriate hardware for your specific needs.
Frequently Asked Questions
Can You Install Shelves On Metal Studs?
Yes, you can install shelves on metal studs. To do so, you will need to drill pilot holes into the metal studs and use toggle bolts to secure the shelf brackets to the studs. Titanium or cobalt drill bits are best suited for boring through metal.
Once you have drilled your pilot holes, use toggle bolts to safely secure heavy items to the metal stud.
How Do You Hang Things On A Wall With Metal Studs?
To hang things on a wall with metal studs, follow these steps: 1. Level and mark the center of the stud. 2. Drill pilot holes. 3. Use steel stud anchors for added support. 4. Drill anchors into the pilot holes through the stud.
5. Use recommended screws to attach the shelf with a female bracket. 6. Tighten set screws. Remember, for heavy items, it’s best to use toggle bolts for secure anchoring.
How Do You Anchor Into A Metal Stud Wall?
To anchor into a metal stud wall, first locate the stud using a stud finder. Then, drill pilot holes and use steel stud anchors to secure your fixture. Finally, attach your shelf or bracket using recommended screws for a sturdy installation.
For heavier items, consider using toggle bolts for added support.
Can I Screw Into A Metal Stud?
Yes, you can screw into a metal stud. Drill pilot holes first, then use screws or anchors to secure items. For heavy objects, use toggle bolts for better support.
How To Attach Shelves To Metal Wall Studs?
To attach shelves to metal wall studs, use toggle bolts for heavy items and drill pilot holes for screws.
Conclusion
Attaching shelves to metal wall studs can be a simple process if you follow the right steps. By identifying the studs, drilling pilot holes, using steel stud anchors, and securely attaching the brackets, you can ensure that your shelves are stable and wobble-free.
Remember to use the appropriate screws and tighten the set screws for added security. With these techniques, you can confidently hang shelves on metal wall studs and create functional and stylish storage solutions for your space.