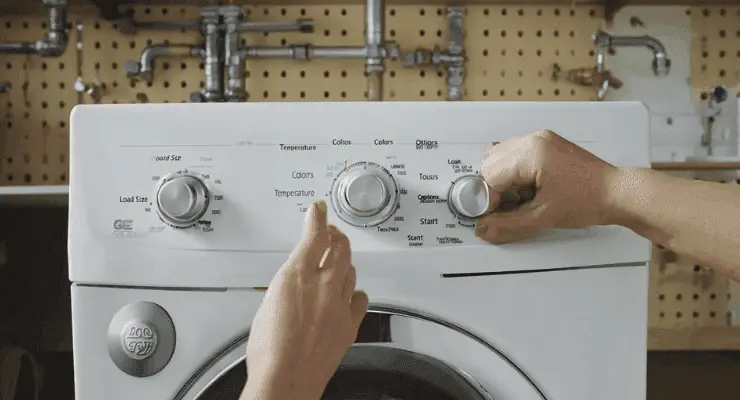
Entering the diagnostic mode on a GE top load washer involves pressing a specific sequence of buttons. This process helps identify issues with the appliance.
GE top load washers are a popular choice among households for their efficiency and reliability. They come equipped with various features and settings to cater to different laundry needs. Yet, like all appliances, they may encounter problems. The diagnostic mode is a crucial tool for troubleshooting these issues.
It allows users and technicians to quickly pinpoint the source of a problem without guesswork. Understanding how to access and use this mode can save time and effort in maintenance and repairs. This feature underscores the importance of user-friendly design in modern home appliances, enhancing the overall user experience.

Introduction To Ge Top Load Washer Diagnostic Mode
Introduction to GE Top Load Washer Diagnostic Mode
Modern appliances simplify life. The GE Top Load Washer is no exception. Understanding the diagnostic mode is vital. It helps keep your washer running smoothly.
What Is Diagnostic Mode?
Diagnostic mode is a built-in feature. It checks the washer’s health. This mode identifies issues without guesswork. Press a sequence of buttons to activate it.
Benefits Of Using Diagnostic Mode
- Time Saving: Quickly finds problems.
- Cost-Efficient: Reduces unnecessary service calls.
- Easy Troubleshooting: Guides through repair steps.
- Preventive Care: Catches issues before they worsen.
Accessing Diagnostic Mode
Diagnosing issues with a GE Top Load Washer just got easier. Accessing Diagnostic Mode is a straightforward process. It helps pinpoint problems quickly. Learn the steps to enter this mode and troubleshoot common washer issues.
Step-by-step Guide
Follow this guide to access Diagnostic Mode on your GE Top Load Washer:
- Power Off: Ensure the washer is off.
- Signal: Press and hold the “Signal” button.
- Delay Start: Press and hold the “Delay Start” button.
- Simultaneous Release: Release both buttons at the same time.
- Display Status: Look for a blinking light or error code.
Common Issues And Fixes
Common washer problems have simple fixes in Diagnostic Mode.
- Error Codes: Identify codes using the washer manual.
- Unbalanced Load: Redistribute clothes evenly.
- Drainage Issue: Check for clogs in the drain hose.
- Power Faults: Reset the circuit breaker.
For complex issues, contact professional service.
Understanding Error Codes
When your GE Top Load Washer enters diagnostic mode, it communicates through error codes. These codes highlight issues within the machine. Knowing what each code means is key to troubleshooting problems.
Common Error Codes
Error codes can seem like confusing strings of letters and numbers. Yet, they offer valuable clues to your washer’s health. Here are some you might encounter:
- UR – Unbalanced Load
- dL – Door Lock Error
- OE – Water Overflow Error
- tC – Temperature Control Error
- LE – Motor Error
Interpreting The Codes
Interpreting these codes is straightforward once you have the key. Each combination of letters and numbers correlates with a specific issue.
| Code | Meaning | Action |
|---|---|---|
| UR | Load is off balance | Redistribute clothes |
| dL | Issue with door lock | Check door mechanism |
| OE | Too much water in the machine | Inspect drain hose |
| tC | Temperature is out of range | Verify water supply temperature |
| LE | Motor is not working properly | Contact service |
Consult your washer manual or a professional with these codes. They can advise on the best steps to fix your washer.

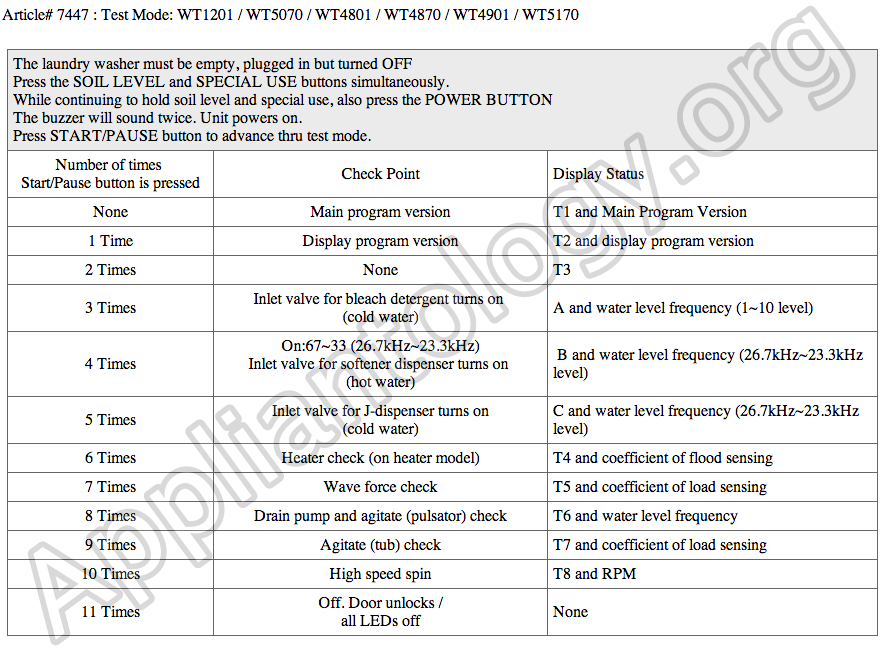
Credit: appliantology.org
Troubleshooting Common Issues
When a GE top load washer shows signs of malfunction, a diagnostic mode can be a lifesaver. It helps identify issues without guesswork. Let’s dive into common problems and their troubleshooting steps.
Water Level Problems
Incorrect water levels can disrupt washing efficiency. The washer’s diagnostic mode checks for these issues. Look for error codes on the display panel. They point to potential faults with the pressure switch or hose.
To troubleshoot, follow these steps:
- Ensure the pressure hose is not kinked or clogged.
- Check the pressure switch for functionality.
- Reset the machine to clear transient errors.
If problems persist, consult the manual or a professional.
Spin Cycle Errors
Spin cycle errors can leave clothes wet. Enter the diagnostic mode to decode these errors. Listen for unusual noises and watch for imbalanced loads. These signs indicate issues with the motor or belt.
To fix these errors:
- Check the washer for balance.
- Inspect the drive belt for wear and tear.
- Run a test cycle to confirm repairs.
Some cases may require part replacements.
Advanced Diagnostic Tests
Advanced diagnostic tests ensure your GE Top Load Washer runs smoothly. These tests can pinpoint issues with your washer’s motor and drainage system. By understanding how to perform these tests, you can quickly troubleshoot and maintain your machine’s performance.
Performing Motor Tests
Motor tests check the washer’s heart – the motor. Follow these steps:
- Enter the washer’s diagnostic mode.
- Select the motor test option.
- Listen for unusual sounds.
- Observe motor’s spinning.
A successful test shows a smoothly running motor. Any hiccups could mean a motor issue.
Checking The Drain And Pump Function
Water should drain fast and clear. Use these steps:
- Access the diagnostic mode.
- Choose the pump test.
- Watch for rapid water drainage.
- Check for pump noises.
A working pump is quiet and efficient. Blockages or noises may suggest a problem.
Resetting The Washer Post-diagnostics
After running diagnostics on your GE top load washer, a reset is crucial. This ensures your washer operates smoothly. Let’s guide you through this simple process.
Steps To Properly Reset
- Power Off: Turn off the washer.
- Unplug: Disconnect from the power source.
- Wait: Leave unplugged for one minute.
- Reconnect: Plug the washer back in.
- Power On: Turn on the washer.
- Run Cycle: Start a wash cycle to check functionality.
These steps help clear error codes. They return the washer to default settings.
When To Contact A Professional
Contact a technician if issues persist. Signs include:
- Error Codes: Recurring codes after reset.
- Strange Noises: Clunks or grinding during operation.
- Water Issues: Not filling or draining correctly.
- Electrical Faults: Unresponsive controls or displays.
A professional will diagnose and fix complex problems. Don’t attempt repairs if unsure. It can cause more harm.
Maintenance Tips To Avoid Future Issues
To keep your GE Top Load Washer running smoothly, regular upkeep is essential. Proper maintenance not only prevents future issues but also ensures your washer operates efficiently. Follow these essential tips to extend your washer’s lifespan and performance.
Regular Cleaning Routines
Buildup from detergent and fabric softener can affect your washer’s performance over time. Regular cleaning is crucial. Here’s a simple routine:
- Monthly tub cleaning with a washer-safe cleaner.
- Wipe the door seal and glass after each use.
- Clean the dispenser drawer to remove residue.
- Leave the lid open after washing to air out the tub.
Periodic Inspection And Care
Every few months, take time for a thorough inspection. This helps catch small problems before they grow. Focus on these areas:
| Component | Care Tips |
|---|---|
| Hoses | Check for cracks or leaks. Replace if needed. |
| Filters | Clean or replace to ensure good water flow. |
| Leveling feet | Adjust to keep the washer stable. |
Remember to unplug the washer before any inspection.
Real-life Success Stories
Many users share their success with the GE Top Load Washer Diagnostic Mode. These stories inspire confidence in this handy tool. Let’s explore real-life cases where diagnostic mode made a difference.
Case Study: Overcoming The Spin Cycle Challenge
One user faced a spin cycle issue. The washer wouldn’t spin, leaving clothes soaking wet. The user felt stuck.
They turned to the diagnostic mode for help. This feature provided error codes that pinpointed the malfunction. It was a faulty lid switch.
With the problem identified, the user replaced the switch. The washer ran like new after the fix. The diagnostic mode turned a guesswork situation into a straightforward repair.
Testimonial: How Diagnostic Mode Saved Time And Money
A testimonial comes from a busy parent with piles of laundry. The washer started acting up, a major inconvenience.
The diagnostic mode came to the rescue. It quickly identified an error with the water level sensor.
The parent followed online guides to clean the sensor. It was a simple, cost-effective solution. This quick fix saved a service call and got the laundry back on track.
These stories highlight the value of the GE Top Load Washer Diagnostic Mode. It empowers users to solve problems efficiently. Users save time and avoid extra costs.
Frequently Asked Questions
How Do I Put My Ge Washing Machine In Diagnostic Mode?
To enter diagnostic mode on your GE washing machine, first ensure the appliance is off. Then, simultaneously press and hold the “Start” and “Rotate” buttons. After a few seconds, the machine will enter diagnostic mode, indicated by a series of blinking lights or a beep.
How To Reset A Ge Top Load Washer?
To reset a GE top load washer, unplug the machine for one minute. Then, reconnect the power. Open and close the lid six times within a 12-second window to complete the reset.
How Do You Read A Fault Code On A Ge Washer?
To read a fault code on a GE washer, first locate the washer’s display panel. Then, press and hold specific buttons (usually “Start” and “Pause”) simultaneously for a few seconds until the fault code appears on the display. Each code identifies a specific issue for troubleshooting.
How To Calibrate Ge Top Load Washer?
To calibrate your GE top load washer, press and hold the “Start” button for 3 seconds. Release when the display indicates calibration mode. Wait for the cycle to finish. This process optimizes washer performance. Ensure the drum is empty before starting.
How To Enter Ge Washer Diagnostic Mode?
GE top load washers enter diagnostic mode by pressing a series of buttons on the control panel. Specific sequences vary by model, so consult the manual for instructions tailored to your washer.
Conclusion
Navigating the diagnostic mode of your GE top load washer can seem daunting, but it’s a vital step in maintaining the machine’s health and efficiency. By understanding the signals and codes, you can quickly address issues and keep your laundry routine running smoothly.
Remember, timely troubleshooting saves time and extends the life of your appliance.


