Dymo Label Maker Troubleshooting can be tricky but manageable. Label makers simplify organization, but issues can arise.
Are you facing problems with your Dymo label maker? From jammed labels to unclear prints, these issues can hinder productivity. Understanding common problems and their solutions can save time and frustration. This guide will help you troubleshoot your Dymo label maker efficiently.
Whether it’s a technical glitch or a simple fix, you’ll find practical tips to resolve the issues. Read on to learn how to keep your label maker running smoothly and get back to your labeling tasks with ease.
Common Issues
Common Issues with the Dymo Label Maker can be frustrating. But most problems are easy to fix. This section covers some of the most common issues you might face. Learn how to solve them quickly and get back to your labeling tasks.
Label Jam
Label jams are a frequent issue. They can stop your work. If you experience this, follow these steps:
- Turn off the Dymo Label Maker.
- Open the label compartment.
- Gently remove the jammed label.
- Check for any small pieces left inside.
- Close the compartment and turn the device back on.
If the problem persists, clean the rollers. This can help prevent future jams.
Poor Print Quality
Poor print quality can make labels hard to read. Here are some solutions:
- Check the label tape: Ensure you’re using the right tape for your model.
- Clean the print head: Use a soft cloth and isopropyl alcohol.
- Replace the batteries: Low battery power can affect print quality.
Make sure the label maker is not exposed to extreme temperatures. High or low temperatures can also affect print quality.
Label Feeding Problems
Label feeding issues can disrupt your work. Follow these steps to fix them:
- Ensure the label tape is properly loaded.
- Check for any obstructions in the tape path.
- Clean the feed rollers with a soft cloth.
- Make sure the tape is the correct type for your label maker.
If the label is still not feeding correctly, reset the device. This can sometimes solve the problem.
Basic Troubleshooting
Experiencing issues with your Dymo Label Maker can be frustrating. But often, basic troubleshooting can resolve common problems. This section will guide you through essential steps to get your device back in working order.
Restarting The Device
Begin by restarting your Dymo Label Maker. Power off the device and unplug it from the power source. Wait for about 10 seconds before plugging it back in. Turn on the device and check if the issue persists. This simple step can often resolve minor glitches.
Checking Connections
Ensure all cable connections are secure. Check the power cord and USB cable (if applicable). Loose or damaged cables can cause connectivity issues. If using a battery-operated model, confirm that the batteries are correctly installed and have sufficient charge.
| Connection Type | Action |
|---|---|
| Power Cord | Ensure it’s firmly plugged in |
| USB Cable | Check both ends for secure connection |
| Batteries | Check installation and charge |
Updating Firmware
Outdated firmware can cause operational issues. Visit the Dymo website to download the latest firmware for your model. Follow the instructions to install the update. Keeping firmware up-to-date can improve performance and fix bugs.
- Visit the Dymo website
- Find the firmware section
- Download the latest version
- Follow the installation instructions
Regular updates can prevent many common issues.
Label Jam Solutions
Label jams in your Dymo label maker can be quite frustrating. They interrupt your workflow and waste labels. This guide will help you clear jams and prevent them in the future. Follow these steps to keep your label maker running smoothly.
Clearing The Jam
First, turn off your label maker. This prevents any accidental damage. Next, open the label compartment. Look for the jammed label. Gently pull the label out. If the label is stuck, use a pair of tweezers. Be careful not to damage the internal parts.
After removing the jammed label, inspect the rollers. Make sure there are no small pieces left. Use a soft cloth to clean the rollers. This ensures smooth operation. Close the label compartment. Turn on the label maker and test it with a new label.
Preventing Future Jams
To prevent future jams, follow these simple tips. First, always use compatible labels. Mismatched labels can cause jams. Second, store your labels in a cool, dry place. Humidity can affect label quality.
| Tip | Description |
|---|---|
| Use Compatible Labels | Ensures smooth operation without mismatched labels. |
| Store Labels Properly | Keep labels in a cool, dry place to maintain quality. |
Third, load labels properly. Follow the manufacturer’s instructions. Ensure the labels are aligned correctly. Fourth, clean the label maker regularly. Dust and debris can cause jams. Use a soft cloth to wipe down the exterior and interior.
- Use compatible labels
- Store labels properly
- Load labels correctly
- Clean the label maker regularly
By following these tips, you can avoid label jams. Keep your Dymo label maker in good condition. Enjoy smooth and efficient labeling.
Credit: www.dymo-label-printers.co.uk
Improving Print Quality
Having trouble with your Dymo Label Maker print quality? This section will help you improve print quality. Follow these steps for clear, sharp labels.
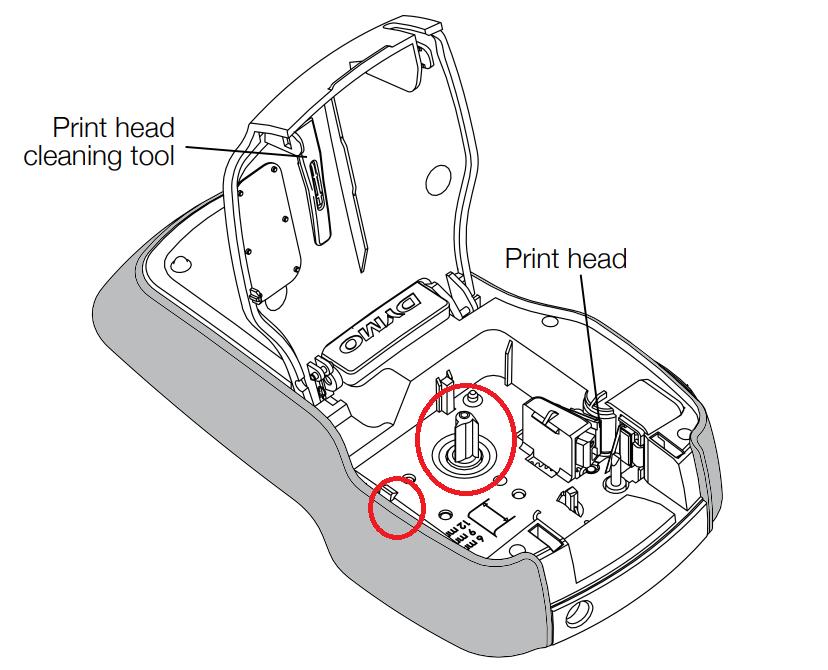
Cleaning The Print Head
A dirty print head can cause poor print quality. Cleaning the print head regularly is essential.
To clean the print head:
- Turn off the label maker.
- Open the label maker cover.
- Use a cotton swab dipped in isopropyl alcohol.
- Gently clean the print head.
- Let it dry for a few minutes.
- Close the cover and turn on the label maker.
Clean the print head every few months for best results.
Adjusting Print Settings
Sometimes, adjusting the print settings can improve print quality. Check the settings and make necessary changes.
To adjust print settings:
- Go to the settings menu on your label maker.
- Check the print density option.
- Increase the print density for darker prints.
- Decrease the print density for lighter prints.
- Print a test label to check the quality.
Finding the right print settings can take a few tries. Be patient and adjust until you get the desired print quality.
Following these steps can help in maintaining optimal print quality for your Dymo Label Maker. Happy labeling!
Fixing Label Feeding Issues
Having problems with your Dymo label maker can be frustrating. Especially when the labels don’t feed correctly. This section will help you fix common label feeding issues. Follow these steps to get your label maker working smoothly again.
Realigning The Labels
If your labels are not feeding correctly, they might be misaligned. Follow these steps to realign your labels:
- Turn off your Dymo label maker.
- Open the label compartment.
- Remove the label roll.
- Check for any stuck labels or debris and remove it.
- Place the label roll back, ensuring the labels are aligned with the guides.
- Close the compartment and turn the label maker back on.
Realigning the labels can fix many feeding issues. If the problem persists, try replacing the label roll.
Replacing The Roll
Sometimes, the label roll may be the problem. Replace the roll with a new one:
- Turn off your Dymo label maker.
- Open the label compartment and remove the old roll.
- Inspect the roll holder for any dust or debris and clean it if necessary.
- Get a new label roll and insert it into the holder.
- Ensure the roll is aligned correctly with the guides.
- Close the compartment and turn the label maker back on.
Using a new roll often solves feeding issues. Make sure to use compatible Dymo labels for the best results.
Software Troubleshooting
Software issues with your Dymo Label Maker can be frustrating. But, fixing them is often straightforward. This section will guide you through the process of resolving common software-related problems.
Reinstalling Drivers
Sometimes, the drivers for your Dymo Label Maker might get corrupted or outdated. Reinstalling the drivers can solve many issues.
- First, uninstall the existing drivers from your computer.
- Go to the Dymo website and download the latest drivers.
- Install the new drivers by following the on-screen instructions.
After reinstalling, restart your computer. This helps to ensure that the new drivers are properly loaded.
Resolving Software Conflicts
Software conflicts can arise when other applications interfere with your Dymo Label Maker software.
Follow these steps to resolve software conflicts:
- Close all other applications running on your computer.
- Open the Task Manager and end any unnecessary processes.
- Restart the Dymo software to see if the problem is fixed.
If the problem persists, consider checking for updates for both the Dymo software and your operating system. Keeping all software up to date is crucial for smooth operation.
| Action | Description |
|---|---|
| Uninstall Drivers | Remove current drivers from your system. |
| Download Latest Drivers | Get the newest drivers from the Dymo website. |
| Install Drivers | Follow instructions to install the new drivers. |
| Close Applications | Shut down other running applications to avoid conflicts. |
| End Processes | Use Task Manager to end unnecessary processes. |
Advanced Tips
Advanced tips for troubleshooting your Dymo Label Maker can save you time and frustration. These tips help keep your device running smoothly. They also ensure clear, professional-looking labels every time. Let’s dive into some expert advice.
Using High-quality Labels
High-quality labels ensure better performance. Cheap labels can cause jams or fade quickly. Always choose labels designed for your specific Dymo model. This ensures compatibility and longevity. Store your labels in a cool, dry place. This prevents adhesive issues and extends shelf life. Avoid exposing labels to direct sunlight. It can weaken the adhesive and cause peeling.
Maintaining The Device
Regular maintenance keeps your Dymo Label Maker in top shape. Clean the print head with a cotton swab and isopropyl alcohol. Do this every few months or after heavy use. This prevents print quality issues and prolongs the device’s life. Check for any paper jams or debris inside the machine. Remove any obstructions carefully to avoid damage.
Update your Dymo software regularly. This ensures compatibility with new labels and improves performance. Store your label maker in a dry, dust-free environment. This protects the internal components and reduces wear and tear. Regularly inspect the power cord and battery compartment. Replace damaged cords or batteries to avoid malfunctions.

Credit: www.ifixit.com
Contacting Support
Experiencing issues with your Dymo Label Maker? Sometimes, the solution isn’t clear. Contacting Support can be your best option. This section provides steps for reaching out to Dymo’s support team for help.
When To Seek Help
Not all problems need expert help. But certain issues do. Here are some common instances:
- Device won’t turn on even after charging.
- Labels are printing incorrectly or are unreadable.
- Software issues that you can’t resolve.
- Error messages you don’t understand.
If your issue matches any of these, it’s time to contact support.
Providing Relevant Information
When contacting support, provide clear details. This helps them assist you faster. Here’s what to include:
- Model Number: Find this on the device or in the user manual.
- Error Messages: Include any codes or messages you see.
- Steps Already Taken: Mention any troubleshooting steps you’ve tried.
- Purchase Information: Date and place of purchase can be helpful.
Here’s a sample template you can use:
Subject: Issue with Dymo Label Maker [Model Number]
Message:
Hello Support Team,
I am experiencing an issue with my Dymo Label Maker [Model Number].
The problem is [Describe the issue].
I have tried [List troubleshooting steps].
I purchased the device on [Date of Purchase] from [Place of Purchase].
Please assist me in resolving this issue.
Thank you.
Providing this information ensures a quicker response from the support team.
Credit: www.youtube.com
Frequently Asked Questions
How To Fix Dymo Label Maker Not Printing?
Check the power and USB connections. Ensure the label roll is correctly inserted. Restart the printer.
Why Are My Dymo Labels Printing Blank?
Ensure the labels are compatible. Clean the print head. Check the print settings in the software.
What To Do If Dymo Label Maker Jams?
Turn off the machine. Open the cover and gently remove the jammed labels. Reload labels correctly.
How To Replace Dymo Label Maker Batteries?
Open the battery compartment. Remove old batteries. Insert new ones following the polarity marks. Close the compartment.
Can I Use Third-party Labels In Dymo Label Maker?
It’s best to use Dymo labels. Third-party labels may cause issues or void your warranty.
Conclusion
Troubleshooting your Dymo Label Maker can be simple with the right steps. Always start with basic checks like power and connections. Clean the print head regularly to avoid issues. Use compatible labels to ensure smooth printing. Follow the manual for detailed guidance.
If problems persist, contact Dymo support for help. Keep your label maker in good condition for best results. Happy labeling!