You’ve just replaced the wax ring on your toilet, expecting everything to work smoothly. But now, you notice water pooling around the base, and your heart sinks.
You may be wondering, “What went wrong? ” You’re not alone, and the good news is, you’re in the right place to find solutions. A leaking toilet can be frustrating and even a bit daunting, but don’t worry. This article is here to guide you through understanding why your toilet might be leaking after replacing the wax ring and how you can fix it.
Imagine the relief of having your bathroom back to its clean, dry state, and let’s get started on making that a reality. Keep reading, because the answer to your problem might be simpler than you think.
Identifying The Problem
A toilet leaking from the base after replacing a wax ring signals a problem needing quick attention. Possible causes include improper installation, damaged flange, or a misaligned wax ring. Identifying the exact issue ensures a swift solution, preventing further damage and unnecessary water loss.
Toilet leaking from the base can be a frustrating issue, especially if you’ve just replaced the wax ring. Identifying the problem is the first step to resolving it and avoiding further damage to your bathroom floor. But how do you know what’s causing the leak, and what signs should you look for?Common Causes Of Leaks
After replacing a wax ring, a leak might occur due to several reasons. A misaligned wax ring is a frequent cause. If it’s not centered properly, it won’t seal the toilet to the floor flange correctly. Another common issue is a damaged flange. If it’s cracked or broken, it won’t hold the wax ring tightly in place, leading to leaks. An uneven floor can also prevent a proper seal, allowing water to escape.Symptoms Of A Faulty Wax Ring
Have you noticed water pooling around the base of your toilet after flushing? That’s a telltale sign of a faulty wax ring. You might also detect a persistent sewage odor in your bathroom. This smell indicates that the seal has been compromised, allowing gases to seep through. Are there any signs of mold or mildew around the toilet base? These often develop when water leaks provide a damp environment, suggesting the wax ring isn’t doing its job. Remember when I replaced my wax ring, only to find a puddle on the floor the next day? It turned out my flange was slightly cracked. Learning from my mistake, I now always double-check the flange’s condition before installing a new wax ring. Have you checked yours lately?
Credit: www.reddit.com
Necessary Tools And Materials
Replacing the wax ring on a toilet seems straightforward. Yet, a leak can appear at the base. Proper tools and materials prevent this issue. The right equipment ensures a tight seal and prevents future leaks.
Basic Plumbing Tools
A wrench helps loosen and tighten bolts. A screwdriver assists in removing the toilet seat. A putty knife scrapes away old wax. Gloves keep hands clean during the process. A bucket catches water from the toilet base. It’s essential for keeping your work area dry.
Recommended Sealants And Rings
Choose a high-quality wax ring. It provides a strong, reliable seal. Rubber rings offer more flexibility. They adapt better to different surfaces. Consider using a silicone sealant. It enhances the wax ring’s effectiveness. It creates an extra barrier against leaks. Make sure all materials are compatible. This ensures a proper fit and seal.
Preparation Steps
Troubleshooting a toilet leaking from the base after replacing the wax ring involves checking for misalignment and ensuring a secure fit. Tighten bolts evenly to prevent wobbling and confirm the toilet sits flush with the floor. Inspect the wax ring for damage and replace it if necessary.
When you notice a toilet leaking from the base after replacing the wax ring, it’s essential to approach the problem methodically. Preparation is key to ensuring a successful fix, preventing further damage, and saving yourself from frustrating repeat efforts. The steps you take before tackling the issue can make all the difference. Let’s delve into these preparation steps to guide you through a smooth repair process.Turning Off Water Supply
First, you need to stop the flow of water to your toilet. Locate the water shut-off valve, usually found behind the toilet on the wall. Turn it clockwise to cut off the water supply. It’s a straightforward step, but crucial to prevent any mess during the repair. You might find yourself thinking, “Why didn’t I do this sooner?” as water pooling around your feet is never a pleasant surprise.Safely Removing The Toilet
Removing the toilet requires care and precision. Begin by flushing the toilet to empty the tank and bowl. Use a sponge or towel to soak up any residual water. Next, unscrew the bolts securing the toilet to the floor. Keep a container nearby to hold these bolts, so they don’t disappear into the abyss of lost tools. Lifting the toilet is best done with a partner. It’s not just about strength; it’s about balance and maneuvering without damaging the floor or the toilet itself. As you lift, ponder the last time you engaged in this kind of teamwork; it can be surprisingly rewarding. Preparation involves these strategic steps, ensuring you’re ready for the next phase of fixing that stubborn leak. Have you ever thought about how these simple tasks can make such a significant impact?Inspecting The Wax Ring
A leaking toilet can be a real nuisance, especially after replacing the wax ring. Inspecting the wax ring can help pinpoint the issue. This step is crucial in ensuring a proper seal between the toilet and the drain. Without a proper seal, water may leak from the base, causing damage.
Understanding what to look for can save time and money. It can also prevent further issues. Let’s delve into the inspection process.
Checking For Damage
First, examine the wax ring for any visible damage. Look for cracks or deformities. These can cause leaks. A damaged wax ring often fails to form a tight seal. It may need replacing if compromised. Use a flashlight to get a clear view. This helps identify hidden issues.
Verifying Proper Installation
Ensure the wax ring was installed correctly. Check if it’s centered on the flange. Misalignment can lead to leaks. The toilet should rest evenly on the floor. Gaps indicate improper installation. Tighten the bolts evenly to secure the toilet.
Carefully reinstall the toilet if needed. This ensures the wax ring forms a complete seal. Proper installation prevents future leaks.
Replacing The Wax Ring
Experiencing leaks after replacing a toilet’s wax ring can be frustrating. Ensure the ring is correctly positioned and the toilet is properly seated. Tighten bolts evenly to prevent wobbling and further leaks.
Replacing the wax ring under your toilet can seem like a simple task, but it can become a bit tricky if not done correctly. If you’ve noticed a leak at the base of your toilet after replacing the wax ring, you’re not alone. Many homeowners face this issue, often due to small oversights during the installation process. By selecting the right wax ring and following the proper steps for installation, you can ensure a leak-free toilet.Selecting The Right Wax Ring
Choosing the correct wax ring is crucial. There are different thicknesses available, and using the wrong one can lead to leaks. Consider the height of your toilet flange. If it’s flush with the floor, a standard wax ring will suffice. However, if the flange is recessed, you may need a thicker or double-thick wax ring. Don’t underestimate the importance of quality. Opt for a trusted brand to ensure durability and a tight seal. Have you ever noticed how cheaper options often end up costing more in the long run?Steps For Proper Installation
Begin by removing the old wax ring completely. Ensure the flange and the bottom of the toilet are clean and dry. Place the new wax ring on the toilet outlet, not on the flange. This reduces the chance of misalignment. Position the toilet carefully over the flange. Lower it slowly, ensuring it aligns perfectly with the bolt holes. Apply even pressure to compress the wax ring and create a watertight seal. Finally, tighten the bolts gradually, alternating sides to maintain balance. Over-tightening can crack the base, so stop once the toilet feels stable. Have you ever tried tightening a bolt too much and ended up damaging what you were working on? It’s a common mistake to avoid here. These steps might seem straightforward, but attention to detail makes all the difference. Next time you tackle this task, remember the importance of selecting the right materials and taking your time with installation.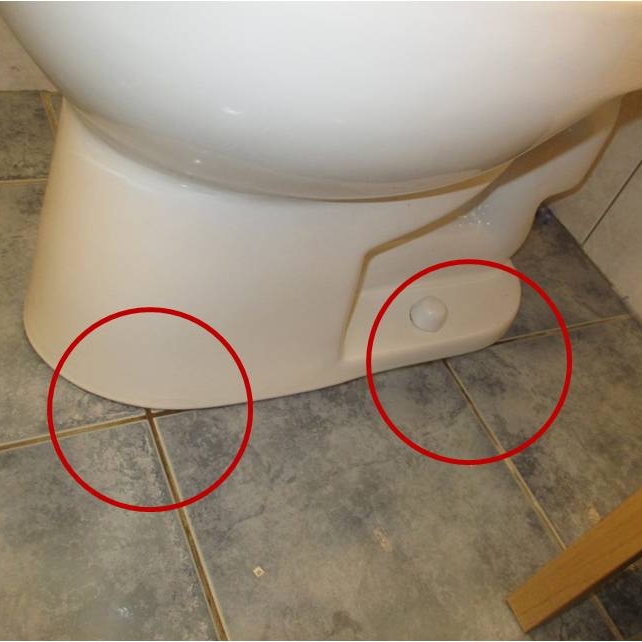
Credit: www.jimmyjoesplumbing.com
Reinstalling The Toilet
Experiencing a toilet leak after replacing a wax ring can be frustrating. This issue often occurs due to improper installation or a damaged wax ring. Ensure the toilet sits evenly and tightly on the flange to prevent leaks.
Reinstalling the toilet after replacing the wax ring can seem daunting, but it doesn’t have to be. Whether you’re a seasoned DIY enthusiast or tackling this for the first time, getting the toilet back in place securely is crucial to avoid any further leaks. A slip here or a misalignment there can lead to messy and costly repairs. Let’s walk you through the key steps to ensure your toilet is reinstalled correctly and snugly.Positioning The Toilet Correctly
Positioning the toilet correctly is the first step in a seamless reinstall. Before you lift the toilet, clean the flange and the surrounding area to ensure a clear, debris-free surface. Carefully lower the toilet over the flange, aligning the bolt holes on the base of the toilet with the flange bolts. A friend or a family member can help guide you, especially if the toilet is heavy or if you’re doing this for the first time. Take a moment to check the alignment from different angles. The toilet should be parallel to the back wall and the sides should be equidistant from the walls. This ensures not only a good fit but also a visually pleasing setup.Ensuring A Secure Fit
Once the toilet is properly positioned, securing it is your next task. Gently press down on the bowl to compress the wax ring and create a seal. Remember, too much pressure can crack the porcelain, so apply even, gentle pressure. Tighten the bolts using a wrench but be careful not to overtighten as this can also damage the porcelain. A good rule of thumb is to tighten each bolt a little at a time, alternating between bolts to maintain balance. To test the fit, give the toilet a gentle rock. It should feel stable with minimal movement. If it wobbles, the wax ring may not be seated properly, or the floor may be uneven. Adjust as needed to achieve that perfect fit. Have you ever dealt with a wobbly toilet and wondered if you missed a step? Ensuring the fit is secure prevents leaks and gives you peace of mind. A little patience and precision here can save you from future headaches.Testing For Leaks
Testing for leaks is a crucial step after replacing the wax ring on your toilet. Even after a successful installation, hidden leaks can cause significant damage over time. By proactively checking for leaks, you can save yourself from potential headaches and costly repairs.
Checking For Seepage
After replacing the wax ring, it’s important to check for any seepage around the base of your toilet. Start by drying the area thoroughly with a towel. Make sure no water is already present to ensure an accurate test.
Place tissue or paper towels around the base. This simple trick can help you detect even the slightest moisture. Check back in a few hours. If the paper is damp, you might have a leak that needs addressing.
It’s easy to overlook small leaks. However, they can lead to larger issues like floor damage or mold growth. Always keep a vigilant eye on any signs of seepage.
Monitoring Water Levels
Water levels in your toilet can tell you a lot about potential leaks. After flushing, watch the water level in the bowl. It should stabilize within a few seconds.
If the water level drops slowly over time, this could indicate a leak. Pay attention to how often you need to refill the tank. Frequent refills might be a red flag.
Use a pencil to mark the water level in the tank when full. Check it after a couple of hours. If the water has dropped, it’s time to investigate further.
Have you ever dealt with a sneaky toilet leak? How did you find and fix it? Sharing your experience can help others facing similar issues.

Credit: www.reddit.com
Preventive Measures
Toilet leaks can be frustrating and costly. They often occur after replacing a wax ring. Preventive measures can save you from such hassles. Proper care can ensure a long-lasting seal. This section will guide you through simple steps to prevent leaks.
Regular Maintenance Tips
Regular checks can help spot issues early. Inspect the toilet base for water stains. Check for any wobbling or movement. Tighten the bolts holding the toilet in place. Ensure the toilet sits firmly on the floor. Clean the area around the toilet regularly. This helps in spotting new leaks quickly.
Listen for any unusual sounds. Gurgling or hissing can indicate problems. Address any issues as soon as they arise. Early action can prevent major repairs. Replace worn parts promptly to avoid future leaks.
Avoiding Future Leaks
Choose quality materials for toilet repairs. A good wax ring ensures a tight seal. Avoid using old or damaged rings. Ensure the floor is dry before installation. This helps the wax ring adhere properly.
Avoid overtightening the bolts. It can crack the toilet base. Use a level to check the toilet’s position. Ensure it is perfectly level. An uneven toilet can cause leaks. Place a rubber mat under the toilet. It provides extra grip and prevents movement.
Frequently Asked Questions
Why Is My Toilet Leaking After Wax Ring Replacement?
A misaligned wax ring or loose bolts often cause leaks. Ensure the toilet is seated properly.
How Can I Fix A Leaking Toilet Base?
Check for proper alignment. Tighten bolts. Consider using a new wax ring or repair kit.
Should I Replace The Wax Ring Again?
If the leak persists, replacing the wax ring may be necessary. Make sure to follow installation instructions carefully.
What Tools Do I Need To Fix The Toilet Leak?
You’ll need a wrench, screwdriver, and possibly a new wax ring or repair kit. Basic tools.
Can Improper Installation Cause Toilet Leaks?
Yes. Incorrectly installing the wax ring or not securing bolts can lead to leaks. Double-check your work.
Conclusion
Fixing a toilet leak after replacing the wax ring can be tricky. But remember, patience is key. Check for cracks and tighten bolts properly. Ensure the wax ring is aligned. A secure fit stops leaks. Consider calling a plumber if unsure.
Regular maintenance helps prevent future issues. Take action quickly to avoid water damage. Keep your bathroom dry and hygienic. With these tips, you can handle minor leaks confidently. Your toilet will soon be leak-free. Happy plumbing!