You’re ready to hang that cherished piece of art or install a shelf, but there’s one big problem—your stud finder isn’t working. Frustrating, right?
You’re not alone. Many people face this issue, often unsure of what steps to take next. But don’t worry, because help is at hand. This article will guide you through the common reasons why your stud finder might be letting you down and offer simple solutions to get it back on track.
By the end, you’ll be equipped with practical tips to ensure your next DIY project is smooth sailing. Curious to find out more? Let’s dive in and tackle this challenge together!
Common Stud Finder Issues
Stud finders can sometimes be tricky to use. They seem simple, but often, they don’t work as expected. Many users face problems that are easy to fix. Understanding these common issues can save time and frustration. Let’s explore some frequent problems.
Battery Problems
Dead batteries are a common reason for stud finder failures. Weak batteries reduce effectiveness. Always check the battery before use. Ensure it’s inserted correctly. A fresh battery can solve many issues. Also, keep spare batteries handy.
Calibration Errors
Proper calibration is essential for accurate results. Many stud finders require calibration before use. Forgetting this step leads to wrong readings. Follow the device instructions carefully. Calibrate it on a clear wall. This ensures precise detection.
Sensitivity Settings
Sensitivity settings can affect performance. High sensitivity might detect wires or pipes. Low sensitivity can miss studs entirely. Adjust the setting based on the wall material. Experiment to find the best setting. This improves accuracy significantly.
Preparing Your Stud Finder
Getting your stud finder ready ensures it works properly. This simple tool helps locate wall studs efficiently. Before starting, check if your device is in good shape. Proper preparation is crucial for accurate results.
Checking Power Source
Ensure the stud finder has working batteries. Dead batteries can cause the tool to malfunction. Replace old batteries with fresh ones. Check battery contacts for corrosion. Clean them if needed. This simple step avoids unnecessary issues.
Cleaning Sensor Area
Keep the sensor area clean for precise readings. Dust and debris can affect the sensor’s accuracy. Wipe the sensor gently with a soft cloth. Avoid using harsh chemicals. They might damage the sensor. Regular cleaning maintains the tool’s efficiency.
Optimizing Wall Conditions
Optimizing wall conditions is key to ensuring your stud finder works effectively. Understanding your wall’s characteristics can prevent detection errors. A stud finder may struggle on walls with unusual surfaces or materials. Preparing the wall can help the device locate studs accurately.
Identifying Wall Type
The first step is knowing your wall type. Drywall, plaster, and concrete require different approaches. Drywall is common in modern homes, and stud finders work well on it. Plaster walls may contain wire mesh, complicating stud detection. Concrete walls are dense and often require specialized tools. Identifying the material helps tailor your approach.
Avoiding Obstructions
Obstructions can hinder stud finder performance. Electrical wires and metal pipes often interfere with signals. Check for these before starting. Move the stud finder slowly to avoid false readings. Objects within the wall can confuse the device. Clear the area of potential obstructions for accurate detection.

Credit: diy.stackexchange.com
Advanced Troubleshooting Techniques
Troubleshooting a non-working stud finder involves checking battery connections, ensuring sensor calibration, and scanning technique adjustment. Confirm proper surface contact and sensitivity settings for accurate stud location. Regular maintenance can improve device reliability and functionality.
When your stud finder seems to have a mind of its own and just won’t cooperate, it’s easy to feel stuck. However, before you give up and call in a professional, there are some advanced troubleshooting techniques you can try. These methods might just reveal the hidden studs in your walls and save you time and frustration.Using Alternative Methods
If your electronic stud finder isn’t working, try using a magnetic stud finder. These devices rely on the magnetic pull of nails or screws in the studs. They can be a bit slower, but they’re reliable. Another method involves using a small nail or a pin. Lightly tap it into the wall and listen for a change in sound. A solid sound usually indicates the presence of a stud. Lastly, consider using a flashlight. Shine it across the wall to spot any slight indentations or bumps which may indicate a stud’s location.Cross-checking With Manual Techniques
Trust your instincts and your senses. Knocking on the wall can help you detect a change in sound, which often signifies a stud. A hollow sound indicates no stud, while a solid sound suggests you’ve found one. Measure from a corner or outlet. Most studs are spaced 16 to 24 inches apart. By measuring from a known stud, you can estimate where the next one might be. Don’t overlook the power of a tape measure. Many homes are built with consistent stud spacing. By measuring out and marking these intervals, you can cross-check your findings. Have you ever wondered why manual techniques sometimes feel more reliable? Perhaps it’s because they engage your senses in a way that electronic devices don’t. Troubleshooting your stud finder doesn’t have to be a tech nightmare. By using a mix of alternative methods and manual techniques, you can improve accuracy and efficiency. Remember, a little patience and creativity can go a long way in home improvement tasks. Have you tried these methods before? What worked best for you?Maintenance Tips
Maintaining your stud finder ensures it works efficiently. Regular upkeep can prevent malfunctions. Here are some simple maintenance tips to keep your device in top shape. Read on to learn about proper care.
Regular Calibration
Calibrate your stud finder regularly. This keeps it accurate. Follow the manufacturer’s instructions. This simple step ensures precise readings. Calibration avoids false readings on walls.
Proper Storage
Store your stud finder in a dry place. Moisture can damage its sensors. Keep it away from extreme temperatures. This prevents internal damage. Use a protective case for added safety.

Credit: www.quora.com
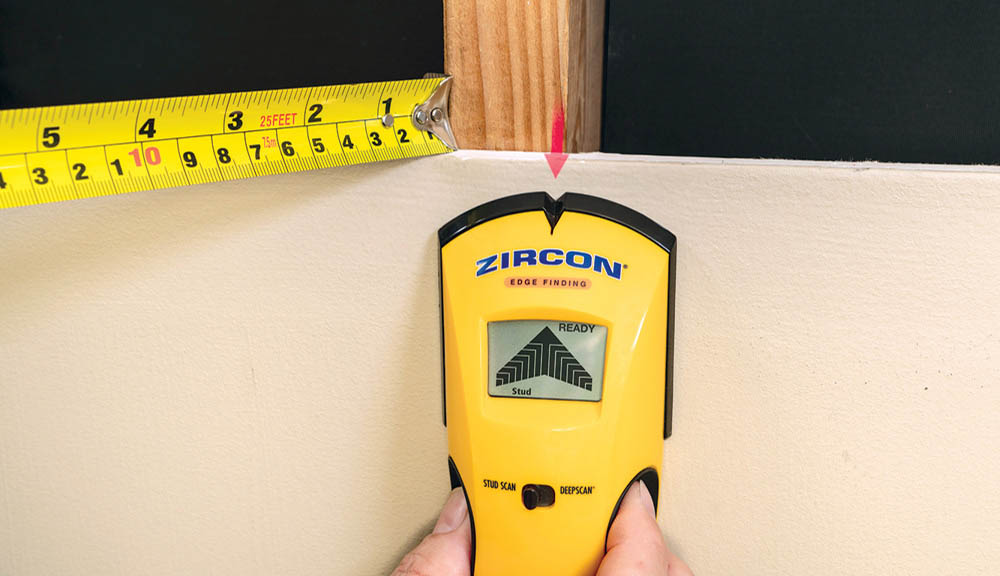
Credit: www.zircon.com
Frequently Asked Questions
Why Is My Stud Finder Not Detecting Studs?
Stud finders may not detect studs due to low battery, thick walls, or incorrect settings.
How Do I Fix A Faulty Stud Finder?
Check the batteries. Ensure it’s properly calibrated. Adjust for different wall materials if needed.
Can Stud Finders Work Through Thick Plaster Walls?
Yes, but some stud finders struggle with thick plaster. Choose one designed for deeper scanning.
What Alternatives Exist If My Stud Finder Fails?
Use a magnet to find nails. Tap the wall to listen for solid areas.
Are Electronic Stud Finders More Reliable?
Electronic stud finders often give better results. They detect density changes within the wall.
Conclusion
A faulty stud finder can be frustrating. These tools often stop working due to low batteries or sensor issues. Double-check battery connections first. If that doesn’t help, clean the sensor area gently. Sometimes, recalibrating the device solves the problem. You might also want to check the user manual for specific guidance.
If the problem persists, consider contacting customer support. Or explore purchasing a new model if it’s old. Reliable stud finders save time and effort. A working tool ensures accurate results and makes home projects smoother. So, keep your stud finder in good condition for the best outcomes.