A leaky saddle valve can quickly turn into a homeowner’s nightmare, causing water damage and unnecessary stress. You might have noticed a small puddle forming under your sink or a suspicious damp spot on your ceiling, leading you to wonder, “What’s causing this mess?”
If you’re facing the frustrations of a saddle valve leak, you’re not alone. These little devices, intended to make water access easy, can sometimes be the culprit behind unexpected leaks. But don’t worry—understanding why your saddle valve is leaking and how to fix it can save you time, money, and a whole lot of hassle.
We’ll dive deep into the reasons behind saddle valve leaks, explore simple solutions, and help you prevent future problems. Keep reading to discover how you can take control of your plumbing woes and restore peace of mind in your home.

Credit: www.youtube.com
Identifying Saddle Valve Leaks
Spotting a saddle valve leak involves checking for moisture around the valve. Look for rust or water stains on pipes. Inspect the valve for dripping water or dampness.
Identifying saddle valve leaks can be a straightforward task if you know what to look for. If you’ve ever noticed a mysterious puddle around your pipes, you’re not alone. Many homeowners overlook small signs until they turn into costly problems. So, how do you determine if your saddle valve is the culprit?Common Signs Of Leakage
The first step in identifying a leak is recognizing the symptoms. Is there water pooling under your sink or near your appliances? This could indicate a slow drip from a saddle valve. Listen for a faint hissing sound, especially if you suspect a small leak. A damp or musty smell can also be a clue that water is escaping somewhere it shouldn’t. Check for corrosion or rust around the valve. This can be a telltale sign that water has been leaking for a while, even if you can’t see it directly.Tools Needed For Inspection
You don’t need a lot of tools to inspect a saddle valve leak. A flashlight is essential for spotting water in dark spaces. Use a dry cloth or paper towel to wipe around the valve and check for moisture. A small mirror can help you see around tight corners and under the valve. If you have a water pressure gauge, it can be handy in confirming issues with water flow that might signal a leak. Don’t forget a wrench for any adjustments or repairs. Having these tools on hand can make the process quicker and help you address small issues before they become big problems. Have you ever tackled a leak only to find it was something else entirely? Spotting these signs early can save you time and money. Keep your eyes and ears open, and you’ll be better prepared to address leaks as they arise.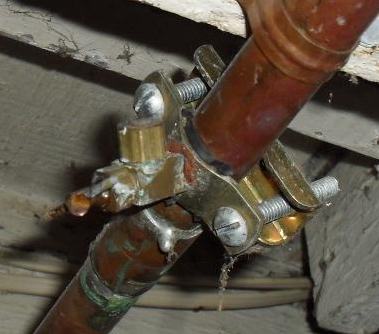
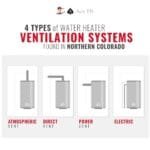
Credit: structuretech.com
Immediate Measures To Halt Leakage
A leaking saddle valve can cause water damage quickly. First, shut off the water supply immediately. Tighten the valve or replace it to stop the leakage. Regular checks can help prevent future leaks.
When you discover a leaking saddle valve, acting swiftly can prevent water damage and save you money on repairs. Understanding the immediate measures to halt leakage is crucial. Whether you’re a seasoned DIY enthusiast or a beginner, these steps will guide you through the initial phase of addressing the issue. It’s all about minimizing damage and ensuring your plumbing system remains intact. Let’s dive into some practical actions you can take right away.Shutting Off Water Supply
The first and most critical step is to shut off the water supply. Locate the main water valve in your home—typically found in the basement or utility area. Turn the valve clockwise to stop the water flow. This action prevents further leakage and gives you time to assess and manage the situation. If you’re unsure where the main valve is, don’t hesitate to ask a neighbor or check your home’s blueprint. Knowing the location of the main water valve is essential for any household emergency.Temporary Seal Solutions
Once the water is off, it’s time to apply a temporary fix. You can use waterproof tape or a pipe clamp to cover the leaking area. These materials are usually available at your local hardware store. A personal tip: I once used a piece of rubber and a C-clamp to stop a leak until a plumber could arrive. It worked like a charm for a short-term solution. Keep in mind, these are temporary solutions meant to buy you some time. Permanent repairs should be done by a professional to ensure safety and long-term effectiveness. Have you ever faced a plumbing emergency like this? Knowing a few quick fixes can save you from a lot of stress and water damage. Make sure you’re prepared for unexpected leaks by having basic repair tools on hand.Repairing The Saddle Valve
A leaking saddle valve can cause frustration and water wastage. Repairing the saddle valve is crucial to maintain efficiency. This process involves a few key steps. Each step ensures the valve functions properly. Let’s explore how to repair a saddle valve effectively.
Replacing Valve Components
Old or damaged components often lead to leaks. Inspect the valve for worn-out parts. Replace the rubber gasket if it’s worn. This simple step can stop leaks. Ensure the new gasket fits snugly. Tighten the nut securely to hold the gasket. Check the piercing needle for corrosion. Replace it if necessary to prevent leaks. New components ensure a tight seal.
Proper Tightening Techniques
Tightening the saddle valve is crucial. Use a wrench for precision. Do not overtighten; it may cause damage. Tighten until the valve feels secure. Check the connections for any play. Ensure the valve sits firmly on the pipe. Proper technique prevents leaks and ensures longevity. Test for leaks by turning the water on. Adjust if necessary for a secure fit.
Preventive Measures For Future Leaks
Regular inspections and proper installation can help prevent saddle valve leaks. Tightening connections and replacing worn parts are essential steps. Regular monitoring ensures early detection of potential issues, reducing the risk of future leaks.
Taking preventive measures can significantly reduce the chances of saddle valve leaks. By ensuring proper maintenance and considering upgrades, you can safeguard your plumbing system effectively. Here are some practical steps you can take to prevent future leaks.Regular Valve Maintenance
Regular maintenance is key to keeping saddle valves in good condition. Check your valve every few months for signs of wear or corrosion. If you notice any rust or mineral buildup, clean it promptly to prevent leaks. Tighten the valve if you detect any looseness. A loose valve can lead to significant water damage over time. Remember, a small adjustment now can save you from costly repairs later. Keep an eye on the water flow. If the water pressure seems off, it might be time to inspect the valve for leaks or blockage. Regular checks ensure that everything is functioning as it should.Upgrading To Alternative Valve Types
Consider upgrading to more reliable valve types. Saddle valves are easy to install but not the most durable option. Switching to a ball valve or gate valve could provide a more robust solution. Ball valves are known for their longevity and reliability. They offer better control over water flow and are less prone to leaks. They might require a bit more effort to install, but the benefits are worth it. Think about the long-term savings. While the initial cost of an upgrade might seem high, the reduction in potential repair costs makes it a wise investment. Is it time to rethink your valve choice for better peace of mind? Investing in your plumbing system’s health today can prevent headaches tomorrow. By staying proactive with maintenance and considering upgrades, you set a strong foundation for a leak-free future. How will you ensure your plumbing system remains leak-free?Diy Tips And Safety Precautions
Handling a leaking saddle valve can be tricky. But, with the right tips, you can manage it safely. Before you start, gather all necessary tools. Use the correct method to avoid any mishaps. Safety should always be your first concern.
Handling Tools Safely
Proper tools make the job easier. Use gloves to protect your hands. Ensure your work area is clean and dry. Check the condition of your tools. A damaged tool can cause accidents. Wear safety goggles to protect your eyes. Follow the tool manufacturer’s instructions.
Avoiding Common Mistakes
Many people rush and skip steps. This can lead to bigger problems. Always turn off the water supply first. Ensure the valve is completely dry before starting. Avoid over-tightening screws. This can damage the valve. Use a correct-size wrench for a secure fit. Double-check your work before finishing.

Credit: m.youtube.com
Frequently Asked Questions
Why Is My Saddle Valve Leaking?
Saddle valves leak due to wear or improper installation. Check for loose fittings or corrosion. Replace if necessary.
How Do I Fix A Leaking Saddle Valve?
Turn off water supply. Tighten fittings. If leaking persists, replace the valve with a new one.
What Are Common Saddle Valve Problems?
Common issues include leaks, corrosion, and blockage. Regular maintenance helps prevent these problems.
Can A Leaking Saddle Valve Cause Damage?
Yes, leaks can lead to water damage and mold growth. Address leaks promptly to prevent costly repairs.
Should I Replace My Saddle Valve?
If the valve leaks frequently, replace it with a more reliable valve type for better performance.
Conclusion
Fixing a saddle valve leak is simple with the right tools. Identify the source first. Tighten any loose connections. Replace damaged parts promptly. Regular checks prevent future leaks. Proper maintenance ensures longevity. Trust reliable guides for step-by-step instructions. Avoid temporary fixes.
Focus on durable solutions. A well-maintained valve saves time and money. Stay proactive to protect your plumbing system. Remember, small steps make a big difference. Keep your saddle valve in top shape. Enjoy peace of mind and a leak-free home.
Happy plumbing!