You notice a small puddle of water forming around the base of your Mansfield toilet. A chill runs down your spine as you realize this could mean trouble.
Leaks can be more than just a nuisance; they can lead to costly water damage and skyrocketing utility bills. But don’t reach for your phone just yet—fixing this problem might be easier than you think. Curious about how to tackle this issue efficiently and save yourself some money?
You’re in the right place. Dive into this guide to discover what causes these leaks and how you can fix them quickly and easily. Get ready to transform this plumbing puzzle into a simple DIY solution!
Causes Of Toilet Leaks
Toilet leaks can be frustrating. They often lead to water wastage and increased bills. Understanding the causes of toilet leaks is crucial. It helps in identifying and addressing the issue promptly. Mansfield toilets, like others, can leak from the bottom of the tank. Various factors contribute to these leaks. Identifying the source is the first step toward a solution.
Common Leak Sources
Leaky toilets often stem from worn-out seals. The flush valve seal may degrade over time. This can cause water to seep through. Loose bolts securing the tank can also be culprits. If they aren’t tight, water can escape at the base. A cracked toilet tank might be the cause. Even a small crack can lead to significant leaks. Another common source is the wax ring. This ring sits between the toilet and the floor. If it becomes damaged, water leaks out.
Signs Of A Bottom Tank Leak
Water puddles near the toilet base indicate a leak. Listen for constant running water sounds. These sounds suggest water is escaping. Check for stains or damage on the floor around the toilet. Visible rust on bolts or screws may signal a leak. If the toilet tank refills frequently, there might be a leak. Pay attention to any unpleasant smells. They can arise from water pooling under the toilet.
Credit: www.reddit.com
Necessary Tools And Materials
Fixing a Mansfield toilet leak requires basic tools and materials. Gather an adjustable wrench, pliers, and a new tank-to-bowl gasket. Have a sponge or towel ready to catch any water.
When faced with a Mansfield toilet leaking from the bottom of the tank, the key to a successful repair lies in having the right tools and materials. This task may seem daunting, especially if plumbing isn’t your forte. Yet, with a little guidance and preparation, you can tackle it confidently. Whether you’ve experienced the frustration of a leaking toilet before or this is your first encounter, knowing what you need beforehand can save you time and stress.
Essential Repair Tools
To start, gather the essential repair tools. A wrench is indispensable. It allows you to tighten bolts securely, ensuring no more leaks. A screwdriver is necessary for removing screws and accessing the internal parts of the toilet tank. Make sure you have both Phillips and flat-head types on hand. Don’t forget a towel or sponge to soak up any water that escapes during the repair. Keeping your workspace dry is crucial for safety and efficiency. Have you ever tried using pliers to grip something stubborn? They can be your best friend in this repair process, helping you hold and twist components with ease.
Materials Needed For Fixing
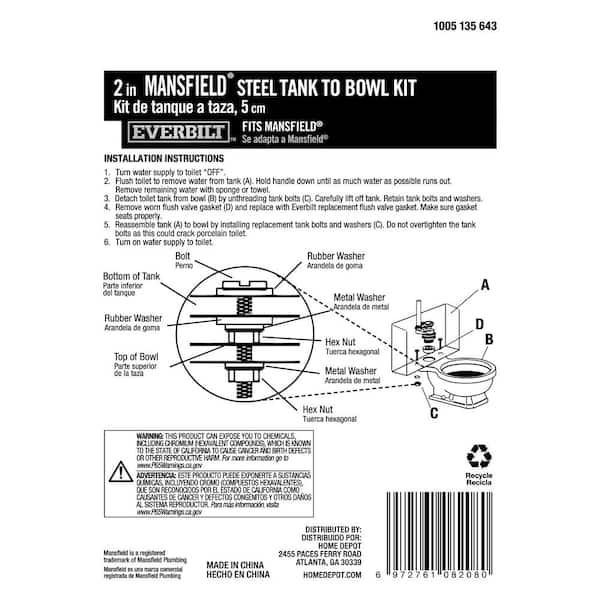
Once your tools are ready, focus on the materials needed for fixing the leak. Rubber washers and gaskets are essential. They create a watertight seal when installed correctly, preventing future leaks. A replacement flush valve or fill valve might be necessary depending on the source of the leak. These parts are the heart of your toilet’s water system, and ensuring they function properly is crucial. Consider using plumber’s tape for extra security. It helps seal threaded pipe connections, reducing the risk of leaks. Have you ever replaced a tank bolt before? If not, adding new bolts to your shopping list is wise. Old bolts can rust and fail, causing leaks.
Your Repair Journey
As you embark on your repair journey, think about how these tools and materials will empower you. Will you feel more confident knowing you’re prepared? Can you see yourself fixing the leak efficiently? Taking the time to gather everything you need before starting can transform a potentially overwhelming task into a straightforward project. What tools do you already have at home that can be repurposed for this repair? Are there materials you need to pick up on your next visit to the hardware store? By ensuring you have the necessary tools and materials, you not only increase your chances of success but also gain peace of mind. This preparation is the first step towards a leak-free toilet and a dry bathroom floor.
Step-by-step Repair Process
Experiencing a leak from the bottom of your Mansfield toilet tank can be frustrating. Fixing it yourself can save time and money. Follow this step-by-step repair process to tackle the issue with ease.
Shutting Off Water Supply
Start by turning off the water supply to the toilet. Locate the valve near the base of the toilet. Turn it clockwise until it stops. This prevents any water from entering the tank during repairs.
Draining The Tank
Flush the toilet to drain the tank completely. Hold the handle down to ensure all water exits. Use a sponge or towel to absorb any remaining water. A dry tank makes inspection easier.
Inspecting And Replacing Gaskets
Check the gaskets at the bottom of the tank. Look for cracks or wear. If damaged, replace them with new ones. Ensure they fit snugly to prevent future leaks.
Tightening Connections
Examine the bolts connecting the tank to the bowl. Tighten them using a wrench. This secures the tank and stops leaks. Avoid over-tightening to prevent damage.

Credit: m.youtube.com
Preventive Measures
A Mansfield toilet leaking from the bottom of the tank might need a few preventive measures. Tighten tank bolts and replace worn-out washers to stop water leaks. Regularly check for cracks in the tank to keep your toilet functioning efficiently.
A leaking toilet can be a nuisance and a potential source of water wastage. To keep your Mansfield toilet in top shape and prevent leaks from the bottom of the tank, it’s crucial to adopt preventive measures. These proactive steps can save you from costly repairs and water bills. Let’s dive into some practical tips that you can implement today.
Regular Maintenance Tips
Regular maintenance is your first line of defense against leaks. Make it a habit to check your toilet at least once a month. Inspect the condition of the tank components. Are the bolts tight? Is the flapper worn out? Replace any worn or damaged parts promptly. Use a mild cleaner to keep the tank clean. A clean tank can help prevent the build-up of minerals that might lead to leaks.
Checking For Early Signs Of Leaks
Spotting a leak early can prevent bigger issues later. Start by checking the area around the base of your toilet. Is there any water pooling? Listen for any hissing sounds coming from the tank. This could be a sign of water escaping due to a faulty seal. Drop a few drops of food coloring into the tank. If the color appears in the bowl without flushing, you might have a leak. Proactive maintenance can seem like a chore, but consider this: would you rather spend a few minutes now or face hours of repair work later? Take charge of your toilet’s health and avoid unnecessary headaches.
When To Call A Professional
Leaking toilets can be a source of frustration and confusion. While some leaks are simple to fix, others may require the expertise of a professional. Knowing when to make that call can save you both time and money. It’s crucial to recognize the signs of a complex issue, especially if you’ve already attempted a DIY repair without success.
Complex Issues Requiring Expert Help
Some toilet leaks can be tricky, especially if the problem lies within the internal components of the toilet tank. If the leak continues despite your best efforts to replace washers or seals, it might be time to seek professional assistance. Professionals have the tools and experience to diagnose issues that aren’t immediately apparent.
Have you noticed water pooling around the base of your toilet? This could indicate a more serious problem, such as a cracked tank or a faulty connection that requires specialized repair skills. Attempting to fix these issues on your own could lead to further damage, turning a simple repair into a costly replacement.
Assessing The Cost Of Professional Repair
Concerned about the cost of hiring a plumber? It’s wise to weigh the potential expenses of professional repair against the long-term savings. Think about the water you’re wasting with each leak; this could add up quickly on your water bill.
Many professionals offer free estimates, allowing you to understand the costs upfront without commitment. Compare these estimates to DIY costs, which include not only parts but also your time and effort. Are you really saving money by going it alone?
If you’re unsure about calling a professional, consider the peace of mind that comes with a guaranteed repair. Many plumbers offer warranties, ensuring that if the problem persists, they’ll address it at no additional cost. This reassurance can be worth the initial expense, providing you with a hassle-free bathroom experience.
Credit: www.homedepot.com
Frequently Asked Questions
Why Is My Mansfield Toilet Leaking From The Bottom?
A faulty seal or gasket may cause leaks. Check for cracks. Replace worn-out parts for a better fix.
How Do I Fix A Leaking Toilet Tank Seal?
Turn off the water supply. Drain the tank. Replace the rubber gasket. Ensure tight fittings for no leaks.
Can Worn-out Bolts Cause Toilet Leaks?
Yes, worn-out or loose bolts can cause leaks. Inspect and replace bolts. Ensure they are tightened securely.
What Tools Do I Need To Fix A Toilet Leak?
You need a wrench, screwdriver, and replacement parts. Simple tools help fix leaks effectively and efficiently.
How Often Should I Check For Toilet Leaks?
Check every six months. Regular inspections prevent damage. Early detection saves money and prevents bigger issues.
Conclusion
Fixing a leaking Mansfield toilet isn’t difficult. Start by checking the tank bolts. Tighten them if needed. Inspect the gasket for damage. Replace it if worn out. Ensure the water level is correct. Adjust the fill valve if necessary. Regular maintenance prevents future leaks.
Keep your bathroom dry and safe. A few simple steps can save time and money. Always have basic tools on hand. Remember, a little effort goes a long way. Your toilet should work smoothly now. Enjoy a leak-free bathroom experience.