Have you noticed a troubling sight in your kitchen—a Kitchenaid mixer leaking oil? This unexpected issue can be frustrating, especially when you’re eager to whip up your favorite recipes.
You might find yourself wondering why this is happening and how to fix it. You’re not alone in this; many Kitchenaid mixer owners have faced the same challenge. But before you consider replacing your trusty appliance, let’s dive into understanding why this occurs and explore simple solutions to get your mixer back in perfect working order.
By the end of this article, you’ll not only have the insights you need to solve the problem but also tips to prevent it in the future. So, let’s untangle the mystery of your mixer and restore peace to your kitchen!
Common Causes Of Oil Leaks
KitchenAid mixers are prized appliances in many homes. They make cooking and baking tasks easier. But sometimes, they leak oil. Understanding why helps you fix the problem. Knowing the common causes can save you time and frustration.
Worn Seals And Gaskets
Worn seals and gaskets often lead to oil leaks. They are essential parts of the mixer. Over time, they can wear out. This allows oil to seep through. Regular maintenance can prevent this issue. Check seals and gaskets periodically. Replace them if they show signs of wear. This keeps your mixer running smoothly.
Improper Storage
Improper storage can also cause oil leaks. Storing the mixer on its side may lead to problems. The oil inside shifts from its normal position. This can cause leaks. Always store the mixer upright. This simple step can help prevent leaks. Proper storage is key to maintaining your mixer.
Identifying Oil Leak Symptoms
Your KitchenAid mixer is a culinary powerhouse, but what happens when it starts leaking oil? Identifying oil leak symptoms is crucial to keep your mixer in top shape. The problem might seem daunting, but with a keen eye, you can spot the signs early and address them before they escalate. Let’s dive into the telltale symptoms that could save your mixer and your next baking session.
Visible Oil Drips
Have you noticed small, dark spots beneath your mixer? These visible oil drips are often the first sign of a leak. It’s easy to overlook them, especially if your mixer sits on a dark countertop or in a dimly lit kitchen.
Regularly check the surface under your mixer. A quick wipe with a paper towel can reveal if there’s oil present. This simple habit can help you catch leaks before they become a bigger issue.
Once, while baking cookies, I noticed a slight smear of oil on the mixer base. Investigating further saved my mixer from more serious damage. Have you checked under your mixer recently?
Unusual Odors
Strange smells in the kitchen can be unsettling. A leaking KitchenAid mixer might emit an unusual, slightly burnt odor. This can happen when oil drips onto the motor or heating elements.
Pay attention to any new scents during or after using your mixer. A distinctive, oily smell might indicate an internal leak. If you detect such an odor, it’s time to take action.
Once, I noticed an odd smell while making a batch of bread. It turned out to be oil, which could have caused more serious problems if left unchecked. Has your mixer ever given off a strange aroma?
Identifying these symptoms can help you maintain your KitchenAid mixer efficiently. Regular checks and a little attention can keep your trusty kitchen companion running smoothly. Have you noticed any of these symptoms in your mixer?
Immediate Steps To Address Oil Leaks
Oil leaks from your KitchenAid mixer can be a concern. They can affect performance and create a mess. Addressing these leaks quickly is essential. Immediate action can prevent further damage. Here are steps to tackle this issue effectively.
Cleaning The Mixer
Start by unplugging the mixer. Place it on a stable surface. Use a damp cloth to wipe the exterior. Focus on the areas where oil is visible. Remove all traces of leaked oil. This prevents it from spreading further. Ensure no oil remains near the motor vents. A clean mixer helps in spotting the source of the leak. Regular cleaning can also prevent future leaks.
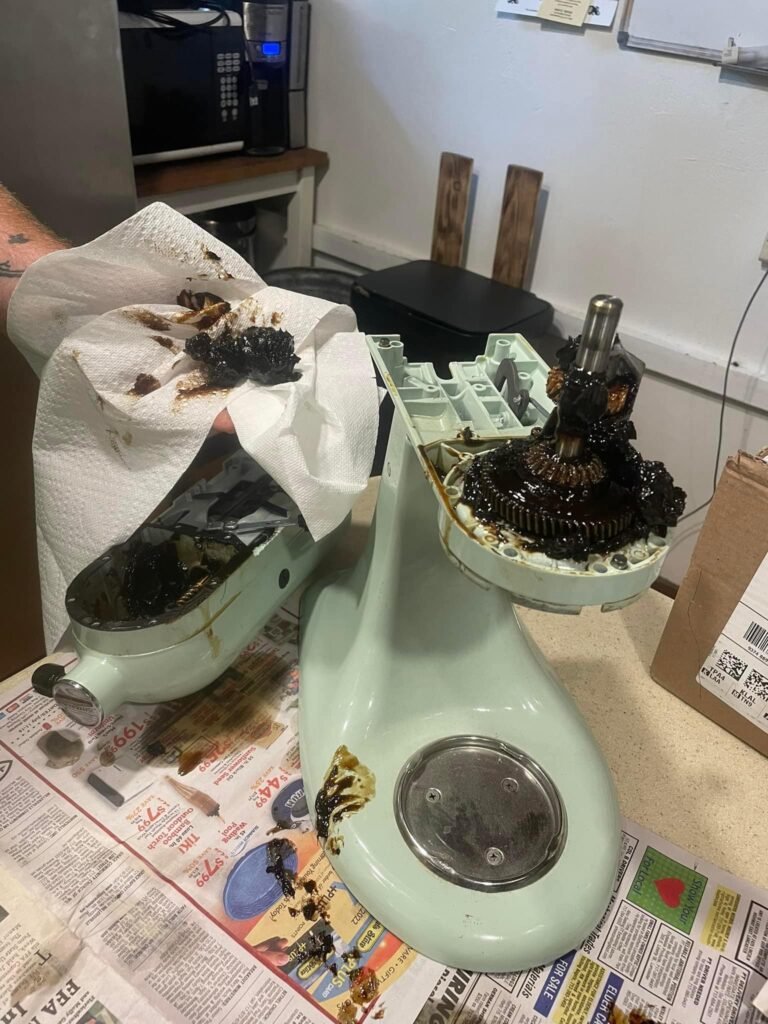
Inspecting Internal Components
Once the mixer is clean, check the internal parts. Remove the mixer head cover carefully. Look for any signs of oil within. Inspect the gasket and seals for wear and tear. These are common sources of leaks. Check the gears and motor for excess oil. Tighten any loose screws you find. Consider replacing damaged seals or gaskets. This can often stop the leak effectively.
Credit: www.chapelhillforge.com
Diy Repair Techniques
Experiencing oil leaks from your Kitchenaid mixer? Explore simple DIY repair techniques to fix it quickly. Regular cleaning and proper storage help prevent further leaks. Keep your mixer in top condition with these easy steps.
Dealing with a KitchenAid mixer leaking oil can be both puzzling and frustrating. But before you consider a costly repair service or a new purchase, why not try some DIY repair techniques? With a little patience and the right approach, you can often fix the issue yourself and keep your trusty kitchen companion in top shape. Let’s dive into some practical solutions that might just save your mixer and your wallet.Replacing Seals And Gaskets
Over time, the seals and gaskets in your KitchenAid mixer can wear out. This is often the culprit behind oil leaks. To address this, you need to replace these components. First, unplug your mixer and remove the back cover to access the internal parts. Look for any worn-out or cracked seals and gaskets. You can find replacement parts at most appliance stores or online. Remove the damaged seals carefully, ensuring not to damage other components. Fit the new seals snugly into place. This simple fix can often stop the leak and extend the life of your mixer.Adjusting Gearbox Components
The gearbox is another area where oil might escape. If the components within the gearbox are misaligned, it can lead to leakage. Start by unscrewing the top part of the mixer to access the gearbox. Check for any loose or misaligned parts. Tightening screws and aligning gears properly can help contain the oil within the gearbox. Make sure everything is fitted securely before reassembling the mixer. This small adjustment can make a huge difference in stopping oil leaks. Have you ever opened up your mixer and felt overwhelmed? You’re not alone. Many users find that taking these small, manageable steps can ease the process and boost confidence. Remember, taking on a DIY repair can be satisfying. Not only do you learn more about your appliance, but you also gain the skills to handle future issues. So, roll up your sleeves and give it a try! You might surprise yourself with how much you can accomplish.Professional Repair Options
Dealing with a KitchenAid mixer leaking oil can be frustrating. Understanding professional repair options can save time and stress. Professionals offer expertise and tools to fix your mixer efficiently. This ensures your mixer returns to optimal performance.
When To Seek Expert Help
Recognize when expert help is needed. If you notice persistent oil leaks, it’s time. Unusual noises during operation also signal a problem. Experts can diagnose and fix these issues. They ensure your mixer runs smoothly again.
Cost Considerations
Repair costs vary based on the problem. Simple fixes may cost less. Complex issues might require more investment. Always ask for a detailed quote. Compare prices from different repair services. This helps in making an informed decision.
Preventative Maintenance Tips
Keeping your KitchenAid mixer in top shape is essential. Regular maintenance can prevent oil leaks and extend its life. These simple tips can ensure your mixer stays in great condition.
Regular Cleaning And Inspection
Clean your mixer after each use. Wipe down with a damp cloth. Avoid using harsh chemicals. Inspect the mixer for any visible oil leaks. Check for loose screws and tighten them. Regular inspections help catch issues early.
Proper Storage Practices
Store your mixer in an upright position. This prevents oil from pooling in unwanted areas. Avoid placing it in hot environments. Heat can cause oil to thin and leak. Cover the mixer to keep dust away. Proper storage ensures your mixer stays ready for use.
Choosing The Right Oil For Your Mixer
Choosing the right oil for your KitchenAid mixer is crucial in maintaining its performance and longevity. You might not think about the oil inside your mixer often, but it’s the unsung hero ensuring everything runs smoothly. If you’ve noticed oil leaking from your mixer, it’s time to consider not only replacing it but also selecting the best type for your appliance.
Recommended Brands
When it comes to choosing oil for your KitchenAid mixer, quality brands make all the difference. KitchenAid itself offers an OEM replacement grease specifically designed for their mixers, ensuring compatibility and performance. Other trusted brands like Chevron and Mobil provide high-quality food-grade grease options that are safe and effective.
Food-grade oils are essential as they are non-toxic and can withstand the high temperatures generated during mixing. You don’t want to risk using non-food-grade oils that might contaminate your food. Always check the label to ensure it meets the necessary safety standards for kitchen appliances.
How Often To Change Oil
Many mixer owners overlook the importance of regular oil changes, which can lead to leaks and reduced efficiency. Typically, you should consider changing the oil every two years or after about 500 hours of use. This might seem frequent, but keeping track ensures that your mixer stays in top condition.
Have you ever wondered if you’ve been using your mixer more than usual? If you bake frequently or use your mixer for extended periods, you might need to change the oil more often. Regular checks can prevent unexpected leaks and keep your mixer operating smoothly.
Ever had a mixer breakdown during a big baking session? Regular oil changes could save you from such frustrating situations. So, mark your calendar and keep your mixer running like new.

Credit: www.ereplacementparts.com
Benefits Of Regular Mixer Maintenance
Regular maintenance of your Kitchenaid mixer is crucial. It keeps your appliance in top shape and prevents issues like oil leaks. By dedicating time to upkeep, you ensure your mixer runs smoothly, offering consistent performance. This practice not only saves money on repairs but also enhances the overall kitchen experience.
Prolonging Mixer Lifespan
Proper maintenance extends your mixer’s life. Regular checks and cleanings prevent wear and tear. This keeps the internal parts functioning well. Oil leaks can signal bigger problems. Addressing them early avoids further damage. A well-maintained mixer lasts for years, serving your kitchen needs.
Ensuring Optimal Performance
Maintenance ensures your mixer works at its best. Clean gears and joints help it run efficiently. This reduces strain on the motor. Regular oil checks prevent leaks, maintaining performance. A well-oiled machine mixes ingredients evenly. This guarantees better baking and cooking results every time.

Credit: www.youtube.com
Frequently Asked Questions
Why Is My Kitchenaid Mixer Leaking Oil?
A Kitchenaid mixer may leak oil due to heat causing oil separation. Regular use helps prevent this issue.
How Can I Fix Oil Leaks In My Mixer?
To fix oil leaks, clean excess oil. Run the mixer regularly to keep oil mixed.
Is Leaking Oil Dangerous For My Kitchenaid Mixer?
Leaking oil isn’t dangerous, but it can affect performance. Regular maintenance can help avoid major issues.
Can I Prevent My Mixer From Leaking Oil?
Prevent leaks by using the mixer often. Store it in a cool place to avoid heat damage.
Should I Contact Kitchenaid Support For Oil Leaks?
Contacting Kitchenaid support is helpful if regular maintenance doesn’t stop leaks. They can offer professional advice.
Conclusion
Regular maintenance prevents your Kitchenaid mixer from leaking oil. Clean it frequently. Tighten loose screws. Use the mixer carefully to avoid damage. Store it in a cool place. Check the warranty for repairs. Contact customer service for persistent issues. Proper care extends your mixer’s life.
Enjoy baking without worries. A well-maintained mixer ensures smooth operation. Keep an eye on performance. Address minor issues quickly. Happy mixing!