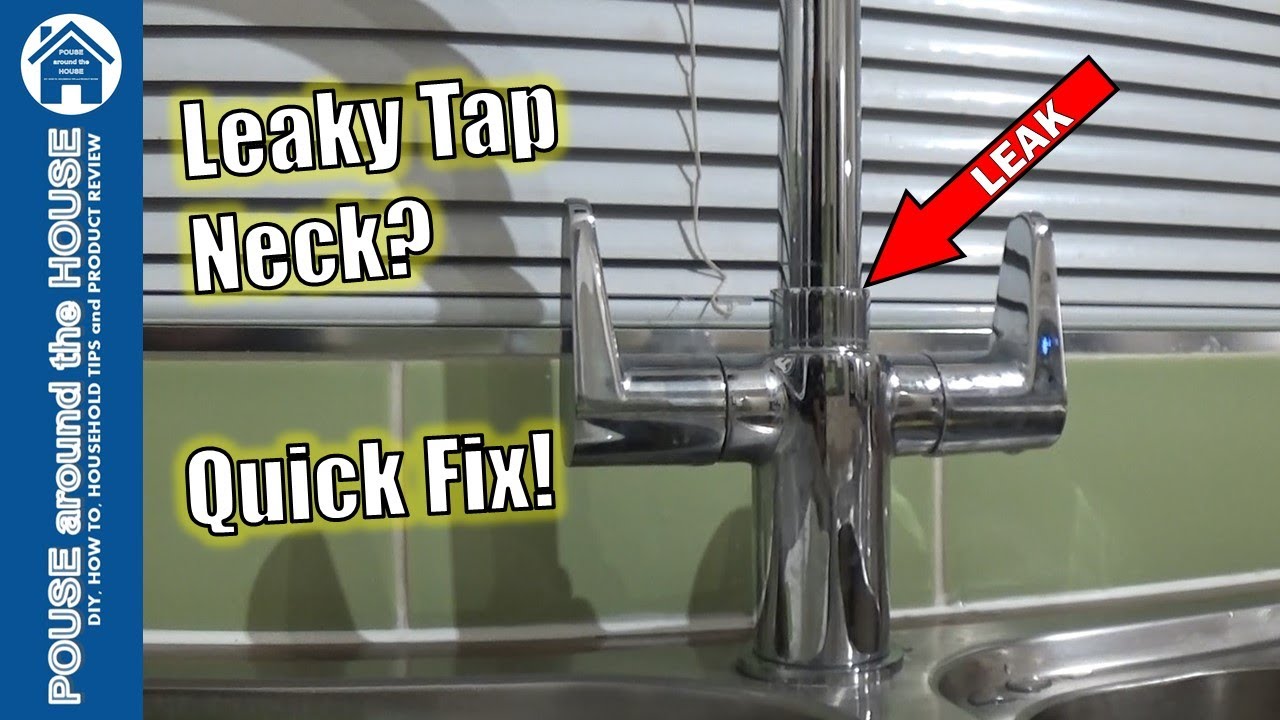
Have you ever experienced the frustration of a leaking kitchen tap, especially at the swivel? It might seem like a small inconvenience at first, but those persistent drips can quickly become an annoying problem.
Not only do they waste water, but they can also lead to bigger issues if left unchecked. Imagine the peace of mind you’ll have when you finally stop that leak for good. We’ll show you how to tackle the problem head-on, using simple steps and a few handy tips.
You’ll learn how to save money on water bills and prevent potential damage to your kitchen. Stick around, and let’s turn that pesky leak into a thing of the past!
Identify The Leak Source
A kitchen tap leaking at the swivel often points to worn-out O-rings or washers. Identifying the leak source quickly can prevent further water damage. Tightening connections or replacing faulty parts usually solves the problem.
Identifying the source of a kitchen tap leak at the swivel can save you from unnecessary repairs and even a hefty plumber’s bill. A few simple checks can help you pinpoint the problem. It’s a task you might hesitate to tackle, but with a little guidance, you’ll find it’s simpler than it seems. Imagine the satisfaction of fixing the leak yourself, knowing you’ve solved the mystery right at its source.
Check The Swivel Joint
The swivel joint is where the tap neck connects to its base, allowing it to move side to side. This joint is often the culprit when your tap starts dripping. Check if the swivel joint is loose. Use your hand to gently twist it back and forth. Does it feel wobbly or unstable? If yes, tightening it might solve the issue. You might find that a simple twist with a wrench can stop the leak. Sometimes, debris can clog the joint, causing water to seep out. Cleaning it with a brush can be surprisingly effective. Imagine the relief when a quick scrub solves your problem.
Inspect The O-ring
The O-ring is a small, rubber component that helps seal the connection between the swivel and the tap. If worn out or damaged, it can lead to leaks. Inspect the O-ring for cracks or splits. If it’s worn, replacing it is straightforward. You can find a suitable O-ring at most hardware stores for just a few dollars. Have you ever thought about how something so small can cause such a mess? Replacing the O-ring might be all you need to stop the drip and save your kitchen from water damage. With these simple checks, you’re well on your way to diagnosing and fixing that pesky leak. Do you feel ready to give it a try? With a little patience, you might discover your inner handyman skills, all while keeping your kitchen dry and functional.

Credit: www.youtube.com
Gather Necessary Tools
Fixing a kitchen tap leak at the swivel can seem daunting. The first step is gathering necessary tools. With the right equipment, the task becomes manageable. Proper tools ensure smooth work and prevent further damage. This guide highlights essential tools for a successful repair.
Wrench And Screwdriver
A wrench and screwdriver are vital for tap repairs. The wrench is useful for loosening nuts. It ensures a firm grip on stubborn fixtures. A screwdriver helps in removing screws. Choose a flathead or Phillips based on the screw type. Both tools must be handy for efficient work.
Replacement Parts
Replacement parts are crucial for a lasting fix. Check the tap model before purchasing parts. You may need new washers or O-rings. These prevent future leaks and ensure a snug fit. Having parts ready avoids work delays. Always opt for quality replacements for durability.
Prepare The Workspace
Fixing a leaking kitchen tap at the swivel requires preparation. Set up your workspace first. This makes the repair process smooth and efficient. A well-organized space helps you find tools easily. It also prevents accidents.
Turn Off Water Supply
Start by turning off the water supply. Look under the sink for the shut-off valves. Turn them clockwise to stop water flow. This prevents any water mess while fixing the tap. If valves are stuck, use a cloth for grip.
Clear The Area
Next, clear the area around your sink. Remove any dishes or items nearby. This gives you more room to work. It also keeps your tools and parts safe. Use a towel to cover the sink’s bottom. This prevents parts from falling down the drain.
Credit: www.youtube.com
Disassemble The Tap
Dealing with a kitchen tap leaking at the swivel? You might need to disassemble the tap. This process helps fix the leak and restore functionality. Before starting, make sure to turn off the water supply. Keep a towel or bucket nearby to catch any water drips. Also, ensure you have the right tools at hand. A screwdriver, adjustable wrench, and penetrating oil are essential. Let’s break down the process into easy steps.
Remove Handle
First, remove the tap handle. Look for a small screw or cap at the base. Use a screwdriver to gently remove this screw. If there’s a cap, pry it off using a flathead screwdriver. This exposes the screw underneath. Turn the screw counterclockwise until the handle loosens. Gently lift the handle off the tap. Set it aside carefully to avoid losing any parts.
Unscrew The Swivel
Next, focus on the swivel part of the tap. Use an adjustable wrench to unscrew it. Turn the wrench counterclockwise to loosen the swivel. Apply a bit of penetrating oil if the swivel is stuck. This helps in loosening rust or debris. Once loose, carefully remove the swivel from the tap. Keep all parts organized for easy reassembly.
Replace The O-ring
Is your kitchen tap leaking at the swivel? It might be time to replace the O-ring. This small component can cause big problems if it wears out. A faulty O-ring often leads to annoying leaks, which waste water and increase bills. Luckily, replacing the O-ring is a simple task. It requires minimal tools and a bit of patience. Follow these easy steps to fix the leak and restore your tap’s function.
Select The Right Size
Choosing the correct O-ring size is crucial for a successful repair. Start by removing the old O-ring from the tap. Take it to a hardware store to find a match. Make sure the new O-ring has the same diameter and thickness. A snug fit ensures a proper seal, preventing future leaks.
Install New O-ring
Once you have the right O-ring, it’s time to install it. First, turn off the water supply to the tap. This step prevents unwanted water flow during installation. Remove the tap handle to access the swivel area. Carefully slide the new O-ring into place. Ensure it fits securely in its groove. Reassemble the tap and turn the water back on. Check for leaks by turning the tap on and off.

Credit: www.reddit.com
Reassemble And Test
Ensure the kitchen tap stops leaking at the swivel by carefully reassembling it. Test for leaks by turning the tap on and off. Adjust any parts if needed for a smooth operation.
Experiencing a kitchen tap leak at the swivel can be frustrating, but addressing it is easier than you might think. Once you’ve identified the cause and gathered your tools, the next crucial step is to reassemble and test your tap. This phase is all about ensuring everything is securely in place and functioning as it should. With patience and attention to detail, you can restore your tap’s functionality and avoid further water wastage. Let’s dive into the practical steps of reattaching the swivel and handle, and checking for leaks to ensure a job well done.
Reattach Swivel And Handle
Start by carefully aligning the swivel with its designated position. Ensure it fits snugly without forcing it. A proper fit is key to preventing future leaks. Once the swivel is in place, it’s time to reattach the handle. Position the handle over the valve stem and secure it with the screw you removed earlier. Make sure the handle moves smoothly, without any obstruction. A well-fitted handle allows for easy control of water flow and temperature.
Check For Leaks
Turn the water supply back on and monitor the tap closely. Is everything functioning smoothly? Watch the swivel and handle as you operate the tap. Pay attention to any signs of dripping or water pooling around the base. To ensure a thorough check, run the tap for a minute and observe. Is there any unexpected moisture? If you spot a leak, it might require additional tightening or checking the seals again. Why not take a moment to consider if any parts were overlooked during reassembly? Remember, the goal is a leak-free tap. A quick test can save you from potential water damage and added stress later on.
Maintenance Tips
Keeping your kitchen tap in top-notch condition is crucial for preventing leaks, especially at the swivel. Regular maintenance can save you from unexpected water drips and costly repairs. Here, we’ll dive into some simple yet effective maintenance tips that will ensure your kitchen tap remains drip-free and fully functional.
Regular Checks
Make it a habit to inspect your kitchen tap regularly. Check for any signs of wear and tear or loose parts. A quick glance can prevent minor issues from turning into major problems.
Listen for unusual sounds when using the tap. If you hear a grinding noise, it might indicate worn-out components. Address these issues promptly to maintain efficiency.
Consider setting a reminder in your phone or calendar. This small step can keep you on track and prevent leaks before they start.
Proper Cleaning
Clean your kitchen tap routinely to avoid build-up that can affect its function. Use a soft cloth and mild detergent to wipe the surface. Avoid harsh chemicals that might corrode the metal.
Pay special attention to the swivel area. Gently move the tap side to side as you clean to reach all hidden spots. This helps maintain smooth movement and prevents stiffness.
Do you notice any mineral deposits? A simple mix of vinegar and water can dissolve these deposits effectively. Just soak a cloth in the solution, wrap it around the affected area, and let it sit for a few minutes before wiping clean.
Regular maintenance doesn’t have to be a chore. By incorporating these checks and cleaning routines into your schedule, you ensure your kitchen tap remains in excellent condition. What small step can you take today to prevent tomorrow’s leaks?
Frequently Asked Questions
Why Is My Kitchen Tap Leaking At The Swivel?
A worn-out O-ring or washer often causes leaks. Check for damage and replace as needed.
How Do I Fix A Leaking Swivel Tap?
Turn off water supply. Unscrew the tap, replace worn parts like O-rings, and reassemble.
Can A Plumber Fix A Swivel Leak Quickly?
Yes, plumbers can usually fix swivel leaks quickly. They have the right tools and expertise.
Should I Replace My Leaking Kitchen Tap?
If the tap is old and frequently leaks, consider replacing it for efficiency and peace of mind.
What Tools Do I Need To Repair A Swivel Leak?
You’ll need a wrench, screwdriver, and replacement O-rings or washers. Simple tools for a quick fix.
Conclusion
Fixing a leaking kitchen tap at the swivel is simple. Regular checks help prevent future leaks. Tightening loose parts can solve the problem quickly. Use basic tools for an easy fix. Keep your kitchen dry and functional. Leaks waste water and raise bills.
Address them promptly for savings. Consider professional help if unsure. Staying proactive saves time and money. Happy kitchen maintenance!