Troubleshooting the Hunter Pro C irrigation controller can be straightforward. With the right guide, you can solve common issues swiftly.
The Hunter Pro C is a trusted irrigation controller for many homeowners. Like any device, it can sometimes malfunction. Whether it’s a display problem or a sprinkler not turning on, these issues can be frustrating. Knowing how to troubleshoot can save time and money.
This blog will help you identify and fix common problems with your Hunter Pro C. From resetting the controller to checking wiring, we cover essential tips. Let’s dive into the solutions and get your system running smoothly again.
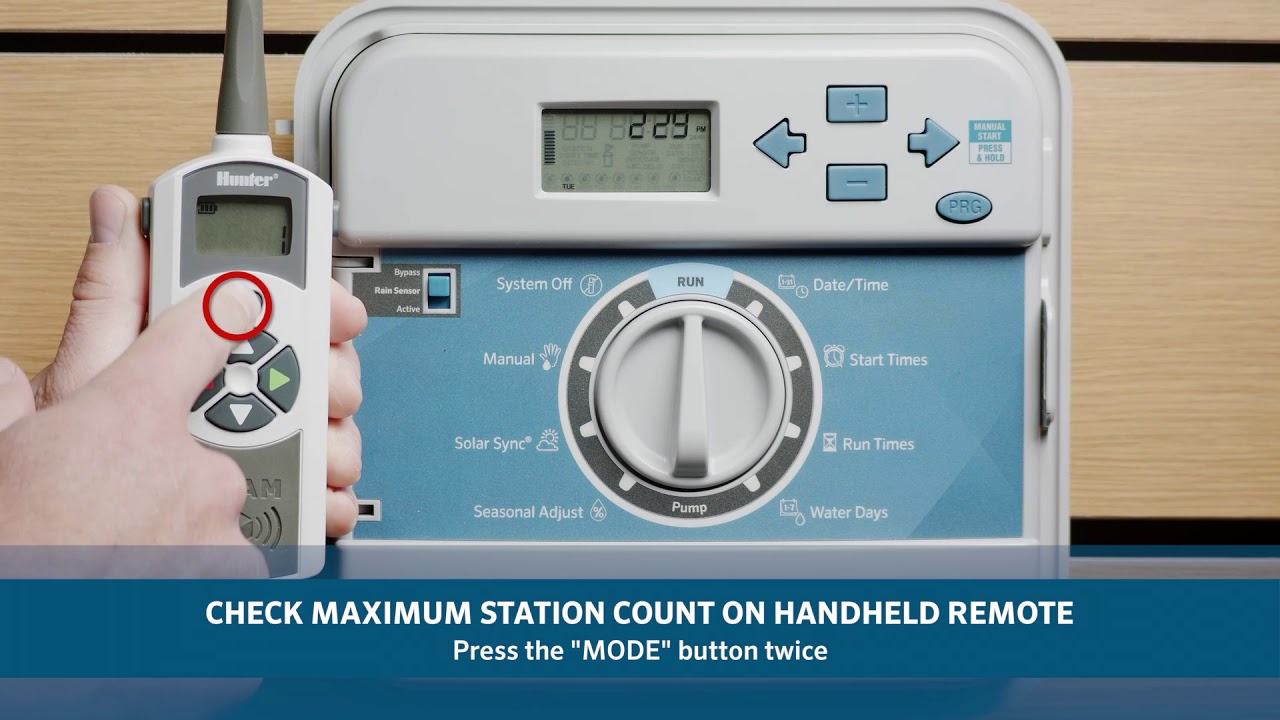
Credit: www.youtube.com
Introduction To Hunter Pro C
The Hunter Pro C is a popular irrigation controller known for its reliability and ease of use. Many homeowners and landscapers prefer it for its advanced features and user-friendly interface. This guide will help you understand its key features and how to troubleshoot common issues.
Overview Of Features
The Hunter Pro C offers several features that make it stand out. It has a flexible station count, allowing for easy expansion. The controller supports up to 23 stations, making it suitable for large landscapes.
It also includes a seasonal adjust feature. This helps save water by adjusting the watering schedule based on the time of year. The Pro C has a non-volatile memory that retains the program even during power outages.
Another important feature is the weather sensor input. It allows the controller to make adjustments based on real-time weather conditions. This ensures efficient water usage.
Common Issues
Despite its reliability, users may face some common issues with the Hunter Pro C. One frequent problem is the controller not turning on. This could be due to a power supply issue. Check the power source and ensure the controller is properly plugged in.
Another issue is the controller not responding to input. This can happen if the buttons are stuck or the display is malfunctioning. Cleaning the buttons and ensuring the display is clear can help resolve this.
Users sometimes experience erratic watering schedules. This can be due to incorrect programming or a faulty sensor. Review the programming settings and check the sensor connections.
Watering zones not activating is another common issue. This could be due to a wiring problem or a defective solenoid. Inspect the wiring and replace any damaged components.

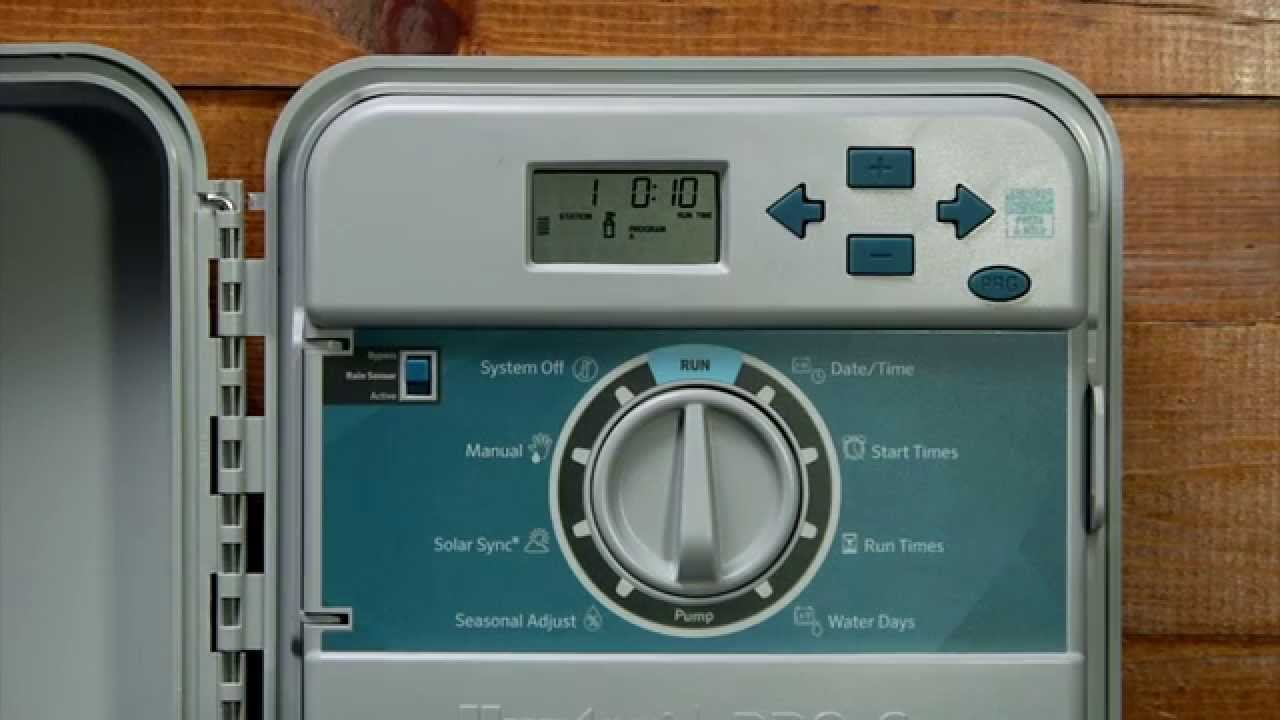
Credit: www.hunterindustries.com
Initial Checks
For those experiencing issues with their Hunter Pro C irrigation controller, starting with initial checks is crucial. This ensures your system runs smoothly and avoids unnecessary headaches. This section will guide you through the basic steps to diagnose common problems.
Power Supply
First, check the power supply. Ensure the controller is plugged in securely. Verify that the outlet has power by plugging in another device. Look for any signs of damage on the power cord.
| Step | Action |
|---|---|
| 1 | Check if the controller is plugged in securely. |
| 2 | Test the outlet with another device. |
| 3 | Inspect the power cord for any damage. |
Controller Settings
Next, examine the controller settings. Make sure the current time and date are correct. Verify the scheduled watering times. Ensure the controller is in the “Run” position.
- Check current time and date.
- Verify scheduled watering times.
- Ensure controller is in “Run” position.
Incorrect settings can lead to missed watering cycles. Adjust as needed to match your watering schedule.
By performing these initial checks, you can often resolve basic issues with your Hunter Pro C controller. For more complex problems, further troubleshooting may be necessary.
Solving Power Issues
Power issues with your Hunter Pro C irrigation controller can disrupt your watering schedule. Identifying and resolving these power problems ensures your system runs smoothly. Let’s dive into some common solutions.
Checking Connections
First, examine all power connections. Ensure the power cord is securely plugged in. Check the outlet for power by plugging in another device. If the outlet works, inspect the controller’s power adapter. Look for any visible damage to the cord or adapter.
Next, inspect the wiring inside the controller. Open the control panel. Look for loose or disconnected wires. Reconnect any loose wires firmly. Ensure all connections are tight and secure. This simple step often resolves many power issues.
Replacing Fuses
If connections are secure, check the fuse. The Hunter Pro C has a built-in fuse to protect the system. Locate the fuse inside the controller. It is usually near the power input.
Remove the fuse and inspect it. If the fuse appears blackened or broken, it needs replacing. Purchase a new fuse with the same rating. Insert the new fuse into the holder. Ensure it fits snugly.
Turn the power back on and test the controller. If the fuse was the issue, your controller should power up. If not, further diagnosis may be required.
Irrigation Problems
Hunter Pro C controllers are reliable. But sometimes, issues arise. Irrigation problems can disrupt a lush garden. It’s essential to identify and fix these problems quickly. Read on to learn how to troubleshoot common irrigation problems.
Valve Troubleshooting
Valves control the water flow in your irrigation system. Faulty valves can cause dry spots or waterlogged areas. First, check if the valves are receiving power. Use a multimeter to test for voltage. If there is no voltage, inspect the wiring connections. Loose or corroded wires can interrupt the power supply.
Next, examine the valve solenoids. A defective solenoid can prevent the valve from opening. Listen for a clicking sound when the system activates. No sound means the solenoid may need replacement. Clean the valve diaphragm to remove debris. This can improve water flow.
Sprinkler Head Maintenance
Clogged or misaligned sprinkler heads can cause uneven watering. Inspect each sprinkler head for debris. Use a small brush to clean the nozzles. Adjust the heads to ensure proper coverage. Sometimes, worn-out sprinkler heads need replacement.
Check for leaks around the sprinkler heads. Leaky heads waste water and reduce pressure. Tighten any loose fittings. Replace damaged parts to stop the leaks. Regular maintenance keeps your irrigation system efficient and your garden green.
Programming Errors
Encountering programming errors with your Hunter Pro C controller can be frustrating. These issues can lead to incorrect watering schedules and wasted water. This section guides you through the process of resetting the controller and correcting schedules to ensure your system runs smoothly.
Resetting The Controller
If your controller displays errors or behaves unexpectedly, a reset can help. Follow these steps to reset your Hunter Pro C controller:
- Turn the dial to the “Off” position.
- Press and hold the “Program” button.
- While holding the “Program” button, turn the dial to “Run”.
- Release the “Program” button. The display should show 12:00 AM.
This resets the controller to its default settings. You will need to reprogram your schedules.
Correcting Schedules
Incorrect schedules can cause over or under-watering. To correct schedules, follow these steps:
- Turn the dial to the “Current Time/Day” position.
- Set the current time using the up and down arrows.
- Turn the dial to the “Start Times” position.
- Use the arrows to set the desired start time for your watering program.
- Turn the dial to the “Run Times” position.
- Set the duration for each zone using the arrows.
- Turn the dial to the “Water Days” position.
- Select the days you want the system to water.
Double-check your settings to ensure accuracy. Remember, correct scheduling saves water and promotes healthier plants.
Sensor Malfunctions
Sensor malfunctions can disrupt your Hunter Pro C irrigation system. Understanding how to troubleshoot these issues is crucial. In this section, we’ll cover two common sensor problems: rain sensors and soil sensors. Let’s dive into how you can test and calibrate these sensors to keep your irrigation system running smoothly.
Testing Rain Sensors
Rain sensors prevent overwatering by detecting rainfall. First, check if the sensor is clean and free of debris. Dirt can block the sensor, causing it to malfunction. Use a soft brush to clean it.
Next, test the sensor manually. Press the button on the sensor and see if the system shuts off. If it doesn’t, the sensor might be faulty. Replace it if necessary. Also, ensure that the sensor is properly connected to the controller.
If the sensor passes the manual test, check its settings. Ensure the sensitivity is set correctly. A low setting may not detect light rain, while a high setting might shut off the system too easily. Adjust the settings according to your local weather conditions.
Calibrating Soil Sensors
Soil sensors measure moisture levels to optimize watering. First, ensure the sensor is placed correctly in the soil. It should be at the root level of your plants.
Next, test the sensor’s accuracy. Water the area where the sensor is placed, then wait for the soil to absorb the water. Check the sensor reading. If it shows a high moisture level, it works well.
If the reading is off, calibrate the sensor. Follow the manufacturer’s instructions for calibration. Usually, this involves adjusting the settings on the controller. Make small adjustments and test again until the readings are accurate.
Regularly check the sensor to ensure it stays accurate. Soil conditions can change, affecting the sensor’s performance.
Advanced Diagnostics
Advanced diagnostics help you identify and fix issues with your Hunter Pro C controller. This feature is crucial for maintaining the health of your irrigation system. Understanding how to use diagnostic tools and interpret error codes can save time and effort. Below, we break down the essential steps for using these advanced diagnostics.
Using The Diagnostic Mode
To access the diagnostic mode, follow these steps:
- Turn the dial to the “System Off” position.
- Press and hold the “Program” button.
- While holding the “Program” button, turn the dial to “Run”.
- Release the “Program” button. The display will show “Diag Mode”.
Once in diagnostic mode, you can check various system parameters. These include voltage levels, sensor status, and station outputs. Use the “Next” and “Back” buttons to navigate through the diagnostic screens.
Interpreting Error Codes
Error codes help identify specific issues within the system. Understanding these codes is vital for effective troubleshooting. Here are some common error codes:
| Error Code | Description | Solution |
|---|---|---|
| E01 | Short in wiring | Check and repair wiring |
| E02 | Valve fault | Replace the faulty valve |
| E03 | Sensor error | Inspect sensor connections |
Recognizing these error codes and their meanings allows you to address issues promptly. Always consult the user manual for detailed error code descriptions.
Credit: www.youtube.com
Expert Tips
Maintaining your Hunter Pro C irrigation system can be simple with the right guidance. These expert tips will help you troubleshoot common issues and keep your system running smoothly.
Regular Maintenance
Regular maintenance is key to the longevity of your Hunter Pro C. Check for any broken or clogged sprinkler heads. Clean or replace them as needed. Ensure all connections are secure and there are no leaks. Leaks can lead to water waste and higher bills. Inspect the wiring for any signs of wear or damage. Replace any damaged wires immediately.
Test your system at least once a month. Run each zone to ensure proper coverage. Adjust the sprinkler heads if needed. This will help prevent dry spots on your lawn. Regularly update the controller settings according to the season. This ensures your system is efficient and conserves water.
Professional Help
Sometimes, problems can be too complex to handle alone. Seek professional help if you encounter persistent issues. Certified technicians have the tools and knowledge to diagnose and fix problems quickly. This saves you time and prevents further damage to your system.
Schedule a yearly inspection with a professional. They can perform a thorough check and make any necessary adjustments. This will ensure your Hunter Pro C system remains in optimal condition. Always choose a reputable service provider with good reviews.
Frequently Asked Questions
How Do I Reset Hunter Pro C Controller?
Press and hold the reset button for 10 seconds. The controller will reboot.
Why Is My Hunter Pro C Not Watering?
Check the water source, valves, and connections. Ensure the controller is set correctly.
What Does “no Ac” Mean On Hunter Pro C?
It means there’s no power supply. Verify the power connections and circuit breaker.
How Do I Change The Watering Schedule?
Navigate to the “Program” menu. Adjust start times, run times, and days.
Can Hunter Pro C Work With Rain Sensors?
Yes, it is compatible. Connect the sensor to the designated terminals in the controller.
Conclusion
Troubleshooting the Hunter Pro C can seem daunting at first. Follow the steps outlined in this guide. Your irrigation system should function smoothly. Regular maintenance prevents many common issues. Always refer to the manual for specific instructions. Seek professional help if problems persist.
Proper care extends the life of your system. Happy gardening!