A leaking shower pan can turn your relaxing shower time into a stressful ordeal. You might notice a damp spot on your ceiling below the bathroom or a mysterious puddle that keeps appearing despite your best cleaning efforts.
Ignoring these signs can lead to bigger problems like mold growth, structural damage, and costly repairs. But how can you tell if your shower pan is the culprit? By understanding the telltale signs and knowing what to look for, you can save yourself from potential headaches and expenses.
In this guide, you’ll learn how to identify the subtle and not-so-subtle hints that your shower pan might be leaking. Ready to ensure your bathroom stays a sanctuary and not a source of stress? Let’s dive in and uncover the secrets to spotting a leaking shower pan.
Signs Of A Leaking Shower Pan
Water stains on ceilings or walls below the bathroom could indicate a leaking shower pan. Unusual dampness or mold growth around the shower area also suggests leakage. If tiles or grout lines appear cracked, these are potential signs of a problem with the shower pan.
Is your shower pan quietly wreaking havoc in your bathroom? Leaks can be sneaky, manifesting in subtle yet telling signs that demand your attention. Identifying a leaking shower pan is crucial to prevent further damage and costly repairs. Let’s dive into the signs that may indicate your shower pan is leaking.
Visible Water Damage
Visible water damage is often the first clue that something is amiss. You might notice peeling paint or wallpaper near your shower area. Swollen or warped baseboards are also key indicators. Have you spotted any water stains on the ceiling below your bathroom? These are all signs that moisture is escaping from your shower pan. Addressing these issues early can save you from bigger headaches down the line.
Mold And Mildew Growth
Mold and mildew thrive in damp environments. Have you noticed any unexpected growth in places you can’t easily clean? If you spot mold or mildew in corners or crevices around your shower, it’s time to investigate further. These fungi not only damage your bathroom but can affect your health. Regularly inspecting these areas can keep your bathroom safe and clean. Mold is persistent, so don’t wait—take action immediately.
Unpleasant Odors
A leaking shower pan can produce unpleasant odors that linger. If your bathroom smells damp or musty, consider it a red flag. Is there a persistent odor despite thorough cleaning? This could indicate water pooling beneath your shower pan, fostering bacteria and mold. You deserve a fresh-smelling bathroom. Regular sniff tests can help you catch problems early. Wouldn’t you rather find the cause before it spreads? By recognizing these signs, you can take control and prevent your bathroom from turning into a major repair project. Have you noticed any of these signs in your bathroom recently? Your proactive approach can save you time and money, ensuring your shower remains a safe and pleasant space.

Credit: dsapone.com
Common Causes Of Leaks
Water pooling around your shower might indicate a leaking shower pan. Cracks in the pan or poor installation often cause these leaks. Check for damp spots or mold, as they are common signs of underlying issues.
When your shower pan starts leaking, it can create a frustrating mess that disrupts your daily routine. Understanding the common causes of these leaks can help you identify the problem early and prevent further damage. Whether it’s a cracked shower pan, issues during installation, or worn-out seals, knowing what to look for can save you time and money.
Cracked Shower Pan
A cracked shower pan is a frequent culprit behind leaks. These cracks can develop from regular wear and tear or from heavy objects accidentally dropped on the surface. If you notice water pooling around your shower, inspect the pan closely. Look for visible cracks or chips. Even minor damage can lead to significant water leakage. Consider your own bathroom habits. Do you often drop shampoo bottles or other items in the shower? This might be contributing to the problem.
Faulty Installation
Another common issue is faulty installation. A shower pan that wasn’t installed correctly can result in water seeping through gaps or uneven surfaces. Imagine rushing through a DIY project without following instructions carefully. A similar scenario might have occurred during your shower’s installation. Think about the age of your shower. If it’s relatively new and leaking, installation errors could be the cause. Professional help may be needed to correct these mistakes.
Worn-out Seals
Seals around the shower pan can wear out over time, leading to leaks. Constant exposure to water and cleaning products can degrade these seals. Are you using harsh chemicals to clean your shower? This might be accelerating the wear and tear on your seals. Check the seals regularly for signs of deterioration. If they look brittle or are peeling away, it’s time for a replacement. Now that you know the common causes, what steps will you take to address potential leaks in your shower? Identifying the issue early can prevent costly repairs and keep your bathroom in top shape.
Testing For Leaks
Discovering a leaking shower pan is crucial to prevent water damage. Watch for water stains around the shower area. Dampness or mold growth on walls may also indicate a problem.
Testing for leaks in your shower pan is crucial to prevent water damage that can lead to costly repairs. A small leak can be sneaky, hiding under tiles and causing havoc without you even realizing it. But fear not, there are simple and effective techniques to help you identify any leaks and save your bathroom from disaster. Whether you’re a DIY enthusiast or just someone who likes to keep things running smoothly, these testing methods will guide you through the process.
Water Staining Techniques
One straightforward way to test for leaks is by using water staining techniques. This method involves pouring water onto the shower pan and checking for any visible stains. You can use a sponge or cloth to wet the pan uniformly. After a few hours, inspect the area around the shower, especially the corners and seams. If you notice any damp spots or discoloration, it could indicate a leak. It’s surprising how a simple water test can reveal underlying issues.
Using Dye Or Food Coloring
Adding dye or food coloring to your testing routine can be a game-changer. Mix a few drops of dye or food coloring with water and pour it into the shower pan. Wait for about 30 minutes and check the outer areas of the shower pan for any colored water seepage. This method is particularly useful for detecting leaks that are not visible to the naked eye. Imagine finding a leak simply by using a few drops of dye!
Pressure Testing
Pressure testing is another method to consider. This technique involves plugging the drain and filling the shower pan with water to create pressure. You then observe for any signs of water escaping from the pan. It’s a great way to test the pan’s integrity. If you notice any water loss without using the shower, it’s time to investigate further. Have you ever thought about how pressure can expose hidden leaks?
Credit: www.tiktok.com
Diy Repair Solutions
Spotting a leaking shower pan can prevent water damage. Look for water stains on ceilings or walls below. Check for dampness or mold around the shower area. These signs indicate potential leaks needing attention. Regular inspection can help maintain a dry and safe bathroom environment.
Having a leaking shower pan can be a real headache, but you don’t always need to call in the pros. Tackling the issue with some DIY repair solutions can save you both time and money. By using a few simple techniques, you can address the problem effectively. Let’s dive into some practical solutions to fix your leaking shower pan.
Sealing Cracks With Epoxy
Epoxy is a powerful tool for sealing small cracks in your shower pan. Begin by thoroughly cleaning the area with soap and water to ensure that dirt and grime don’t interfere with the seal. After drying, apply the epoxy directly into the crack and spread it evenly with a putty knife. The key here is to let the epoxy cure completely. Check the instructions on your epoxy kit for exact curing times, as they can vary. Once cured, test the seal by running a small amount of water over the repaired area to ensure it holds.
Replacing Worn-out Seals
Worn-out seals around your shower pan can be a major cause of leaks. Inspect the seals for signs of wear, such as cracks or mold. To replace them, carefully remove the old sealant using a utility knife or sealant remover tool. After cleaning the surface, apply a new bead of sealant. Use a caulking gun for a smooth and even application. Make sure the sealant is specifically designed for bathroom use to withstand moisture. Allow it to dry completely before using the shower again.
Re-grouting Tiles
Cracked or missing grout can be another culprit of leaks. Re-grouting is a straightforward process that involves removing the old grout and applying new grout. Use a grout saw or a similar tool to remove the damaged grout from between the tiles. Clean the area with a damp cloth to remove any dust or debris. Mix new grout according to the package instructions and apply it with a grout float. Ensure you fill all gaps completely, then wipe away excess grout with a damp sponge. Let it dry for the recommended time, usually 24 hours, before exposing it to water. Have you ever tackled a DIY repair that seemed daunting at first but ended up being easier than expected? Sometimes, all it takes is a bit of patience and attention to detail. By following these steps, you can effectively address a leaking shower pan and keep your bathroom in top shape.
When To Call A Professional
Noticing a leak in your shower pan can be worrying. While small issues might be solved by a DIY approach, certain situations demand expert help. Knowing when to call a professional can save you time and prevent bigger problems. Consider professional assistance if you face any of these scenarios.
Extensive Damage
If you see water stains or mold on walls and ceilings, this points to extensive damage. Such damage often hides behind walls and floors. Fixing this requires specialized tools and skills. Professionals can assess the situation and prevent further harm to your home.
Persistent Leaks
Leaks that don’t stop after quick fixes suggest deeper issues. These may involve the plumbing or the shower pan itself. Persistent leaks can lead to higher water bills and structural damage. A professional can identify the source and provide a lasting solution.
Complex Repairs
Some repairs involve more than just sealing a crack. Replacing a shower pan or fixing complex plumbing issues is not easy. These tasks need expert knowledge and equipment. Attempting these repairs yourself can worsen the problem. Calling a professional ensures the job is done right.
Preventive Measures
Preventing a shower pan leak can save you time, money, and stress. Being proactive ensures your bathroom remains a sanctuary rather than a source of frustration. Let’s explore some simple yet effective strategies to keep your shower pan in top shape.
Regular Inspection
Regularly inspecting your shower pan is crucial. You might notice minor cracks or discolored grout that signal impending leaks. Have you checked for any unusual dampness or musty odors? These could be signs that water is seeping where it shouldn’t.
Make it a routine to glance over your shower pan after cleaning. Keep an eye out for any changes. A small effort today can prevent a big mess tomorrow.
Proper Installation Techniques
Proper installation is the foundation of a leak-free shower pan. Was your shower pan installed by a professional? If not, you might want to consider having an expert review it.
Ensure that the sealant used is of high quality. A well-sealed shower pan keeps water contained. If you’re installing a new pan, ask your installer about their methods and materials.
Routine Maintenance
Routine maintenance is your best friend in preventing leaks. Clean your shower pan regularly to prevent soap scum and mold buildup. These can weaken the pan’s structure over time.
Are you using the right cleaning products? Harsh chemicals can erode the materials, leading to tiny leaks. Opt for gentle cleaners and rinse thoroughly. This simple step can extend the life of your shower pan significantly.
Taking these preventive measures can make a world of difference. Have you taken steps to ensure your shower pan is leak-free? It’s worth the effort to avoid the headache of repairs later on.
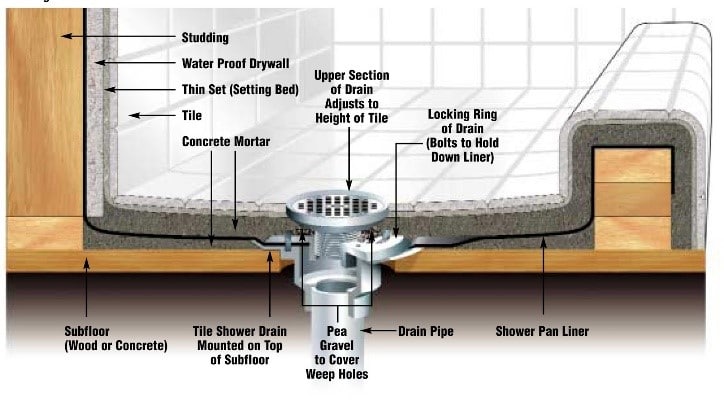
Credit: www.home-probe.com
Frequently Asked Questions
How Can I Spot A Shower Pan Leak?
Look for water stains on ceilings. Check for damp floors near the shower. Inspect grout and caulking for damage.
What Causes Shower Pan Leaks?
Cracks in the pan. Damaged grout or caulking. Poor installation. Old age and wear. These are common causes.
How Do I Test For A Leaking Shower Pan?
Seal the drain. Fill the pan with water. Wait a few hours. Look for leaks. Simple test.
Can A Leaking Shower Pan Lead To Mold?
Yes, moisture can cause mold. Mold grows quickly in damp areas. Check for leaks to prevent mold growth.
How Can I Fix A Leaking Shower Pan?
Repair cracks with epoxy. Replace damaged caulking. If severe, call a professional. Regular maintenance helps prevent leaks.
Conclusion
Detecting a leaking shower pan early can prevent damage. Regular checks help spot issues before they worsen. Notice any water stains or mold around your shower. These are common signs of leaks. Act quickly to avoid costly repairs. Use simple tools to inspect the shower pan.
A flashlight and a keen eye work well. Consult a professional if you find persistent issues. They offer expert solutions. Keeping your bathroom dry is essential. A little attention now saves trouble later. Stay vigilant and maintain your shower efficiently.
This ensures a safe and comfortable home environment.