To repair water damaged leather, first ensure that the leather is completely dry. Once dry, repair any cracks or damage using a leather repair kit for small repairs, or take it to a professional for bigger cracks or damage.
Water stains on leather are not necessarily permanent, but if left untreated, they can cause discoloration and alter the texture of the leather. In this blog post, we will discuss in detail how to repair water damaged leather and salvage your leather items.
We will also cover how water affects leather, how to prevent water damage, and the best products to use for repairing water damaged leather. By following these tips, you can restore your water damaged leather items and keep them looking their best for years to come.
Initial Assessment Of Water Damage
When it comes to repairing water-damaged leather, the initial assessment is crucial. By identifying the severity of the damage and understanding the common signs of water damage, you can take the necessary steps to salvage your leather items effectively.
Identifying Damage Severity
Before proceeding with the repair process, it’s essential to determine the severity of the water damage. By assessing whether the leather has experienced mild, moderate, or severe damage, you can tailor your repair approach accordingly.
Common Signs Of Water Damage
Recognizing the common signs of water damage is vital for effectively addressing the issue. These signs may include discoloration, stiffness, odor, mold growth, and visible water stains. By identifying these indicators, you can initiate the appropriate restoration techniques.
Pre-cleaning Preparations
Before diving into the process of repairing water-damaged leather, it’s crucial to make the necessary pre-cleaning preparations. By taking the time to gather the required materials and set up your work area, you can ensure a smooth and effective leather restoration process.
Gathering Necessary Materials
When preparing to repair water-damaged leather, it’s essential to gather the following materials:
- Soft, lint-free cloths
- Mild leather cleaner or saddle soap
- Distilled water
- leather conditioner
- White vinegar
- Isopropyl alcohol
- Leather repair kit (for larger cracks or damage)
Preparing The Work Area
Creating an optimal work area is key to successfully repairing water-damaged leather. Here’s how to prepare your work area:
- Choose a well-lit and well-ventilated space to work in.
- Lay down a protective covering to prevent any further damage to the surrounding area.
- Ensure all necessary materials are within easy reach to avoid interruptions during the repair process.
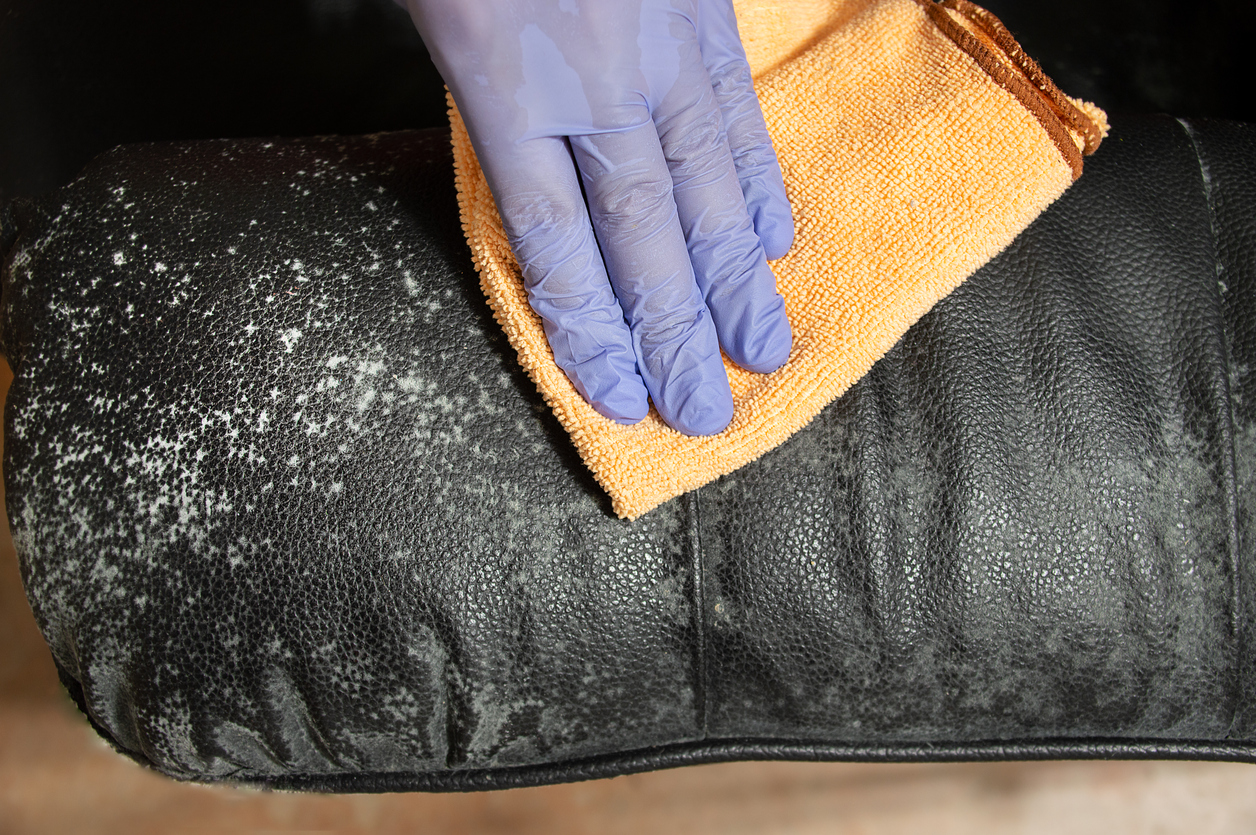
Removing Surface Dirt And Debris
To repair water-damaged leather, start by gently wiping off any excess dirt and debris with a soft, lint-free cloth. Allow the leather to thoroughly dry before applying a leather conditioner, such as Leather Honey, to restore its flexibility and texture.
Repeat the application if necessary for optimal results.
Gentle Cleaning Techniques
To effectively repair water-damaged leather, it’s crucial to start by removing surface dirt and debris. This step is essential as it allows you to have a clear view of the damage and prevents any further scratching or staining during the repair process.
Here are some gentle cleaning techniques to remove surface dirt and debris from water-damaged leather:
1. Use a soft, lint-free cloth: Begin by gently wiping off any excess dirt or debris from the leather surface. This will help to remove any loose particles that may have accumulated due to the water damage.
2. Avoid abrasive materials: It’s important to avoid using harsh or abrasive materials, such as brushes or rough sponges, as these can further damage the leather. Stick to soft, lint-free cloths or microfiber towels for gentle cleaning.
3. Consider using a mild soap: If the surface dirt is stubborn or hard to remove, you can mix a small amount of mild soap, such as baby shampoo or saddle soap, with water. Dampen a cloth with the soapy solution and gently wipe the affected areas in a circular motion. Remember to test the solution on a small, inconspicuous area first to ensure it doesn’t cause any discoloration or damage.
4. Pat dry: After cleaning, use a clean, dry cloth to pat the leather surface dry. Avoid rubbing or scrubbing, as this can lead to further damage or discoloration.
Drying Before Treatment
Once you have removed the surface dirt and debris, it’s crucial to allow the leather to dry completely before proceeding with any further treatment. This step is essential to prevent the growth of mold or mildew and ensure the effectiveness of the repair process.
Here are some tips for drying water-damaged leather before treatment:
1. Avoid direct heat: Keep the leather away from direct heat sources, such as heaters or hairdryers, as high temperatures can cause the leather to shrink or crack. Instead, allow the leather to air dry naturally at room temperature.
2. Patience is key: Drying leather naturally may take some time, so it’s important to be patient. Avoid rushing the process by applying excessive heat or placing the leather in direct sunlight, as this can cause irreversible damage.
3. Ensure proper ventilation: To aid in the drying process, ensure that the area is well-ventilated. This helps to promote air circulation, which helps to speed up the drying time.
4. Use a leather conditioner: Once the leather is completely dry, it’s a good idea to apply a leather conditioner to restore moisture and prevent further damage. Ensure that the conditioner is suitable for the type of leather you’re treating and follow the manufacturer’s instructions for application.
Remember, when repairing water-damaged leather, it’s important to be gentle and patient. Rushing the process or using harsh cleaning materials can lead to further damage. By following these gentle cleaning techniques and allowing the leather to dry properly before treatment, you can effectively repair water-damaged leather and restore its beauty and functionality.
Drying The Leather Properly
When repairing water damaged leather, it is crucial to properly dry the leather to prevent further damage. Gently wipe off any excess dirt and debris, then allow the leather to air dry. Apply a leather conditioner to restore moisture and flexibility to the leather.
Air Drying Vs. Artificial Heat
When it comes to drying water-damaged leather, it’s important to choose the right method to avoid causing further damage. Two common methods are air drying and using artificial heat.
Air drying is the preferred method for most types of leather. This involves allowing the leather to dry naturally at room temperature. It may take longer for the leather to dry using this method, but it helps to prevent shrinkage and maintain the natural shape of the leather.
On the other hand, using artificial heat to dry leather can speed up the drying process. However, it is important to exercise caution when using this method as excessive heat can cause the leather to crack or become brittle. If you choose to use artificial heat, make sure to keep the heat source at a safe distance and avoid direct contact with the leather.
Maintaining Shape While Drying
Properly maintaining the shape of the leather while drying is crucial to ensure that it retains its original form. Here are a few tips to help you maintain the shape of your water-damaged leather:
- Stuff the leather item with clean, dry towels or newspaper to provide support and help it hold its shape as it dries. Make sure to fill all the crevices and corners of the item.
- Avoid hanging leather items to dry, as this can cause stretching and distortion of the shape. Instead, lay the leather flat on a clean, dry surface.
- If you’re drying leather shoes or boots, use shoe trees or crumpled paper inside them to help maintain their shape.
By following these tips, you can ensure that your water-damaged leather dries properly and maintains its original shape.
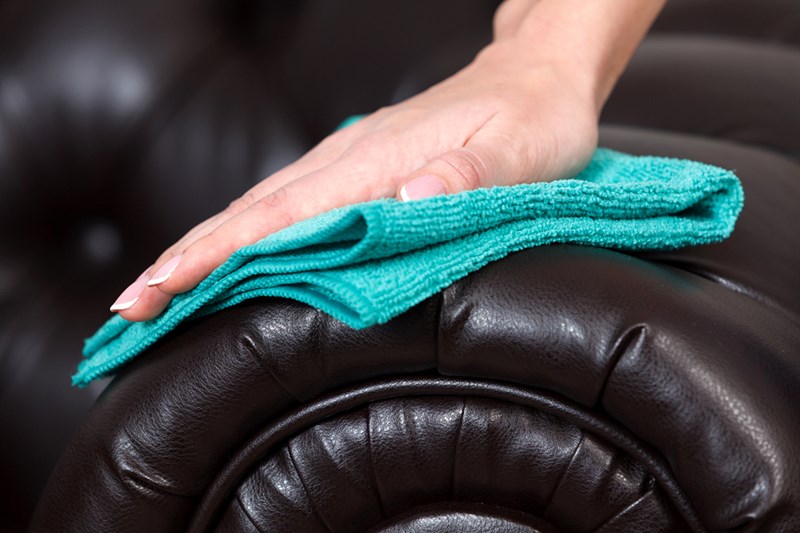
Conditioning To Restore Flexibility
To repair water damaged leather, conditioning to restore flexibility is key. Gently wipe off any excess dirt and allow the leather to dry completely. Apply a leather conditioner to restore moisture and flexibility, repeating the application if necessary.
Conditioning to Restore Flexibility:
After cleaning the water damaged leather, the next step is to restore its flexibility and prevent it from cracking or becoming stiff. Conditioning is an essential step in the process of repairing water-damaged leather. Leather conditioners are specially designed to help restore the natural oils and moisture of the leather that have been lost due to exposure to water. Here are some tips for selecting the right leather conditioner and applying it for the best results.
Selecting the Right Leather Conditioner:
Choosing the right leather conditioner is crucial in restoring the flexibility of water-damaged leather. There are various types of leather conditioners available in the market, such as creams, oils, and sprays. It’s essential to select the right type of leather conditioner based on the type of leather, the extent of damage, and the desired finish. It’s recommended to use a water-based leather conditioner as it’s less likely to cause discoloration or damage to the leather. It’s also essential to choose a conditioner that doesn’t contain any harsh chemicals that can further damage the leather.
Application Tips for Best Results:
Once you’ve selected the right leather conditioner, it’s time to apply it to the water-damaged leather. Here are some tips for the best application results:
1. Test the conditioner on a small, inconspicuous area before applying it to the entire leather surface.
2. Apply the conditioner using a soft, lint-free cloth or a sponge.
3. Apply the conditioner in a thin, even layer, and avoid applying too much conditioner as it can cause the leather to become greasy or oily.
4. Allow the conditioner to dry completely before using or storing the leather item.
5. For best results, apply the conditioner several times, allowing each layer to dry completely before applying the next layer.
In conclusion, conditioning is a crucial step in restoring the flexibility of water-damaged leather. Selecting the right leather conditioner and applying it correctly can help prevent the leather from cracking or becoming stiff. By following these tips, you can restore your water-damaged leather to its original state and prolong its lifespan.
Addressing Stains And Discoloration
Repairing water-damaged leather can be tricky, but addressing stains and discoloration is possible. Gently wipe off any excess dirt and use a soft, lint-free cloth to remove debris and dirt. Apply a leather conditioner like Leather Honey to restore the texture and flexibility of your leather.
Addressing Stains and Discoloration is a crucial step in repairing water-damaged leather. Stains and discoloration can be caused by water, and if left untreated, can cause permanent damage to your leather items. But don’t worry, there are several ways to address these issues and restore your leather items to their former glory.
Homemade Solutions
One effective way to address stains and discoloration is by using homemade solutions. A simple mixture of equal parts water and vinegar can be used to remove water stains. Apply the solution to the affected area and let it sit for a few minutes. Then, wipe the area clean with a damp cloth and allow it to dry.
Another effective homemade solution is a mixture of lemon juice and cream of tartar. Mix the two ingredients together to form a paste and apply it to the affected area. Let it sit for a few minutes before wiping it off with a damp cloth.
Commercial Stain Removers
If homemade solutions don’t work, you can try using commercial stain removers. There are several products available on the market that are specifically designed to remove water stains and discoloration from leather. Be sure to follow the instructions carefully and test the product on a small, inconspicuous area before applying it to the entire item.
One popular commercial stain remover is the Leather CPR Cleaner & Conditioner. It is safe to use on all types of leather and can remove even the toughest stains. Another popular option is the Chamberlain’s Leather Milk Stain Remover. It is a gentle yet effective product that can remove stains without damaging the leather.
In conclusion, addressing stains and discoloration is an important part of repairing water-damaged leather. Whether you choose to use homemade solutions or commercial stain removers, it’s important to take action as soon as possible to prevent permanent damage. With a little effort and the right products, you can restore your leather items to their former beauty.
Repairing Cracks And Damage
Water damage can cause cracks and damage to your leather items, affecting both their appearance and durability. However, there are steps you can take to repair the cracks and restore the leather to its former glory. In this section, we will discuss two main approaches to repairing cracks and damage: using a leather repair kit and seeking professional help.
Using A Leather Repair Kit
If you’re dealing with small cracks or damage on your leather items, a leather repair kit can be a cost-effective solution. These kits typically include everything you need to make small repairs, such as adhesives, fillers, and color-matching materials.
Here’s a step-by-step guide on how to use a leather repair kit:
- Clean the affected area: Start by gently wiping off any dirt or debris from the damaged area using a soft, lint-free cloth.
- Prepare the leather: Use the provided materials to prepare the leather surface, which may involve sanding or cleaning the area.
- Apply the adhesive: Follow the instructions in the kit to apply the adhesive or filler to the cracks or damaged spots. Make sure to apply it evenly and smoothly.
- Allow it to dry: Give the adhesive or filler enough time to dry completely. This may take a few hours or overnight, depending on the specific product.
- Sand and blend: Once the adhesive or filler has dried, use a fine-grit sandpaper to smooth out the repaired area. Then, use the provided color-matching materials to blend the repaired spot with the rest of the leather.
- Apply a leather conditioner: To restore moisture and flexibility to the repaired area, apply a leather conditioner recommended by the kit manufacturer.
When To Seek Professional Help
In some cases, the cracks or damage on your leather items may be too severe or extensive for a DIY repair. If you’re unsure about your ability to effectively repair the leather or if the damage is significant, it’s best to seek professional help.
Professional leather repair experts have the necessary skills, tools, and materials to handle complex repairs and restore your leather items to their original condition. They can assess the extent of the damage, provide expert advice, and perform the necessary repairs using specialized techniques.
When choosing a professional leather repair service, consider their experience, reputation, and customer reviews. It’s also a good idea to inquire about their warranty or guarantee on the repairs they perform.
Remember, timely and proper repair of water-damaged leather can help extend the lifespan of your cherished items and maintain their aesthetic appeal. Whether you choose to use a leather repair kit or seek professional assistance, taking action to repair cracks and damage is essential for preserving your leather possessions.
Credit: wecanfixthat.com
Preventive Measures For Future Protection
Preventing water damage to your leather items is essential for maintaining their longevity and appearance. By taking proactive measures, you can protect your leather from potential water-related issues. Here are some preventive measures you can follow:
Waterproofing Options
One effective way to prevent water damage is by using waterproofing products specifically designed for leather. These products create a protective barrier that repels water, preventing it from seeping into the leather fibers. There are various waterproofing options available, including:
- Waterproofing sprays: These sprays are easy to use and provide a quick and efficient way to waterproof your leather items. Simply spray the product evenly on the surface of the leather and allow it to dry.
- Wax-based waterproofing: Wax-based products create a durable barrier on the leather, offering long-lasting protection. Apply the wax evenly on the leather surface using a soft cloth, and then buff it to a shine.
- Silicone-based waterproofing: Silicone-based products provide excellent water repellency and can be applied to both smooth and textured leathers. Apply the silicone-based product using a cloth or sponge, ensuring even coverage.
Routine Maintenance And Care
Maintaining a regular cleaning and care routine can significantly reduce the risk of water damage to your leather. Here are some essential maintenance tips to follow:
- Clean your leather items regularly using a mild leather cleaner and a soft cloth. This will help remove dirt and debris that can potentially trap moisture.
- After cleaning, ensure that the leather is completely dry before storing or using it. Excess moisture can lead to mold or mildew growth.
- Condition your leather periodically to keep it moisturized and supple. Leather conditioners help maintain the natural oils in the leather, preventing it from drying out and becoming susceptible to water damage.
- Avoid exposing your leather items to excessive heat or direct sunlight, as it can cause the leather to become brittle and prone to water damage.
- Store your leather items in a cool, dry place when not in use. Use dust covers or breathable bags to protect them from dust and moisture.
By following these preventive measures, you can ensure that your leather items remain protected and maintain their beauty for years to come.
Restoration Success Stories
Discover inspiring restoration success stories on how to repair water-damaged leather. Learn effective techniques, such as gentle cleaning, drying, and applying leather conditioners, to revive cracked or damaged leather furniture, boots, bags, and more. Say goodbye to water stains and hello to restored leather with these helpful tips and tricks.
Before And After Comparisons
Before attempting any repair on water-damaged leather, it’s natural to wonder if restoration is possible. Here are some remarkable before and after comparisons that demonstrate the incredible transformation possible with the right techniques and products.
Testimonials And Tips From Users
Real-life experiences and tips from users who have successfully restored water-damaged leather can provide invaluable insights. Here are some testimonials and tips that can guide and inspire you in your restoration journey.
Credit: www.porterscleaning.com
Faqs On Water Damaged Leather
When it comes to water damaged leather, there are some common questions that people often have. Here are the answers to some frequently asked questions about water damaged leather:
Are Water Stains Permanent?
Water itself does not necessarily damage the leather permanently, but if left untreated, these water stains can become permanent, cause discoloration, and alter the texture of the leather, affecting the aesthetic appearance of your product.
Can Leather Be Fixed After Rain Exposure?
After exposure to rain, you can gently wipe off any excess dirt and use a soft, lint-free cloth to remove debris and dirt. Allow the leather to dry and then apply a leather conditioner. Repeat the application if necessary to restore the leather.

Credit: m.youtube.com
Frequently Asked Questions
Can You Fix Water Damage Leather?
To fix water-damaged leather, gently wipe off excess dirt, let it dry, and use a leather conditioner. For small cracks, use a repair kit; for bigger damage, seek professional help. Untreated water stains can become permanent, causing discoloration and altering the leather’s texture.
Are Water Stains On Leather Permanent?
Water stains on leather are not necessarily permanent, but if left untreated, they can cause discoloration and alter the texture. It’s essential to address water stains promptly to prevent permanent damage.
How To Fix Leather That Has Been Rained On?
To fix leather that has been rained on, gently wipe off excess dirt and allow the leather to dry. Then, apply a leather conditioner to restore moisture and flexibility. For larger damage, consider professional repair or a leather repair kit.
Does Leather Get Ruined When Wet?
Leather can be ruined when wet due to stiffness and loss of flexibility. However, with proper care and treatment, water damage can be repaired. Gently blot the leather to remove excess water and apply a leather conditioner to restore moisture and flexibility.
For severe damage, seek professional repair assistance.
How Can I Repair Water-damaged Leather At Home?
You can gently wipe off excess dirt and debris, let the leather dry, and then apply a leather conditioner. For more severe damage, consider professional repair.
Conclusion
Repairing water-damaged leather requires careful attention and the right techniques. Whether it’s small cracks or significant damage, there are solutions available. From using leather repair kits for minor repairs to seeking professional help for larger cracks, the key is to address the damage promptly.
Remember that water stains can become permanent if left untreated, affecting the appearance and texture of the leather. By following the proper steps and using appropriate products, you can salvage your water-damaged leather items and restore them to their former glory.