Have you noticed a tear or leak in your rolled roofing? Before you start worrying about costly repairs or replacements, take a deep breath.
Repairing rolled roofing might be simpler than you think. With the right guidance, you can tackle this issue yourself and save money. Imagine the satisfaction of fixing your roof with your own hands! This guide will walk you through each step, ensuring you have the confidence and know-how to restore your roof to its best condition.
Get ready to transform your roofing woes into a manageable DIY project. Keep reading to discover the secrets of effective rolled roofing repair.
Tools And Materials Needed
Repairing rolled roofing requires specific tools and materials for effective results. Knowing what you need saves time and effort. Let’s explore the essentials for a successful repair.
Tools Needed
To begin, gather your tools. You’ll need a utility knife for cutting. A hammer is vital for securing nails. Keep a tape measure on hand for accurate measurements. A roofing brush will help clean surfaces. Lastly, a ladder ensures you reach the roof safely.
Materials Required
Start with roofing cement for sealing edges and seams. Have extra rolled roofing material ready for patches. Use roofing nails to secure the material. Sandpaper is useful for smoothing rough spots. Don’t forget a caulking gun for applying cement neatly.
Safety Equipment
Your safety is crucial. Wear gloves to protect your hands. Safety goggles shield your eyes from debris. Non-slip shoes help maintain grip on the roof. Consider a safety harness for extra security. Always prioritize safety during repairs.
Preparation Supplies
Preparation is key. Gather a broom to sweep debris away. Use a cleaning solution to remove dirt. Rags are handy for drying surfaces. Have a bucket ready for waste disposal. Keep everything organized to streamline the repair process.
Assessing The Damage
Identifying problem areas is crucial before fixing rolled roofing. Check for cracks, leaks, or loose material. Thorough inspection helps pinpoint the extent of damage, ensuring efficient repair and longevity.
Assessing the damage on your rolled roofing is a crucial first step in any repair process. Understanding the extent of the damage allows you to determine whether a simple patch will suffice or if more extensive repairs are necessary. This section will guide you through the process of evaluating your roof’s condition, ensuring you are well-prepared to tackle the task efficiently and effectively.Inspecting The Surface
Begin with a thorough visual inspection. Look for obvious signs of wear like cracks, blisters, or punctures. These are often indicative of areas needing immediate attention. Use a flashlight to examine less visible spots. This helps you catch subtle issues that might otherwise go unnoticed. Consider the weather conditions. Recent storms or heavy rain could have impacted your roof’s integrity.Checking For Leaks
Identify any water stains inside your home. These can point directly to leaks in your roofing. Test for soft spots by gently pressing on the surface. Soft areas may indicate moisture trapped beneath the roofing material. Trace the source of the leak. Sometimes, the actual entry point of water is far from the visible damage.Evaluating The Age Of The Roof
Consider how long the roofing has been installed. Older roofs are prone to more frequent issues and may require a complete overhaul. Look for signs of aging, such as brittleness or color fading. These can suggest the material is nearing the end of its lifespan. Think about past repairs. Frequent fixes might indicate underlying problems that need addressing.Assessing The Extent Of Damage
Measure the size of the damaged area. Large sections may require more than just patching. Determine if the damage is isolated or widespread. Widespread issues might mean it’s time for a new roof. Consider the impact on the overall roof structure. Damage to supporting elements can affect the roof’s stability. Understanding the scope of the damage can save you time and money. Have you considered how frequent inspections could prevent major repairs in the future? Taking proactive steps now can extend the life of your roof and protect your home investment.Preparing The Roof Surface
Repairing rolled roofing requires careful preparation of the roof surface. This crucial step ensures the repair lasts. It prevents future damage. Begin by cleaning debris and drying the area thoroughly. These actions help the new roofing adhere properly.
Cleaning Debris
Start by removing all debris from the roof. Use a broom to sweep away leaves and dirt. A clean surface is essential for repair success. Inspect the area for moss or algae growth. Scrape off any stubborn buildup using a brush. This prevents moisture retention.
Check the gutters for blockages. Clear any debris to ensure proper drainage. Water pooling can damage roofing materials. Regular cleaning maintains the roof’s integrity. Remember, a clean roof is a healthy roof.
Drying The Area
After cleaning, ensure the roof is completely dry. Moisture can hinder adhesion of new roofing materials. Use a towel to soak up remaining water. For faster drying, a leaf blower can help.
Consider the weather conditions. Choose a sunny day for roof repair. Sunlight aids drying and speeds up the process. A dry surface is key to a successful repair. Avoid working on wet surfaces. This ensures the roofing materials stick well.

Credit: perimeterroofing.com
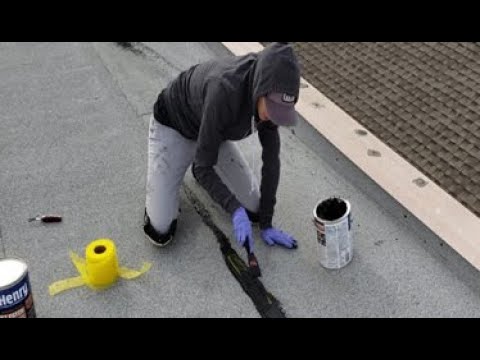
Cutting And Patching
Repairing rolled roofing involves cutting damaged areas and patching them with new material. Clean the surface. Use roofing cement to secure the patch. This simple technique extends the life of your roof.
Cutting and patching rolled roofing is essential for repair. It ensures your roof stays protected and leak-free. This task involves choosing the right patch, cutting it to size, and applying adhesive. Each step requires precision and care. Let’s dive into the details.Choosing The Right Patch
Selecting the right patch is crucial. Use material similar to your existing roof. This ensures compatibility and durability. Measure the damaged area accurately. Buy a patch slightly larger than the damage. This provides better coverage and security.Cutting The Patch
Cutting the patch correctly is vital. Use a sharp utility knife or scissors. Ensure clean and straight edges. This helps in a snug fit. Place the patch over the damaged area. Mark the exact cutting lines for precision. Double-check your measurements before cutting.Applying Adhesive
Applying adhesive ensures the patch stays in place. Clean the damaged area thoroughly. Remove any dirt or debris. Apply roofing adhesive on the patch’s underside. Use a brush or roller for even distribution. Press the patch firmly onto the roof. Ensure no air bubbles are trapped. Let the adhesive dry completely. This step secures the patch effectively.Securing The Patch
Repairing rolled roofing involves securing the patch effectively. First, clean the damaged area thoroughly. Apply roofing cement generously and press the patch firmly. Ensure edges are sealed tight to prevent leaks. Regular maintenance can extend the life of your roofing, keeping it durable and leak-free.
Securing the patch on a rolled roofing repair is a crucial step to ensure longevity and effectiveness. A well-secured patch will withstand the elements, preventing leaks and further damage. Whether you’re a DIY enthusiast or tackling this project for the first time, understanding how to properly secure the patch will make all the difference. Let’s dive into the specifics of using roofing nails and sealing the edges effectively.Using Roofing Nails
When it comes to attaching the patch, roofing nails are your best friends. These nails are designed to hold the roofing material securely in place. Start by choosing galvanized roofing nails, as they resist rust and corrosion. This ensures your patch remains intact during rainy seasons. Place the patch over the damaged area, ensuring it covers the entire section. Drive the nails through the patch, keeping them around two inches apart along the edges. This spacing helps distribute the weight evenly, preventing any lifting or peeling.Sealing Edges
Sealing the edges is the next crucial step to prevent water from seeping under the patch. A quality roofing sealant or adhesive is key to achieving a watertight barrier. Apply the sealant generously along the edges of the patch. Use a putty knife for smooth application, ensuring every gap is covered. Think about how the sealant will expand and contract with temperature changes. It’s important to use a flexible sealant to accommodate these shifts. This flexibility prevents cracks that can lead to leaks. Have you ever had a patch come loose after a storm? Ensuring the edges are sealed properly can make the difference between a quick fix and a lasting solution. Isn’t it satisfying knowing that your roof patch will hold up against the next downpour? Properly securing the patch can save you time and money in the long run.Finishing Touches
Completing a rolled roofing repair involves careful attention to detail. These final steps ensure the longevity and effectiveness of your repair. Taking time to finish properly can prevent future problems and save money. Let’s explore the final touches needed.
Inspecting The Repair
Start with a thorough inspection of your repair work. Look for any loose edges or gaps. Ensure all seams are tightly secured. Check for any visible damage that might have been overlooked. Verify that the roofing material lays flat without any wrinkles. This step confirms that your repair is solid.
Additional Sealing
Apply an extra layer of sealant to all seams and edges. This provides added protection against water leaks. Use a high-quality sealant designed for roofing. Make sure the sealant covers all vulnerable areas. This step is crucial for long-term durability. Let the sealant dry completely before walking on the roof.
Maintenance Tips
Fixing rolled roofing involves cleaning the damaged area and applying roofing cement. Use roofing nails to secure any loose sections. Seal edges with roofing cement to prevent leaks.
When it comes to maintaining your rolled roofing, consistent care is key to extending its lifespan. Regular maintenance not only prevents potential damage but also saves you from costly repairs. By following a few simple tips, you can ensure your roof stays in top condition for years to come.Regular Inspections
Inspect your rolled roofing at least twice a year. Look for signs of wear, such as cracks, bubbles, or loose edges. If you notice any issues, address them immediately to prevent further damage. Consider checking your roof after significant weather events like heavy rain or strong winds. These conditions can exacerbate minor issues, leading to bigger problems if left unattended. Keep safety in mind. Use a sturdy ladder and have someone spot you if needed. Your safety is as important as your roof’s condition.Cleaning The Roof
Dirt and debris can accumulate on your roof, leading to water pooling and eventual damage. Use a soft broom or a leaf blower to remove leaves, branches, and other debris. Avoid using high-pressure water sprays, as they can damage the roofing material. A gentle rinse with a garden hose is sufficient to clear away dirt and dust. Make it a habit to clear your gutters regularly. Clogged gutters can lead to water overflow, damaging your roof and home exterior. A clean gutter system ensures proper drainage and prolongs your roof’s life. Have you ever thought about the impact of neglected maintenance on your home’s value? Regular care not only protects your investment but also enhances your property’s overall appeal. Take these steps seriously, and your roof will thank you for it.
Credit: www.pjfitz.com
Credit: www.youtube.com
Frequently Asked Questions
What Tools Are Needed To Repair Rolled Roofing?
Basic tools include a utility knife, roof cement, and a roofing roller. Safety gear is important too.
How Do I Locate Leaks In Rolled Roofing?
Look for water stains inside. Check for damaged or missing roofing material outside.
Can Rolled Roofing Be Patched?
Yes, cut and remove the damaged area. Apply a new piece with roof cement.
How Long Does A Rolled Roof Repair Last?
Repairs can last several years. Regular maintenance can help extend its lifespan.
Is Professional Help Necessary For Rolled Roofing Repair?
Not always. Simple repairs can be DIY. For extensive damage, consider hiring a professional.
Conclusion
Repairing rolled roofing is simple with the right steps. Inspect the roof regularly. Fix small holes and tears promptly. Use roofing cement to seal cracks. Replace damaged sections as needed. Keep tools handy for quick repairs. Safety should always be your top priority.
Follow these tips for a durable roof. A well-maintained roof lasts longer. Protects your home from weather damage. Costs less in the long run. Keeping your roof in good shape is smart. Enjoy peace of mind with a sturdy roof.
Happy roofing!