To repair a pitted concrete garage floor, start by cleaning the area and applying a concrete resurfacer. Follow this with sealing for long-lasting results.
Repairing a pitted concrete garage floor can seem daunting, but it’s a manageable task with the right approach. This common issue in many homes and buildings arises due to wear and tear, exposure to chemicals, and the natural aging process of concrete.
Addressing it promptly can prevent further damage and restore the floor’s appearance and functionality. The key is to begin with a thoroughly cleaned surface, free of dirt, grease, and loose material. A high-quality concrete resurfacer will fill the pits and create a smooth, durable surface. Sealing the repaired area helps protect it against future wear, ensuring your garage floor remains in top condition for years to come. This method is cost-effective, straightforward, and yields professional-looking results, making it a popular choice among homeowners seeking to enhance their garage’s durability and aesthetic appeal.
Credit: m.youtube.com
Assessing The Damage
Before diving into repairs, understand the extent of the damage. A careful assessment helps in choosing the right repair method. It ensures a smooth, durable finish.
Signs Of Pitting
Pitted concrete shows small, deep holes. These can vary in size and depth. Look for these common signs:
- Rough texture
- Small, crater-like indentations
- Dust or powder on the garage floor surface
Determining The Severity
It’s crucial to gauge how bad the pitting is. Follow these steps:
- Inspect the entire floor.
- Note the number of pits.
- Measure the width and depth of several pits.
Use a ruler for accuracy. Record your findings. This will help in selecting the right repair materials.
Tools And Materials Required
Tools and Materials Required to repair a pitted concrete garage floor are essential for a successful fix. Proper preparation sets the stage for a smooth, long-lasting repair. Let’s explore what you’ll need.
Concrete Repair Products
- Concrete patching compound – Fills pits and cracks.
- Epoxy filler – Binds well for a durable surface.
- Concrete resurfacer – Creates a new, smooth surface.
Protective Gear
- Safety glasses – Protects eyes from debris.
- Dust mask – Keeps lungs clear of fine particles.
- Work gloves – Guards hands during mixing and application.
Application Tools
- Wire brush – Removes loose concrete and debris.
- Trowel – Spreads and smooths repair products.
- Mixing paddle – Ensures even compound consistency.
- Bucket – Holds mixed repair compound.
Preparing The Concrete Surface
Before repairing a pitted concrete garage floor, preparing the surface is crucial. This process ensures the repair material adheres properly. Follow these steps for the best results.
Cleaning The Area
Start with a clean surface. Use a broom to sweep away dust and debris. For stubborn stains, apply a concrete cleaner. Use a stiff brush to work the cleaner into the surface. Rinse thoroughly with water. Let the area dry completely before proceeding.
Removing Loose Material
Inspect the surface for loose concrete. Use a chisel and hammer to remove any unstable pieces. Be thorough but gentle to avoid further damage. Sweep away the debris after chiseling. This step is essential for a solid repair foundation.
Surface Leveling
Uneven surfaces need leveling. Use a self-leveling concrete product for best results. Follow the manufacturer’s instructions carefully. Mix the product in a clean bucket. Pour the mixture over the low areas. Spread it with a trowel for an even finish. Allow it to cure as directed.
Choosing The Right Concrete Filler
Repairing a pitted concrete garage floor starts with the right filler.
Choosing the correct concrete filler is crucial. It ensures durability and smoothness.
Epoxy-based Fillers
Epoxy-based fillers are strong. They bond well with concrete. Perfect for garages.
- Quick to harden, making them ideal for busy areas.
- Resist chemicals and water well.
- Best for deep pits.
Polymer-modified Cement
Polymer-modified cement mixes cement with polymers. This improves performance.
- Easier to apply than epoxy.
- Good for wider areas.
- Flexible, reducing future cracks.
Selecting For Durability
Consider your garage’s needs before choosing.
| Type | Best For | Durability |
|---|---|---|
| Epoxy-based Fillers | Deep pits | High |
| Polymer-modified Cement | Surface level repairs | Medium |
Both options have pros and cons. Consider your needs carefully.
Mixing And Applying The Filler
Fixing a pitted concrete garage floor is a task you can do. The key part is mixing and applying the filler. This section will guide you. Follow these steps for a smooth, strong repair.
Correct Mixing Ratios
First, get your filler and mixing tools ready. You need the right mix for a good fix. Think of making a cake – the right mix makes it great!
- Read the filler instructions. Each product is different.
- Measure carefully. Use a mixing bucket and a stick.
- Mix until you have a thick, creamy texture. No lumps!
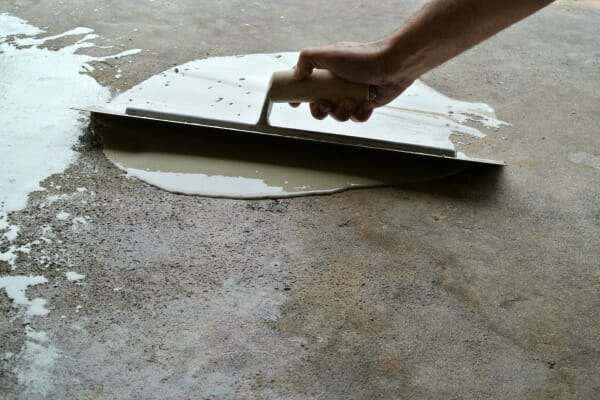
Application Techniques
Now, let’s apply the filler. This part is like painting – smooth and even is the goal.
- Wear gloves. Keep your hands clean and safe.
- Use a putty knife or trowel. Scoop and spread the filler.
- Press the filler into the pits. Fill them all!
- Smooth the top. Use your tool to make it flat.
Ensuring Even Distribution
Last, we make sure the filler is even. You want a flat floor, not a bumpy one!
- Check the area from different angles. Look for bumps or dips.
- Use your tool to add or remove filler as needed.
- Let it dry. Patience is key. Wait for the time on the label.
Remember, practice makes perfect. Your garage floor can look new again. Just mix, apply, and smooth the filler right.
Curing And Drying
Once you’ve filled and smoothed your pitted concrete garage floor, curing and drying it properly is key. This stage is crucial for strength and longevity. Here’s how to get it right.
Ideal Conditions
Temperature and humidity play a major role in curing concrete. Aim for a steady temperature between 50°F and 75°F. High humidity is good; it slows evaporation. Shield the area from direct sunlight, wind, and rain. These can cause uneven drying.
Time Frames
Different concrete mixes have unique drying times. A standard mix may take around 28 days to cure completely. But, light foot traffic is often okay after 24 to 48 hours. Keep vehicles off for at least 7 days.
Curing Compounds
Curing compounds can help the process. They form a barrier to lock in moisture. Apply them evenly right after smoothing the surface. Use a low-pressure sprayer for best results. Check the product instructions for specific drying times.
Finishing Touches
After repairing your pitted concrete garage floor, the final steps are crucial. These steps ensure a smooth, durable finish that lasts for years. The following phases will guide you to a professional-looking repair job.
Sanding The Repaired Surface
Sanding is vital for a smooth finish. It removes excess material and levels the patch with the surrounding area. Use a concrete sander for this task.
- Start with a coarse-grit sandpaper.
- Progress to a finer grit for a smooth texture.
- Ensure the entire surface is evenly sanded.
Applying Sealant
Sealant protects your floor from future damage. It also enhances the floor’s appearance. Choose a high-quality concrete sealant.
- Clean the floor to remove dust and debris.
- Apply the sealant with a roller or sprayer.
- Allow it to dry according to the product’s instructions.
Restoring Texture
Texture is important for grip and safety. After sealing, you might need to restore the floor’s texture. Use a texturing product designed for concrete.
- Mix the texturing compound as directed.
- Apply with a trowel or broom for a non-slip finish.
- Work in small sections to ensure an even application.

Credit: www.familyhandyman.com
Maintenance Tips
Keeping a concrete garage floor in top condition requires regular upkeep. Maintenance prevents further pitting and extends the floor’s lifespan. Follow these tips to keep your concrete garage floor strong and smooth.
Regular Cleaning
Remove dirt and spills to prevent surface damage. Use a stiff-bristled broom for loose debris. For tough stains, a concrete cleaner works best. Rinse thoroughly with water afterwards.
- Sweep weekly
- Spot clean stains
- Mop with proper cleaners
Sealant Reapplication
Sealants protect floors from moisture and stains. Check the sealant’s condition annually. Reapply every 1-2 years for best protection. Use a high-quality concrete sealant for best results.
- Clean the floor before sealing
- Apply sealant evenly
- Allow sealant to dry completely
Monitoring For New Damage
Inspect your floor regularly for signs of wear. Look for new pits or cracks. Early detection leads to easier repairs. Patch small areas quickly to prevent worsening.
| Damage Type | Action |
|---|---|
| Small Pits | Fill with epoxy or patching compound |
| Cracks | Seal with concrete crack filler |
Remember to clean, seal, and inspect your garage floor regularly. This will keep it strong and smooth for years to come.
Credit: allgaragefloors.com
Frequently Asked Questions
Can Epoxy Fix Pitted Concrete Floors?
Epoxy can effectively fill and repair pitted concrete floors, providing a smooth, durable surface that resists further damage and wear.
What Causes Concrete Garage Floors To Pit?
Concrete garage floors pit due to wear and tear, freeze-thaw cycles, chemical spills, and insufficient concrete mix or finishing at the time of installation.
How Long Does Concrete Patching Take To Dry?
Concrete patching compounds typically dry enough for light foot traffic within 24 hours, but complete curing may take up to a week.
Is Sealing Necessary After Repairing Concrete Pits?
Sealing after repairs is recommended to protect the surface, prevent water penetration, and extend the life of the concrete garage floor.
Can Diy Methods Effectively Repair Pitted Concrete?
DIY methods can be effective for small-scale repairs if proper techniques and materials are used, but professional help is advised for larger issues.
Conclusion
Repairing pitted concrete in your garage floor can be straightforward with the right approach. By following the steps outlined, you can rejuvenate your space effectively. Remember, a smooth and durable floor not only looks better but also adds value to your home.
Embrace the challenge, and enjoy the benefits of your hard work!