Have you ever found yourself staring at your tub, frustrated by a drain that just won’t cooperate? You’re not alone.
A broken crosshair in your tub drain can turn a simple task into a headache. But don’t worry—there’s a solution, and it’s easier than you think. Imagine the satisfaction you’ll feel once that stubborn drain is out, and the peace of mind knowing your tub is back to working order.
In this guide, you’ll discover straightforward steps to tackle this issue head-on. So, roll up your sleeves and prepare to reclaim your tub without calling in the professionals. Dive in, and let’s make your bathroom a place of relaxation once more.
Tools Required
Removing a tub drain with broken crosshairs requires specific tools. Essential items include a drain removal tool, pliers, and a screwdriver. A wrench might be necessary to loosen stubborn fixtures.
Removing a tub drain with broken crosshairs can be a challenging task, but with the right tools, you can do it yourself without calling a plumber. Having the correct tools not only makes the process easier but also ensures you don’t damage the tub or the plumbing. Before diving into the task, it’s crucial to gather all the necessary tools, ensuring you’re well-prepared for each step of the process.1. Screwdriver
A screwdriver is essential for removing screws that may be holding the drain in place. Choose a screwdriver that matches the screw type; typically, a Phillips head screwdriver works best for drain screws.2. Drain Removal Tool Or Drain Extractor
A drain removal tool is specifically designed to grip and remove the drain flange. If the crosshairs are broken, this tool will help you twist and lift the drain out without causing additional damage.3. Adjustable Wrench
An adjustable wrench is useful for tightening or loosening the nuts that hold the drain assembly together. Ensure it’s large enough to fit around the nuts but compact enough to maneuver easily in tight spaces.4. Pliers
Pliers are versatile and can be used to grip and twist stubborn parts. They come in handy for pulling out broken pieces or for holding the drain in place as you work to remove it.5. Flashlight
A flashlight helps you see clearly in the dimly lit area beneath the tub. Proper lighting is essential for spotting screws, nuts, and any blockages that might be hidden.6. Bucket
A bucket is useful for catching any water that might spill when you remove the drain. This prevents a mess and keeps your workspace clean and dry.7. Rags Or Towels
Keep rags or towels nearby to wipe away dirt, grime, or excess water. They help maintain cleanliness and provide a better grip on tools and parts. With these tools at your disposal, you’re ready to tackle the task of removing a tub drain with broken crosshairs. Have you ever tried removing a tub drain yourself? What unexpected challenges did you face, and how did you overcome them? Share your experiences in the comments!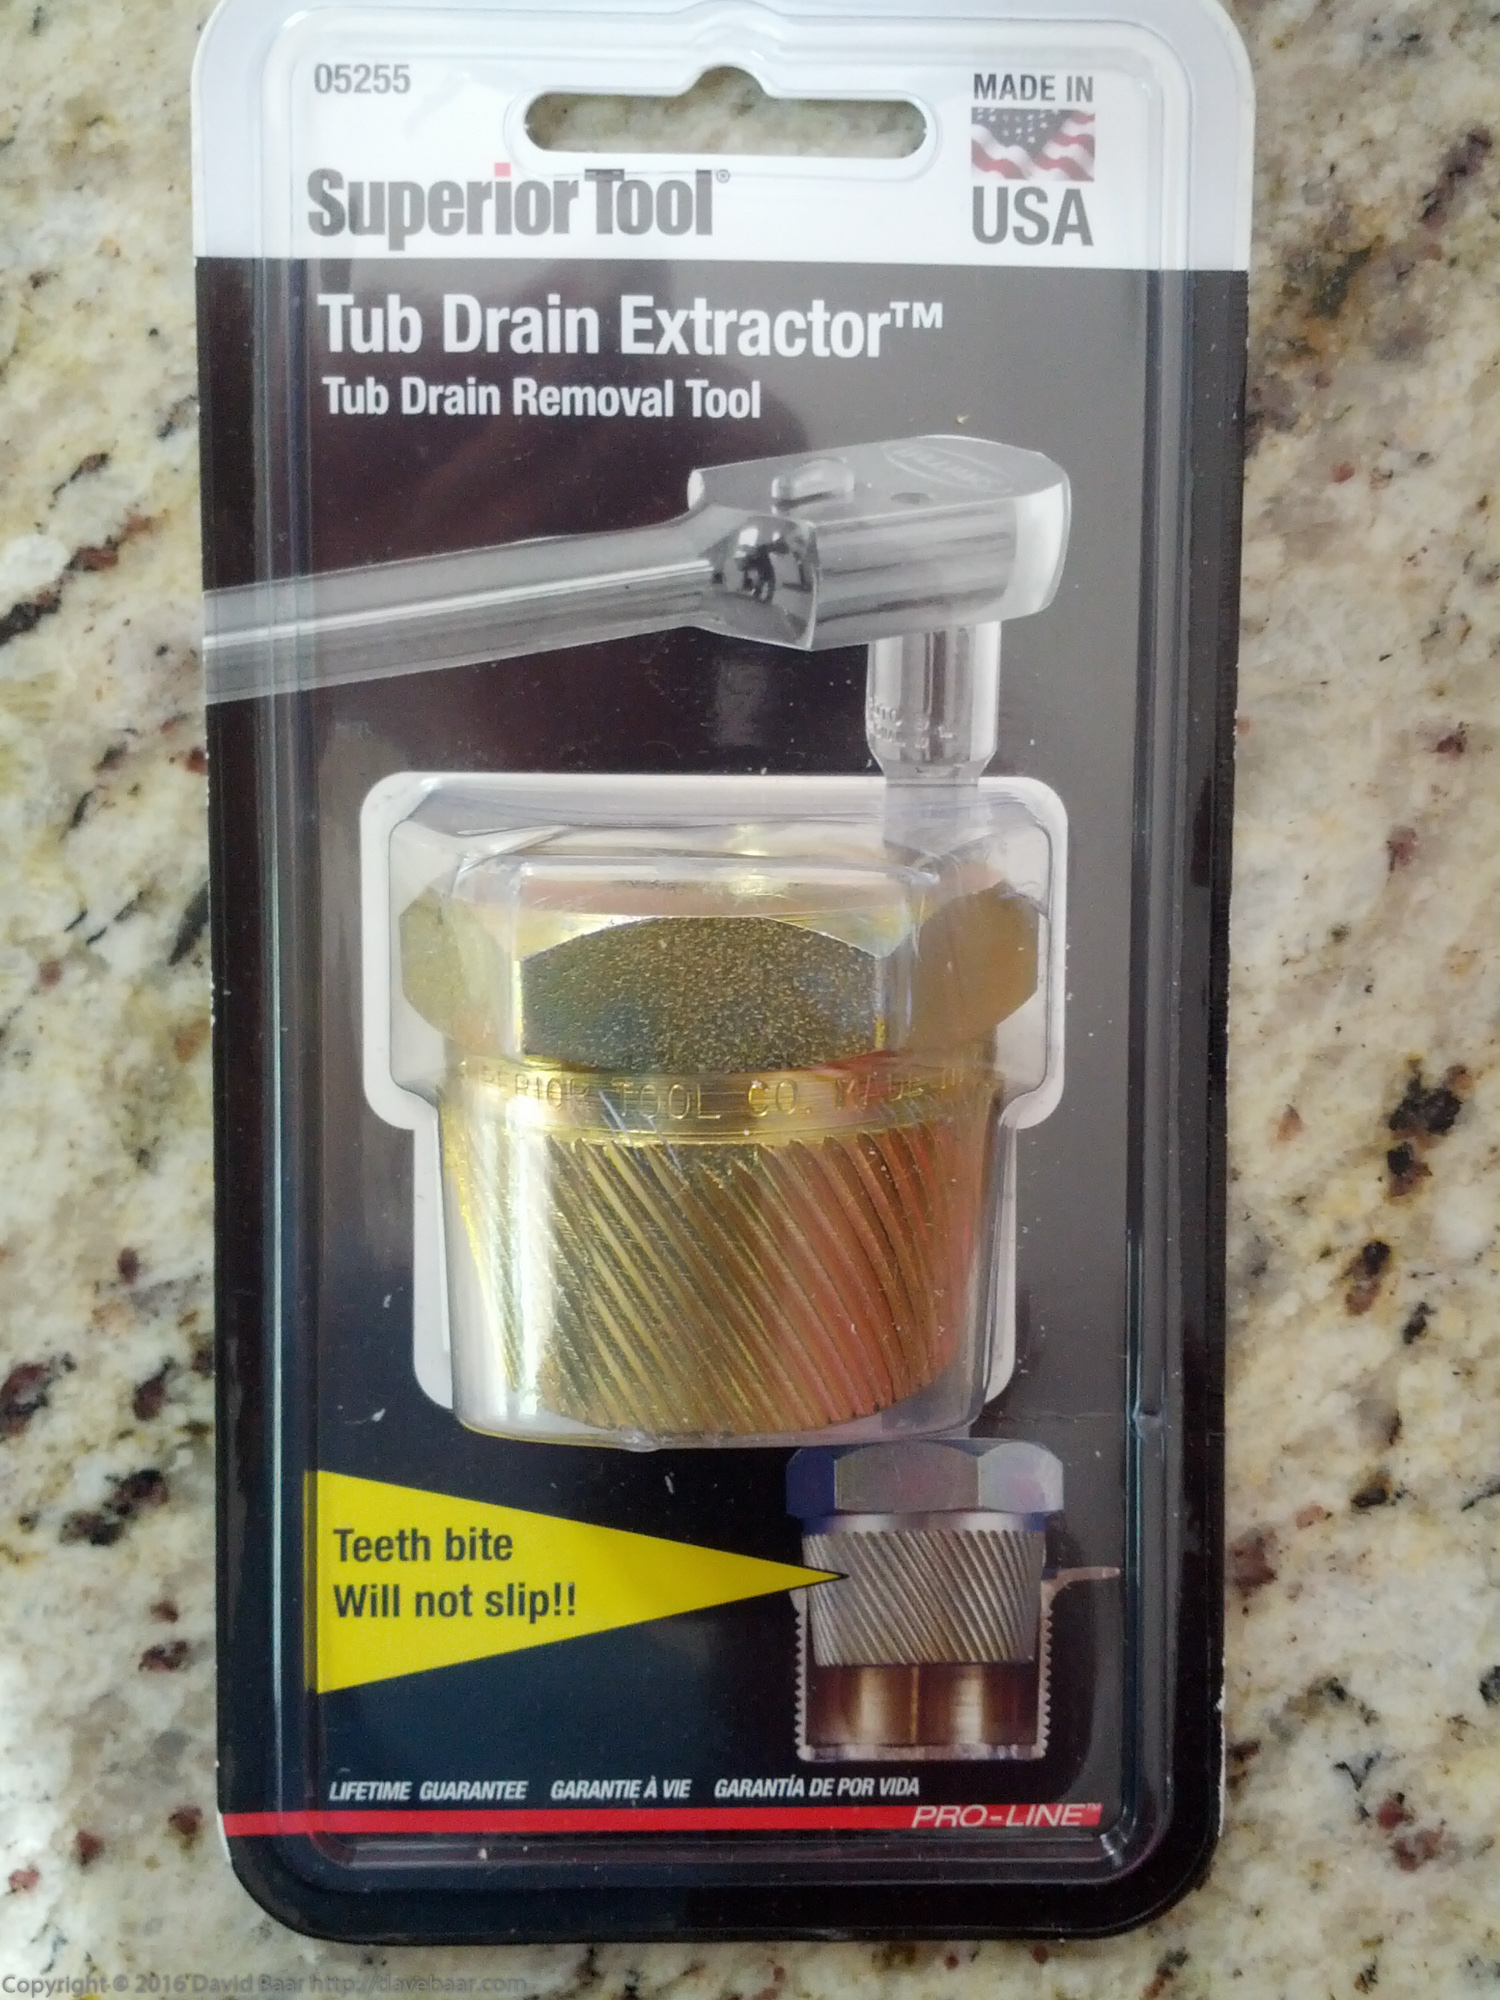
Credit: www.davebaar.com
Safety Precautions
Removing a tub drain with broken crosshairs can be tricky. Safety precautions are crucial in ensuring a smooth process. Taking time to prepare can prevent accidents and damage.
Wear Protective Gear
Always wear protective gloves when handling tools. They prevent cuts and scrapes on your hands. Safety goggles are also essential. They protect your eyes from debris and accidental splashes.
Ensure Proper Ventilation
Proper ventilation is necessary to avoid inhaling fumes. Open windows and doors for fresh air flow. Use a fan to circulate air if needed. This reduces the risk of dizziness or headaches.
Turn Off Water Supply
Before starting, turn off the water supply to the tub. This prevents accidental flooding and water damage. Check that all faucets are closed tightly. A dry area is safer to work in.
Use The Right Tools
Using the correct tools is vital. Choose tools that are in good condition. Broken or worn-out tools can cause injuries. Double-check for the right size and type before use.
Check For Hidden Hazards
Inspect the area for hidden hazards like loose tiles or sharp edges. Ensure the workspace is clear and organized. This reduces the chance of tripping or accidents.
Work Methodically
Work slowly and methodically. Rushing can lead to mistakes and injuries. Take breaks to reassess your progress. Stay focused on each step for successful removal.
Assessing The Damage
Removing a tub drain with broken crosshairs requires careful assessment. Start by understanding the extent of the damage. This step helps in planning the right approach for removal. Broken crosshairs can complicate the task. Knowing the degree of damage aids in choosing the correct tools and techniques.
Identifying Broken Crosshairs
First, examine the tub drain closely. Use a flashlight for better visibility. Check if the crosshairs are partially or fully broken. Partial breaks might allow for easier removal. Fully broken crosshairs need more effort. Feel the crosshairs with your fingers. Ensure safety by wearing gloves. This tactile check confirms the extent of breakage. Identifying the damage helps in deciding the next steps.
Determining Accessibility
Next, assess the accessibility of the drain. Check if the surrounding area allows easy tool access. Some tubs have narrow spaces. Consider the plumbing layout. Accessible drains simplify the removal process. Note any obstructions like rust or debris. These can hinder tool movement. Accessibility determines the ease of repair. It also influences the choice of tools. Prepare for challenges if access is limited.

Credit: www.superiortool.com
Preparation Steps
Preparing to remove a tub drain with broken crosshairs can seem challenging. But with the right steps, it becomes manageable. Proper preparation ensures a smooth process. Follow these steps to get ready.
Clearing The Area
First, make sure the work area is clean. Remove any bath mats or toiletries nearby. This prevents any accidents or misplaced tools. A clean space helps you focus better on the task.
Gathering Materials
Next, gather the necessary tools and materials. You will need pliers, a screwdriver, and a drain removal tool. Having everything in one place saves time and effort. It prevents interruptions during the task. Check if you need a flashlight for better visibility.
Keep a cloth or towel handy. It helps with any water spills. Being well-prepared ensures a smoother process.
Removing The Drain
Removing a tub drain with broken crosshairs can be tricky. But with the right tools and methods, it becomes manageable. This guide will help you tackle this common household issue.
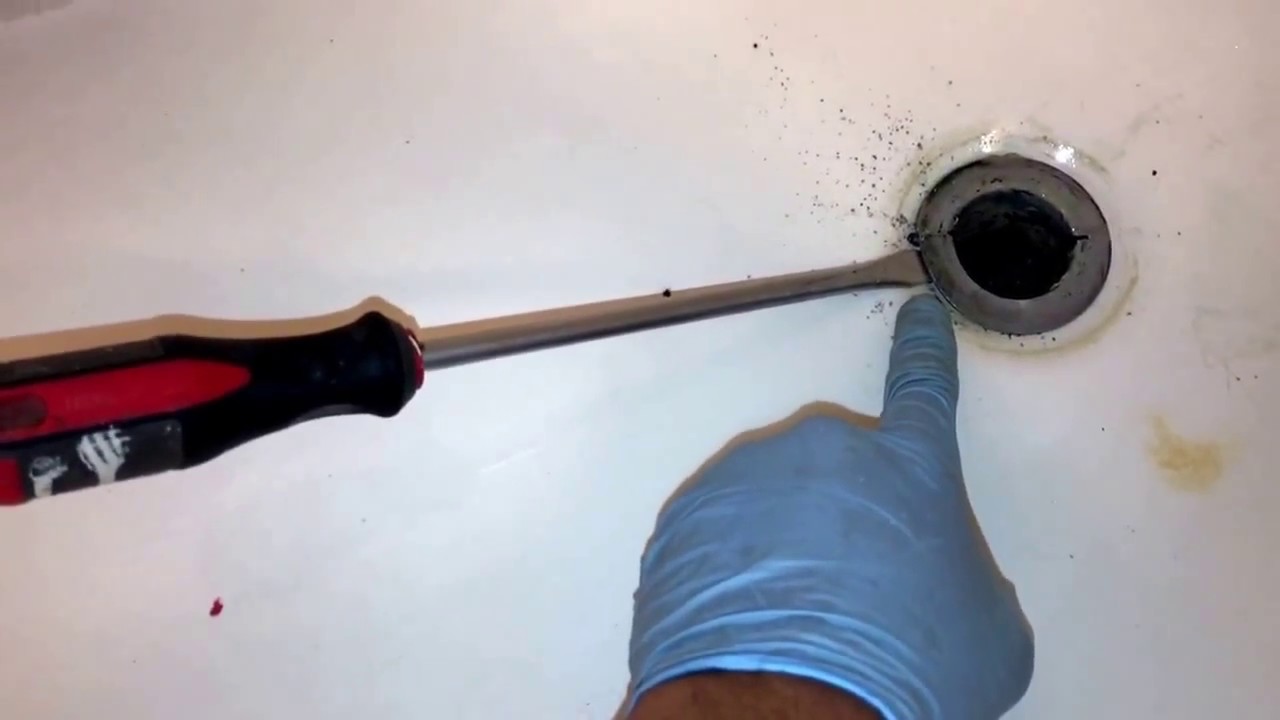
Using Drain Extractor Tool
The drain extractor tool is a reliable option. First, insert the tool into the drain opening. Ensure it fits snugly into the crosshairs. Twist the tool counterclockwise to loosen the drain. Apply steady pressure to avoid damaging the tub. Once loose, continue turning until the drain is free. This method works well for most tub drains.
Alternative Methods
Other methods can also remove a stubborn drain. One option is using pliers. Grip the drain firmly with the pliers. Turn counterclockwise to loosen it. Be cautious to prevent scratching the tub.
Another approach involves using a hacksaw. Cut through the drain carefully. Ensure you don’t damage the tub surface. After cutting, remove the drain pieces with pliers. This method requires caution and precision.
For drains with severe damage, consider using a hammer and chisel. Tap gently to break the drain loose. Remove the pieces carefully to avoid scratches.
Handling Stubborn Drains
Dealing with a tub drain that has broken crosshairs can be frustrating. These stubborn drains often resist removal efforts. They can cause significant delays in your bathroom projects. Yet, with the right techniques, you can remove them efficiently. Below are some effective methods to handle stubborn drains.
Applying Lubricant
Start by applying a generous amount of lubricant to the drain. Lubricant reduces friction, making it easier to loosen the drain. Use a spray lubricant for precise application. Allow it to sit for several minutes. This gives the lubricant time to penetrate and work. Afterward, use pliers to twist and remove the drain. If it feels stuck, reapply lubricant and try again.
Using Heat Techniques
Heat can loosen stubborn metal parts. Use a hairdryer to apply heat around the drain. Heat expands the metal, breaking the grip of corrosion. Make sure to heat evenly for the best results. Be cautious not to overheat and damage surrounding areas. After heating, attempt to twist the drain with pliers. The heat should make it easier to remove.
Cleaning The Drain Area
Removing a tub drain with broken crosshairs involves a few simple steps. Start by cleaning the drain area thoroughly to avoid debris interference. Use pliers to grip and twist the broken crosshairs gently, allowing for easy removal.
Cleaning the drain area is an essential step in fixing a tub drain with broken crosshairs. This process ensures a clear workspace and prevents further damage. A clean area helps you see the problem more clearly. It also makes it easier to remove the broken parts. Start by gathering your cleaning tools. A small brush, a soft cloth, and some mild cleaner will be useful.Removing Debris
First, remove any debris from the drain. Use a small brush or old toothbrush to scrub away dirt and grime. Wipe the area with a damp cloth to pick up loose particles. Ensure the surface is clean and dry before proceeding.Inspecting For Residual Damage
After cleaning, inspect the area for any residual damage. Look for cracks or other signs of wear around the drain. Check if the broken crosshairs have affected the tub surface. Identifying damage early can prevent bigger problems later.Installing New Drain
After successfully removing the broken crosshairs, it’s time to install a new tub drain. This step ensures your bathtub remains functional and prevents future leaks. A well-installed drain enhances your bathroom’s efficiency and aesthetics. Let’s dive into the process of installing a new drain.
Choosing The Right Drain
Start by selecting a drain that matches your bathtub’s design. Consider the material and finish of the drain. Stainless steel offers durability and resistance to corrosion. Choose a finish that complements your bathroom fixtures. Popular options include chrome, brushed nickel, and oil-rubbed bronze. Remember, the right choice enhances your bathroom’s look.
Ensuring Proper Fit
Ensure the new drain fits your bathtub’s dimensions. Measure the drain hole accurately. Compare these measurements with the new drain’s specifications. A proper fit prevents leaks and ensures smooth water flow. Misaligned drains can cause water damage over time. Double-check the gasket and washer sizes for a snug fit. Proper fitting is crucial for a hassle-free installation.
Testing For Leaks
Testing for leaks is a crucial step in ensuring your bathroom remains dry and damage-free after a DIY repair. Especially when dealing with a tub drain with broken crosshairs, you need to be meticulous. Leaks can lead to mold growth and structural issues, so it’s essential to get it right.
Gather Your Tools
Before you start testing, make sure you have everything you need. A flashlight, some paper towels, and a bucket should be at hand. These simple tools will help you spot any leaks and keep your workspace clean.
Fill The Tub
Fill the tub with a few inches of water. Watch closely for any signs of leaking around the drain. If you notice water pooling or dripping, it’s time to reassess your repair work.
Use Paper Towels For Detection
Place paper towels around the drain area. They are excellent leak detectors because they absorb water quickly. Check them after a few minutes. If they are wet, you might have a leak.
Check For Slow Leaks
Sometimes, leaks aren’t immediately visible. Let the water sit for a while and then check again. Slow leaks can be sneaky, so patience is key. Ensure you’re thorough to avoid future complications.
Inspect The Surrounding Area
Don’t forget to look beyond the drain. Inspect the surrounding tiles and grout for any moisture. A wet spot could be a sign of a hidden leak that needs attention.
What If You Find A Leak?
If a leak is detected, don’t panic. Ask yourself: Did I tighten everything properly? Double-check connections and seals. Sometimes a simple adjustment can solve the problem.
Have you ever faced a leak despite being careful? Share your experience and tips in the comments. Your insights could save someone from a watery disaster!
Credit: www.youtube.com
Frequently Asked Questions
How Do I Identify Broken Crosshairs In A Tub Drain?
Look for missing or damaged metal pieces in the drain center. They support the stopper.
What Tools Do I Need To Remove A Broken Tub Drain?
Use a drain wrench, needle-nose pliers, and a screwdriver. These help in removal.
Can I Use Household Items To Remove A Tub Drain?
Yes, try using pliers or a screwdriver if specialized tools are unavailable. Be gentle.
Is It Safe To Remove A Tub Drain Myself?
Yes, if you follow instructions carefully. Ensure water is off and use tools safely.
What Are The Steps To Remove A Tub Drain?
Remove the stopper, loosen the drain with a wrench, and lift it out. Simple process.
Conclusion
Removing a tub drain with broken crosshairs can seem tricky. Follow steps carefully to ensure success. Gather the right tools first. Use pliers to grip and twist. Apply gentle pressure, then lift the drain. Clean the area thoroughly after removal.
Replace with a new drain for smooth function. Regular maintenance prevents future issues. Your bathroom experience improves greatly with a working drain. Enjoy hassle-free showers and baths. Troublesome drains shouldn’t ruin your day. With these tips, you’ll fix it fast and easy.
A simple solution for a common problem.