You’ve just finished a long day, and all you want is to relax with a warm bath. But when you reach for the faucet handle, it refuses to budge.
Frustrating, isn’t it? You might be tempted to give up or call a plumber, but wait—before you do, read this guide. Removing a stuck faucet handle can be easier than you think. With the right approach, you can save time, money, and keep your home running smoothly.
You’ll find simple steps and clever tricks that will empower you to tackle this common household problem yourself. Don’t let a stubborn faucet ruin your day; discover how you can fix it with ease and confidence.

Credit: diy.stackexchange.com
Common Causes Of Stuck Faucet Handles
Faucet handles can sometimes become stubbornly stuck, leading to frustration and a potential plumbing headache. Understanding the common causes behind this issue is essential for anyone faced with a stuck faucet handle. Whether you’re dealing with an old fixture or a new one, knowing what might be causing the problem can guide you towards the right solution.
Build-up Of Mineral Deposits
Mineral deposits can accumulate over time, especially if your water supply is high in calcium or magnesium. These minerals can form a crusty layer around the faucet handle, making it difficult to turn. Have you ever noticed a white, chalky substance on your fixtures? That’s a sign of mineral build-up.
Regular cleaning with vinegar or a commercial descaling agent can prevent these deposits from becoming a problem. You might be surprised at how effectively a simple cleaning can restore your faucet’s functionality.
Rust And Corrosion
Rust is another common enemy of faucet handles, particularly in older homes. Metal parts can corrode over time, leading to a stuck handle. If you’ve ever struggled with a handle that feels like it’s glued in place, rust might be the culprit.
Consider applying a penetrating oil to loosen the rust. Have you tried using WD-40? It’s a handy solution that often works wonders on stubborn, corroded parts.
Worn-out Internal Components
Sometimes, the internal mechanisms wear out, causing the handle to stick. This is common in faucets that have been in use for many years. If the handle turns but doesn’t engage properly, internal wear and tear might be to blame.
Replacing these components can be a straightforward task. Have you ever thought of checking the manufacturer’s website for replacement parts? It’s a practical step that can save you from a complete faucet replacement.
Loose Or Misaligned Parts
Loose or misaligned parts can lead to a stuck handle as well. If you’ve recently had plumbing work done, parts might not have been properly tightened or aligned. Have you ever wondered why your faucet handle worked perfectly yesterday but not today?
A quick inspection to ensure everything is in place can often resolve the issue. Tightening screws and realigning parts may be all that’s needed to get your faucet working smoothly again.
Are you dealing with a stuck faucet handle right now? Understanding these causes might help you identify what’s wrong and take action. It’s not just about fixing the problem; it’s about learning how to prevent it in the future. Which of these causes do you think might be affecting your faucet?

Credit: diy.stackexchange.com
Tools You Will Need
Fixing a stuck faucet handle requires some basic tools. Having the right tools makes the job easier and quicker. This guide will help you gather everything you need for the task.
1. Screwdriver Set
Most faucet handles have screws. You’ll need a screwdriver to remove them. A set with different sizes is useful. You might encounter various screw types.
2. Allen Wrench
Some handles use Allen screws. An Allen wrench set is essential. It helps to loosen these screws easily.
3. Pliers
Pliers are handy for gripping and turning. They help remove stubborn parts. Choose adjustable pliers for versatility.
4. Penetrating Oil
Penetrating oil helps loosen stuck parts. Apply it to the handle and wait. It reduces friction and eases removal.
5. Rag Or Cloth
A rag protects your sink and faucet. Use it to wipe off excess oil. It keeps the area clean during work.
6. Flashlight
Light can be limited under the sink. A flashlight helps you see clearly. It illuminates hard-to-reach spots.
7. Bucket
A bucket collects water if needed. It prevents mess and keeps your workspace tidy.
Preparing The Area
Removing a stuck faucet handle can be a challenging task. Preparing the area is crucial for a smooth process. This step prevents damage and ensures safety during the repair.
Clear The Workspace
Start by removing all items around the sink. This includes soap dispensers, toothbrush holders, and any other objects. A clear workspace reduces the risk of accidents. It also provides more room to work comfortably.
Protect The Sink And Surroundings
Place a towel or cloth over the sink. This protects the surface from scratches or damage. It also prevents small parts from falling into the drain. If you have a double sink, cover both sides.
Gather Necessary Tools
Collect all the tools needed for the job. Common tools include a screwdriver, wrench, and lubricant. Having everything on hand saves time and keeps the process efficient.
Turn Off The Water Supply
Locate the water valves under the sink. Turn them clockwise to shut off the water. This step prevents water from spraying when the handle is removed.
Ensure Proper Lighting
Good lighting is essential for visibility. Use a flashlight or a headlamp if needed. This helps in spotting small screws and other parts.
Using Lubricants For Easy Removal
Faucet handles can get stuck over time due to rust or grime. Using lubricants is a simple method to loosen them. It’s effective and doesn’t require much effort. Let’s explore how lubricants can help in removing a stuck faucet handle.
Using Penetrating Oil
Penetrating oil works wonders on stubborn faucet handles. Spray the oil around the base of the handle. Wait for a few minutes. This allows the oil to seep into the crevices. Gently try to move the handle. Repeat if the handle remains stuck.
Applying Wd-40
WD-40 is a popular choice for loosening stuck parts. Apply a small amount to the faucet handle. Allow it to sit for a short time. This helps break down any rust or deposits. Twist the handle slowly to free it. Patience is key here.
Using Cooking Oil
If penetrating oil isn’t available, try cooking oil. Olive oil or vegetable oil can work in a pinch. Apply a few drops to the stuck area. Let it sit for several minutes. Attempt to move the handle gently. It may take a few tries.
Safety Precautions
When using lubricants, ensure proper ventilation in the area. Keep the lubricant away from children and pets. Wear gloves to protect your hands. Clean up any excess oil to prevent slipping hazards. Always follow the product instructions for best results.
Removing Rust And Mineral Deposits
Stuck faucet handles can be loosened by addressing rust and mineral deposits. Use vinegar or a rust remover. Gently tap and wiggle the handle to free it.
Removing a stuck faucet handle can be a frustrating experience, especially when rust and mineral deposits have taken hold. These stubborn residues can make what should be a simple task seem impossible. But with the right approach, you can tackle these deposits effectively and get your faucet working smoothly again.Inspect The Problem Area
Before diving in, take a close look at the faucet handle and the surrounding area. Identify any visible rust or mineral buildup. Knowing exactly what you’re dealing with can help you choose the most effective cleaning method.Use Vinegar For Mineral Deposits
White vinegar is a powerful ally against mineral deposits. Soak a cloth in vinegar and wrap it around the faucet handle. Leave it for about 30 minutes to allow the vinegar to break down the deposits. Gently scrub the area with a toothbrush to remove the loosened minerals.Apply Baking Soda Paste For Stubborn Rust
Baking soda can work wonders on rust. Mix it with water to form a paste and apply it to the rust-affected areas. Let it sit for 10-15 minutes. Use a toothbrush to scrub the paste and remove the rust. This method is effective and non-toxic, making it safe for you and your faucet.Try A Commercial Rust Remover
If household items aren’t cutting it, consider a commercial rust remover. These products are specially formulated to tackle tough rust. Follow the instructions on the label carefully. Make sure to wear gloves to protect your skin from harsh chemicals.Prevent Future Buildup
Once you’ve successfully removed the rust and deposits, think about how to prevent them from coming back. Regular cleaning with vinegar can help keep minerals at bay. You might also consider installing a water softener if hard water is a recurring issue in your home. Removing rust and mineral deposits doesn’t have to be a daunting task. By using these simple, effective methods, you can restore your faucet handle and enjoy a smooth, functional fixture. What technique will you try first?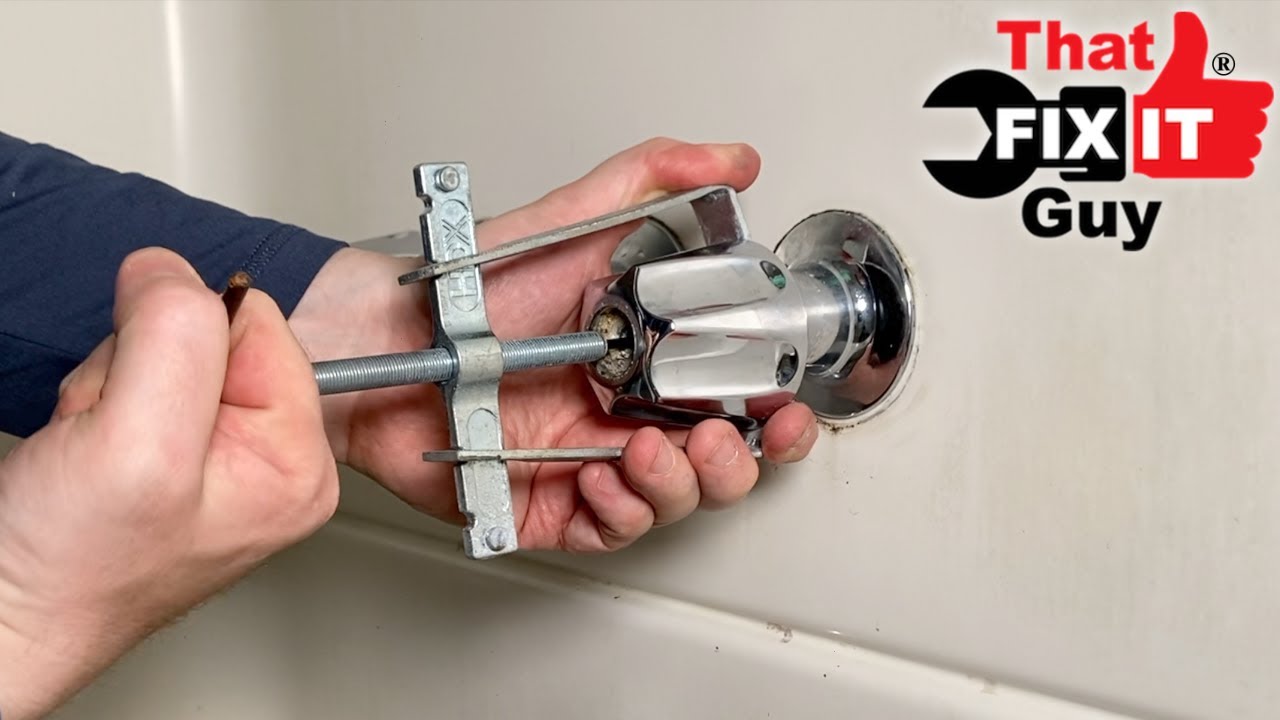
Credit: www.youtube.com
Applying Heat To Loosen The Handle
Applying heat can help remove a stuck faucet handle. Gentle heat causes the metal to expand slightly. This expansion loosens the grip, making it easier to remove the handle without damage.
Applying heat to a stuck faucet handle can be an effective way to loosen it without causing damage. Sometimes, mineral deposits and corrosion can cause the handle to seize up. Applying the right amount of heat can help expand the metal parts slightly, making it easier to remove the handle without hassle.Why Heat Works
When you apply heat, the metal components of the faucet expand slightly. This can break the bond caused by rust or mineral buildup. It’s a simple physics trick that often resolves the issue quickly.Tools You’ll Need
You’ll need a few basic tools to get started. A hairdryer or a heat gun works best for applying heat. Make sure you also have a pair of thick gloves and a cloth to protect your hands.Safety Precautions
Before you start, ensure the area is dry to avoid any electrical hazards. Keep the heat source moving to prevent damage to the faucet’s finish. Always use gloves to protect your hands from burns.Step-by-step Guide
First, plug in your hairdryer or heat gun and set it to a medium heat setting. Direct the heat towards the base of the handle. Keep the device moving in a circular motion for about 3-5 minutes. Once the handle feels warm to the touch, use a cloth to grip and gently twist the handle. If it doesn’t budge, apply more heat for another couple of minutes.When To Seek Professional Help
If the handle still won’t move after several attempts, it might be time to call a professional. Excessive force can lead to more damage, costing you more in the long run. Have you ever thought about how much easier it would be if you knew these tricks beforehand? The next time a faucet handle is stuck, you’ll have the knowledge and tools to tackle it efficiently.Using A Handle Puller
Struggling with a stuck faucet handle? A handle puller can be a handy tool to free it effortlessly. Carefully position the puller over the handle, apply gentle pressure, and watch the handle release with ease.
Removing a stuck faucet handle can be frustrating, but using a handle puller can simplify the task. This tool grips and pulls the handle without causing damage. Let’s explore how a handle puller can be your best friend in this situation.What Is A Handle Puller?
A handle puller is a specialized tool designed to safely remove handles from faucets. It grips around the base and pulls straight out. This prevents scratches or dents on your faucet.Why Choose A Handle Puller?
Handle pullers are effective for stubborn handles. They apply even pressure, reducing the risk of damaging your fixtures. Have you ever tried yanking a handle with pliers only to leave marks? A handle puller avoids this.Steps To Using A Handle Puller
1. Prepare the Area: Clear any objects around the faucet. You need room to work comfortably. 2. Secure the Tool: Place the handle puller around the base of the faucet handle. Ensure it’s gripping firmly. 3. Apply Pressure: Turn the tool’s screw mechanism to apply pressure. You’ll feel the handle begin to loosen. 4. Remove the Handle: Once loosened, pull the handle straight off with gentle pressure. Isn’t it satisfying when it comes off smoothly?Tips For Success
– Check the Fit: Make sure the handle puller fits your faucet size. Different faucets may need different sizes. – Be Patient: If the handle doesn’t budge immediately, take a break. Forcing it can damage the faucet. – Protect Your Fixtures: Use a cloth or tape around the handle if you’re worried about scratches.Common Mistakes To Avoid
Using excessive force is the biggest mistake. If you’re sweating and straining, you’re applying too much pressure. Have you ever ended up with a broken faucet instead of a fixed one? It’s usually because of impatience.What If You Don’t Have A Handle Puller?
If you don’t own a handle puller, consider borrowing one from a friend or renting. It’s a small investment for saving yourself a headache. Would you rather struggle or find a solution that works? The choice is yours.Preventing Future Problems
Removing a stuck faucet handle prevents future plumbing issues. Gently loosen screws and apply penetrating oil. Use a wrench cautiously to avoid damage.
A stuck faucet handle can be a real headache. But even after you’ve managed to remove it, how do you ensure it doesn’t get stuck again? Taking a few preventive steps can save you from future frustration and keep your faucet handles turning smoothly. Let’s dive into some practical tips to keep those pesky handles from sticking again.Regular Cleaning And Maintenance
Keeping your faucet handles clean can prevent them from sticking. Wipe them down with a damp cloth regularly to remove any soap scum or mineral deposits. Consider using a mild cleaner for a more thorough cleaning. This simple habit can go a long way in ensuring your handles remain functional.Lubrication
Adding a little lubricant can work wonders for your faucet handles. Use a silicone-based lubricant, as it is water-resistant and safe for plumbing fixtures. Apply it to the threads and moving parts of the handle. It creates a smooth barrier that prevents rust and eases movement.Checking For Wear And Tear
Regularly inspecting your faucet can help you catch problems early. Look out for signs of wear and tear, such as rust or loose screws. Addressing these issues promptly can prevent more severe problems down the line. A quick check every few months can save you time and money.Quality Replacement Parts
When replacing parts, opt for quality over price. Cheaper parts might save you money upfront but can wear out quickly. Investing in durable replacement parts can provide better performance and longevity. This approach can help ensure your faucet handles stay in good condition for longer.Water Softener
Hard water can lead to mineral buildup, which can cause your faucet handles to stick. Installing a water softener can reduce these deposits. This change can improve the lifespan of your plumbing fixtures. It’s a worthy investment if you want to avoid stuck handles in the future. Your faucet handles are small but essential parts of your home. Taking a little time to care for them can save you a lot of hassle. So, what steps will you take today to ensure your faucet handles remain problem-free?Frequently Asked Questions
How Do I Know If My Faucet Handle Is Stuck?
A stuck faucet handle won’t turn easily. It may feel jammed or resist movement.
What Tools Do I Need To Remove A Stuck Faucet Handle?
You’ll need a screwdriver, wrench, and penetrating oil. Basic tools for a simple fix.
Can I Remove A Faucet Handle Without Damaging It?
Yes, use gentle force and proper tools. Avoid using excessive pressure.
How Long Does It Take To Remove A Stuck Faucet Handle?
It typically takes 10-20 minutes. Time varies with handle condition.
What Should I Do If My Faucet Handle Is Still Stuck?
Try more penetrating oil. Wait a few minutes, then gently try again.
Conclusion
Removing a stuck faucet handle isn’t too hard. Follow the steps carefully. Tools and patience are key. Always turn off the water first. This avoids leaks and mess. Use the right tools for safety and efficiency. Lubricants help loosen stubborn parts.
Gently wiggle the handle if stuck. Avoid forcing it off. This prevents damage. Once removed, check for wear or corrosion. Replace if needed. Regular maintenance keeps faucets working well. Remember, patience and care make the task easier. Now, enjoy a smoothly working faucet.