To fix cracks between crown molding and ceiling, start by caulking the molding with a bead of caulk in the gap. This will stabilize the molding and fill the void.
Don’t worry about trying for a cosmetic fix with the caulk, just let it dry. Regardless of how well-installed your crown molding is, it’s always a good idea to caulk both the top and bottom to ensure a uniform look and get rid of any unsightly gaps that may be present.
Crown molding can add elegance and character to a room, but cracks and gaps between the molding and ceiling can detract from its beauty. While it may seem like a daunting task to fix these imperfections, it can be a relatively simple DIY project. In this blog post, we will discuss how to fix cracks between crown molding and ceiling using caulk. We will also answer some common questions about crown molding, such as whether cracks are normal and what type of caulk is best for filling gaps. So, let’s get started!
Introduction To Crown Molding Cracks
Crown molding adds an elegant touch to any room, but over time, cracks can develop between the molding and the ceiling. These cracks not only detract from the aesthetic appeal but can also indicate underlying issues. In this article, we will explore the signs of crown molding damage and the common causes of cracks, providing practical solutions to fix and prevent them.
Signs Of Crown Molding Damage
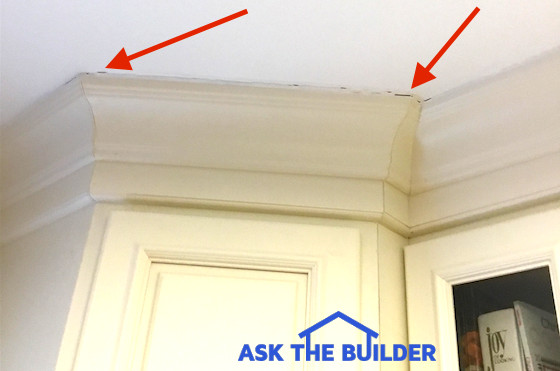
- Visible cracks or gaps between the crown molding and the ceiling
- Peeling or chipping paint on the molding
- Uneven or sagging appearance of the molding
- Evidence of moisture or water damage near the molding
Common Causes Of Cracks
- Temperature and humidity fluctuations leading to wood expansion and contraction
- Improper installation or inadequate support for the molding
- Moisture infiltration from leaks or condensation
- Settling of the building structure causing movement in the molding
Credit: www.askthebuilder.com
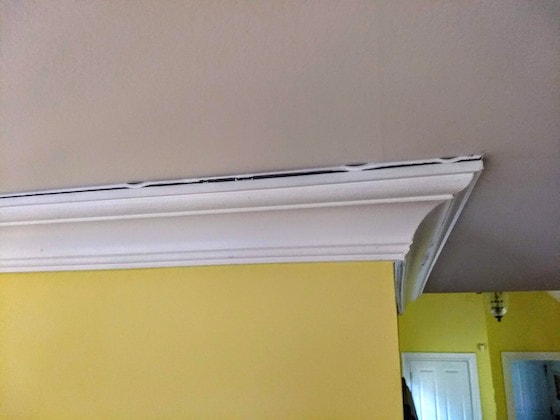
Inspecting The Severity Of Cracks
To fix cracks between crown molding and the ceiling, start by inspecting the severity of the cracks. Use a caulk gun to apply caulk in the gap and let it dry to stabilize the molding. Regardless of how well-installed the molding is, it’s always a good idea to caulk both the top and bottom to ensure a uniform look and get rid of any unsightly gaps.
Before addressing the cracks between crown molding and the ceiling, it’s crucial to inspect the severity of the damage. This allows for a better understanding of the necessary steps for repair.
Tools And Materials Needed
| Tools | Materials |
|---|---|
| Flashlight | Painter’s tape |
| Putty knife | High-quality paintable caulk |
| Level | Sanding block |
| Caulk gun | Primer |
Safety Precautions
- Ensure the area is well-lit to detect cracks effectively.
- Use a sturdy ladder or step stool to reach the molding.
- Wear safety goggles and gloves when handling tools and materials.
- Avoid overreaching to prevent accidents or strain.
Preparation Steps
To fix cracks between crown molding and ceiling, start by caulking the molding and applying a bead of caulk in the gap for stability. Regardless of how well-installed the molding is, it’s always a good idea to caulk both the top and bottom to ensure a uniform look and get rid of any unsightly gaps.
Using the right caulk, such as latex or expandable foam, can help fill in and seal the gaps effectively.
Cleaning The Affected Area
Before you can effectively fix cracks between crown molding and the ceiling, it’s crucial to clean the affected area thoroughly. Start by removing any dirt, dust, or debris using a soft cloth or vacuum cleaner. Make sure to reach all the nooks and crannies where the cracks are located.
Removing Old Caulk
The next step in preparing to fix cracks between crown molding and the ceiling is to remove any old caulk. Old caulk can deteriorate over time, causing the cracks to become more prominent. Use a caulk removal tool or a putty knife to carefully scrape away the old caulk. Be gentle to avoid damaging the molding or the ceiling.
Once you have removed the old caulk, clean the area again to ensure there is no residue left behind. A clean surface will allow the new caulk to adhere properly and provide a seamless finish.
Now that you have completed the preparation steps of cleaning the affected area and removing old caulk, you are ready to move on to the next stage of fixing cracks between crown molding and the ceiling. Stay tuned for the next section on how to apply new caulk and achieve a flawless result.
Choosing The Right Caulk
When fixing cracks between crown molding and the ceiling, it is important to choose the right caulk. Opt for a caulk that is suitable for repairing cracks in drywall, plaster, stucco, and wood. Look for a caulk that is easy to use, doesn’t shrink or crack, and allows for painting without priming.
Types Of Caulk For Molding
When it comes to fixing cracks between crown molding and the ceiling, choosing the right caulk is essential. There are different types of caulk available, each with its own unique properties and purposes. Let’s take a look at some of the most commonly used caulks for molding:
1. Latex Caulk: Latex caulk is a popular choice for filling narrow gaps around doors, windows, baseboards, and crown molding. It is easy to apply, dries quickly, and can be painted over without the need for priming. Latex caulk is suitable for smaller cracks and offers good flexibility.
2. Silicone Caulk: Silicone caulk is known for its durability and resistance to moisture. It is an excellent choice for areas prone to high humidity, such as bathrooms and kitchens. Silicone caulk provides a watertight seal and is flexible enough to accommodate movement without cracking.
3. Polyurethane Caulk: Polyurethane caulk is a versatile option that works well for both interior and exterior applications. It offers excellent adhesion and flexibility, making it suitable for larger cracks and gaps. Polyurethane caulk is also resistant to weathering and can withstand temperature changes.
Selecting For Durability And Flexibility
When selecting caulk for crown molding, it’s important to consider both durability and flexibility. Cracks and gaps between the molding and ceiling can be caused by various factors, including natural expansion and contraction of the materials due to temperature changes or moisture exposure. Choosing a caulk that can withstand these movements without cracking or shrinking is crucial for a long-lasting repair.
In addition to durability, flexibility is also essential. Crown molding can experience slight shifts and movements over time, and the caulk needs to be able to accommodate these changes. A flexible caulk will ensure that the seal remains intact and prevents any future cracks or gaps from forming.
To ensure the best results, it’s recommended to read the manufacturer’s instructions and choose a caulk specifically designed for crown molding or trim applications. Always clean the area thoroughly before applying the caulk and allow sufficient drying time before painting or finishing the molding.
By selecting the right caulk for your crown molding, you can fix cracks and gaps effectively, providing a seamless and visually appealing finish to your room. Remember to consider the type of caulk that suits your specific needs, such as latex caulk for narrow gaps or silicone caulk for moisture-prone areas. With the right caulk, you can restore the beauty of your crown molding and achieve a professional-looking result.
Application Techniques
To fix cracks between crown molding and ceiling, start by caulking the molding as usual and include a bead of caulk in the gap. This stabilizes the molding and eliminates unsightly gaps. Use a quick and easy caulk gun for interior or exterior application, and choose a caulk that won’t shrink or crack and doesn’t need priming before painting.
Applying Caulk Properly
When it comes to fixing cracks between crown molding and ceiling, applying caulk is a crucial step. The first thing you need to do is to prepare the area by cleaning it thoroughly. Then, load the caulk gun with the caulk of your choice. Start by cutting the tip of the caulk tube at a 45-degree angle. Next, apply a steady, continuous bead of caulk along the gap between the crown molding and ceiling. Be sure to push the caulk into the gap, ensuring that it adheres to both surfaces.
Smoothing And Shaping
Once you’ve applied the caulk, it’s time to smooth and shape it. You can use your finger or a caulk smoothing tool to remove any excess caulk and shape it to match the surrounding area. Make sure to wipe away any excess caulk before it dries to avoid leaving a mess.
If you’re dealing with a larger gap, you may need to apply multiple layers of caulk, allowing each layer to dry before applying the next. This will help ensure a smooth, even finish.
In conclusion, applying caulk properly and smoothing and shaping it are essential steps to fixing cracks between crown molding and ceiling. By following these techniques, you can achieve a professional-looking finish that will last for years to come.

Credit: www.reddit.com
Dealing With Larger Gaps
To fix cracks between crown molding and ceiling, start by caulking the molding as usual and include a bead of caulk in the gap for stability. Don’t worry about cosmetic perfection, just fill the void and let it dry. It’s also a good idea to caulk both the top and bottom of the molding to ensure a uniform look and get rid of any unsightly gaps.
Latex caulk works well for narrow gaps while expandable foam caulk is better for larger gaps.
Dealing with Larger Gaps
If you’re dealing with larger gaps between crown molding and the ceiling, there are a few solutions that can help. Here are two effective methods:
Using Backer Rods
Backer rods are foam rods that can be used to fill gaps before applying caulk. To use backer rods, start by measuring the width of the gap. Then, select a backer rod that is slightly larger than the gap. Insert the backer rod into the gap, making sure it fits snugly. Once the backer rod is in place, you can apply caulk over it to seal the gap. This method is particularly effective for larger gaps, as it provides a solid base for the caulk to adhere to.
Applying Expandable Foam
Expandable foam is another option for filling larger gaps. To use expandable foam, start by selecting a foam that is appropriate for your project. You can find foam in spray cans or in tubes that can be applied with a caulk gun. Apply the foam directly into the gap, filling it completely. The foam will expand as it dries, filling any gaps or voids. Once the foam has dried, you can trim off any excess with a sharp knife or saw. Keep in mind that expandable foam can be messy, so be sure to protect your work area and wear gloves and eye protection.
In conclusion, dealing with larger gaps between crown molding and the ceiling may seem daunting, but with the right materials and techniques, it can be a simple fix. Backer rods and expandable foam are two effective methods for filling larger gaps, giving you a seamless and professional finish.
Finishing Touches
Fixing cracks between crown molding and the ceiling can be easily accomplished by using a caulk gun to fill in the gaps with caulk. This not only stabilizes the molding but also provides a uniform look, eliminating any unsightly gaps.
Choose a high-quality caulk that is easy to use, doesn’t shrink or crack, and allows for painting without priming.
Sanding For Smoothness
Sanding is an essential step in achieving a flawless finish for your crown molding. It helps to smooth out any rough edges or imperfections, ensuring a seamless transition between the molding and the ceiling. To start, gather a fine-grit sandpaper (around 220-grit) and a sanding block. The sanding block provides a flat and even surface, making it easier to achieve a consistent smoothness.
Begin by lightly sanding the area where the crack meets the crown molding. Use gentle, circular motions to avoid damaging the molding. Be sure to sand the crack itself, as well as the surrounding area, to create a smooth and seamless surface. After sanding, wipe away any dust or debris using a clean cloth or tack cloth.
Priming And Painting
Once the sanding is complete, it’s time to prime and paint the repaired area. Priming helps to seal the wood and create a smooth surface for the paint to adhere to. Choose a high-quality primer suitable for the material of your crown molding. Apply a thin, even coat of primer using a brush or roller, following the manufacturer’s instructions.
After the primer has dried, it’s time to apply the paint. Select a paint color that matches or complements the existing molding. Use a small brush or a foam brush to carefully apply the paint to the repaired area. Start with a thin coat and allow it to dry completely before applying additional coats if needed. Remember to feather the paint outwards to blend it seamlessly with the surrounding molding.
Once the paint has dried, step back and admire your handiwork. The cracks between the crown molding and ceiling are now a thing of the past, replaced by a smooth and flawless finish. Your attention to detail in the finishing touches has truly brought the room together.
Credit: www.askthebuilder.com
Preventive Measures And Maintenance
To fix cracks between crown molding and the ceiling, start by caulking the molding and applying a bead of caulk in the gap for stability. Regardless of how well-installed the crown molding is, it’s always a good idea to caulk both the top and bottom to ensure a uniform look and get rid of any unsightly gaps.
Using the right caulk can prevent future cracking and damage, providing a quick and easy solution for interior or exterior application.
Regular inspection and maintenance are crucial to prevent and fix cracks between crown molding and the ceiling. By following some simple preventive measures, you can ensure the longevity and stability of your crown molding. Here are some tips to help you maintain your crown molding and prevent cracks:
Regular Inspection Tips
- Inspect your crown molding regularly, looking for any signs of cracks or gaps.
- Check for any movement or shifting of the molding, which can indicate potential issues.
- Look for any water damage or moisture buildup that can lead to cracks.
- Examine the caulking and sealing around the molding to ensure it is intact.
- Keep an eye out for any paint peeling or chipping, as this can be a sign of underlying problems.
Maintaining Optimal Humidity Levels
Controlling the humidity levels in your home can help prevent cracks in crown molding. Here are some tips to maintain optimal humidity:
- Use a dehumidifier in areas prone to high humidity, such as bathrooms and kitchens.
- Ensure proper ventilation in your home to reduce moisture buildup.
- Fix any leaks or plumbing issues promptly to prevent water damage.
- Avoid excessive use of humidifiers, as they can contribute to high humidity levels.
By regularly inspecting your crown molding and maintaining optimal humidity levels, you can prevent cracks and ensure the longevity of your crown molding. Taking these preventive measures will save you time and money in the long run, as well as maintain the aesthetic appeal of your home.
When To Call A Professional
Evaluating The Complexity Of The Job
Assess the extent of the crack and the underlying cause. If the crack is extensive and the molding is pulling away from the ceiling, it may indicate structural issues. In such cases, it’s best to seek professional help to ensure the problem is addressed correctly.
Finding Qualified Contractors
Look for contractors with experience in repairing crown molding and ceiling cracks. Check for certifications, licenses, and customer reviews to ensure the contractor is reputable and skilled in handling such repairs.
Frequently Asked Questions
How Do You Fill Gaps Between Crown Molding And Ceiling?
To fill gaps between crown molding and ceiling, use a caulk gun to apply caulk along the gap. Allow the caulk to dry for stabilization. Avoid trying to make it look perfect, just fill the void and let it dry.
This will help create a uniform and seamless look.
Should You Caulk Between Crown Molding And Ceiling?
Yes, caulking between crown molding and ceiling is recommended to ensure a uniform look and eliminate unsightly gaps. Fill the void with caulk, let it dry, and paint without priming for a seamless finish.
Are Cracks In Crown Molding Normal?
Cracks in crown molding are not normal and can be caused by moisture exposure or improper sealing. To fix cracks, use a caulk gun to fill the gaps with caulk and let it dry. Caulking both the top and bottom of the molding ensures a uniform look and eliminates unsightly gaps.
For larger gaps, expandable foam caulk is recommended.
What Is The Best Caulk For Cracks In Crown Molding?
The best caulk for cracks in crown molding is latex caulk. It quickly fills narrow gaps and works well for doors, windows, baseboards, and crown molding. For larger gaps and holes, expandable foam caulk is a better choice. It provides a more effective seal.
Using the right caulk will help you achieve a uniform look and eliminate unsightly gaps.
How To Effectively Fill Gaps Between Crown Molding And Ceiling?
Start by applying caulk in the gap to stabilize the molding. Focus on functionality rather than cosmetic appearance.
Conclusion
Fixing cracks between crown molding and the ceiling is a common issue that can easily be addressed. By using caulk, you can stabilize the molding and fill in any gaps, ensuring a uniform and polished look. It’s important to choose the right type of caulk for the job, such as latex caulk for narrow gaps and expandable foam caulk for larger ones.
By following these simple steps, you can achieve a seamless finish and restore the beauty of your crown molding.