Picture this: you’re eagerly anticipating a refreshing shower after a long day, but when you turn on the faucet, the water stubbornly refuses to switch from the bathtub to the showerhead. Frustrating, right?
You might be dealing with a faulty shower diverter gate. This small but crucial component can throw a wrench in your plans for a relaxing shower. But don’t worry—you’re not alone, and fixing it might be easier than you think.
In this guide, you’ll discover straightforward steps to troubleshoot and repair your shower diverter gate. We’ll walk you through the process, using simple language and clear instructions. By the end, you’ll be equipped with the knowledge to tackle this common issue with confidence. So, let’s dive in and make sure your next shower is smooth and stress-free. Don’t let a minor hiccup stand between you and your well-deserved relaxation.

Credit: www.linkedin.com
Tools And Materials Needed
To fix a shower diverter gate, gather essential tools and materials. You’ll need a screwdriver, adjustable wrench, and plumber’s tape. Ensure you have a replacement diverter gate and a clean cloth for any water spills.
Fixing a shower diverter gate might seem daunting, but having the right tools and materials can make the task straightforward and manageable. Whether you’re a seasoned DIY enthusiast or a first-timer looking to save on a plumber’s fee, having the appropriate items on hand is crucial. Let’s explore what you need to get started.Tools You’ll Need
To begin, ensure you have a wrench. This tool is essential for loosening and tightening bolts. A crescent wrench can work wonders for adjusting parts without damaging them. It’s adjustable, making it versatile for various sizes. A screwdriver set is also a must-have. Depending on your shower diverter model, you might need a flathead or Phillips screwdriver. Having both types in your toolbox will cover all bases. A plumber’s tape is another critical item. This tape helps prevent leaks by sealing the threads on pipe connections. It’s a small investment that can save you from potential water damage down the line.Materials Required
It’s always wise to have replacement parts on hand. Before you start the repair, check if you need a new diverter gate or seals. Bringing the old ones to a hardware store can help you find the right match. silicone lubricant is beneficial to keep the moving parts of the diverter operating smoothly. It reduces friction and extends the life of the components. Another handy item is a bucket. It might sound simple, but it’s invaluable for catching any water that might spill during the repair. This prevents mess and makes cleanup easier.Preparing Your Workspace
Before diving into the repair, create a clean and organized workspace. Clear the area around your shower to prevent any accidents. Having a small towel nearby can help with unexpected drips or spills. Think about the lighting in your bathroom. A well-lit space can significantly improve your visibility, making the task less cumbersome. A portable work light can be a great addition if your bathroom lighting is insufficient. Now, with your tools and materials ready, you’re set to tackle the repair. Remember, preparation is key. Have you ever started a project only to realize you’re missing a tool halfway through? Avoid that frustration by double-checking your list now. With everything in place, you can fix your shower diverter gate efficiently and confidently.
Credit: www.amazon.com
Identifying Diverter Gate Issues
Shower diverter gates can face issues over time. Knowing these issues helps in fixing them. A diverter gate controls water flow between the tub and shower. Problems with it can disrupt a relaxing bath experience. Recognizing symptoms early can prevent bigger issues later.
Common Symptoms
A faulty diverter gate shows clear signs. Water might leak from the tub spout when using the shower. You may notice weak water pressure in the shower. Sometimes, the diverter handle can feel stiff or jammed. These symptoms indicate potential issues with the diverter gate.
Causes Of Malfunction
Several reasons can cause diverter gate problems. Over time, mineral buildup affects the gate’s function. Hard water deposits can make the diverter sticky. Regular use can wear out the diverter’s components. Aging seals might fail, leading to leaks. Understanding these causes helps in addressing the malfunction.
Preparing For Repair
Before you dive into fixing a shower diverter gate, it’s essential to prepare adequately. Preparation sets the stage for a smooth repair process, minimizing potential hiccups. Whether you’re a seasoned DIY enthusiast or a first-time fixer, having a clear plan can make all the difference. So, let’s ensure you have everything in place before starting this plumbing adventure.
Safety Precautions
Safety should always be your top priority. Make sure you have protective gear like gloves and goggles. They may seem unnecessary for such a small task, but they can save you from unexpected mishaps.
Keep your workspace tidy. A cluttered area increases the risk of accidents. Lay out your tools neatly and ensure they’re in good condition.
Consider this: Have you ever tripped over a misplaced wrench? Simple things can cause big problems. Stay alert and focused throughout the repair.
Turning Off Water Supply
Start by turning off the water supply to your shower. Locate the shut-off valve; it’s typically near the bathroom or in the basement. Turning it off prevents water from gushing out when you disassemble the diverter.
Test the water by turning on the shower. If no water comes out, you’ve successfully shut it off. This step saves you from a potential mess and allows you to work without interruptions.
Have you ever considered the chaos of a sudden water rush? Preparing correctly avoids such scenarios and keeps your repair process smooth and predictable.
By focusing on these preparatory steps, you’ll be setting yourself up for success. Remember, a well-prepared repair is half the battle won. Now, are you ready to tackle that diverter gate?
Removing The Diverter Gate
Fixing a shower diverter gate may seem daunting. But, it’s manageable with guidance. Removing the diverter gate is essential for repair or replacement. This task requires patience and a few tools. Dive into the process step-by-step for a seamless experience.
Accessing The Diverter
Start by turning off the water supply. Ensure safety and avoid leaks. Next, locate the diverter. Usually, it’s inside the faucet or spout. You might need a wrench or screwdriver. These tools help in dismantling components. Carefully remove the faucet handle or spout. This exposes the diverter gate, ready for further action.
Loosening Components
Before loosening, check the diverter’s attachment. Use a wrench to loosen nuts or screws. Turn them counterclockwise. This frees the diverter gate. Be gentle to avoid damaging parts. If stuck, apply a penetrating oil. This eases stubborn components. Once loose, remove the diverter gate. Keep track of all parts and their positions.
Cleaning And Inspecting Parts
Cleaning and inspecting parts is crucial for a working shower diverter gate. Regular maintenance can prevent issues and extend the lifespan of your shower system. This process involves two main steps: debris removal and checking for damage. These steps ensure the diverter operates smoothly, providing a seamless shower experience.
Debris Removal
Start by turning off the water supply to your shower. Carefully remove the diverter gate to access internal parts. Use a brush or cloth to wipe away dirt and grime. Pay close attention to small crevices where debris may hide. Mineral deposits can build up over time and affect performance. Use a vinegar solution to dissolve stubborn deposits if necessary.
Checking For Damage
Once clean, inspect all parts for any signs of wear and tear. Look for cracks, rust, or bent components. These issues can cause leaks or reduce water flow. Ensure the rubber washers and seals are intact. Replacing damaged parts is often more cost-effective than repeated repairs. If you find damage, consult a professional for replacement advice.
Replacing Or Repairing Parts
Fixing a shower diverter gate involves either replacing or repairing faulty parts to restore water flow. Start by turning off the water supply. Then, remove the diverter handle and inspect the gate for damage. Replace worn-out parts or reseat components to ensure proper function.
When tackling a faulty shower diverter gate, you might face the dilemma of whether to replace parts or simply repair them. This decision can significantly impact both your wallet and your shower experience. Let’s explore both avenues so you can make an informed choice.Choosing New Components
When your diverter is beyond repair, replacing it is often the best option. Start by identifying the exact model of your shower diverter gate. This ensures compatibility and smooth installation. Visit your local hardware store or browse online to find the right replacement parts. Don’t hesitate to ask for assistance if you’re unsure about the correct components. Investing time in choosing the right parts saves you from future headaches. Consider the material of the replacement parts. Brass components are often more durable than plastic ones. Although they might be slightly more expensive, they offer longevity and reliability.Fixing Existing Parts
Sometimes, all your diverter needs is a little TLC to get back in working order. Check for any visible wear or damage on the diverter gate. Clean away mineral deposits with vinegar to improve function. Examine the rubber washers and seals. If they are worn or cracked, replacing them can restore your diverter’s efficiency. These small and inexpensive parts can make a big difference. Tighten any loose screws or nuts. A simple adjustment might fix the issue without needing new parts. Your shower could be back to perfect condition with just a little effort. Have you ever faced a similar DIY challenge? Share your experience and what worked for you in the comments below!Reassembling The Diverter Gate
Fixing a shower diverter gate involves removing the handle and inspecting the valve for wear. Replace worn parts or clean debris to ensure smooth operation. Reassemble carefully, checking each component for proper alignment and securing all screws tightly.
Reassembling the diverter gate in your shower can feel like piecing together a puzzle. It’s the moment when all your efforts begin to take shape. If you’ve ever found yourself frustrated with a weak shower stream, you’re not alone. Many people have faced the dilemma of a malfunctioning diverter gate. The good news is that with a bit of patience and attention to detail, you can successfully reassemble it and enjoy a refreshing shower once again.Ensuring Proper Fit
Proper fit is crucial when reassembling the diverter gate. Misalignment can lead to leaks or reduced water pressure. Double-check each part before attaching it. Use your phone to take photos as you disassemble. These images can guide you during reassembly, ensuring each piece goes back in the right order. Tighten connections firmly, but avoid over-tightening. Overdoing it can damage the threads or create unwanted pressure points.Testing Functionality
Once everything is back in place, it’s time to test your handiwork. Turn on the water slowly and watch for any leaks. If you notice any, stop and adjust the connections. Switch between the bath and shower modes to ensure the diverter gate is functioning correctly. Does the water shift smoothly from the faucet to the showerhead? If something feels off, don’t hesitate to go back and make adjustments. It’s better to take a few extra minutes now than deal with ongoing issues later. Have you ever wondered why some shower repairs seem to fail so quickly? Often, it’s due to skipping these critical reassembly and testing steps. By being thorough now, you’re setting yourself up for a hassle-free shower experience in the future.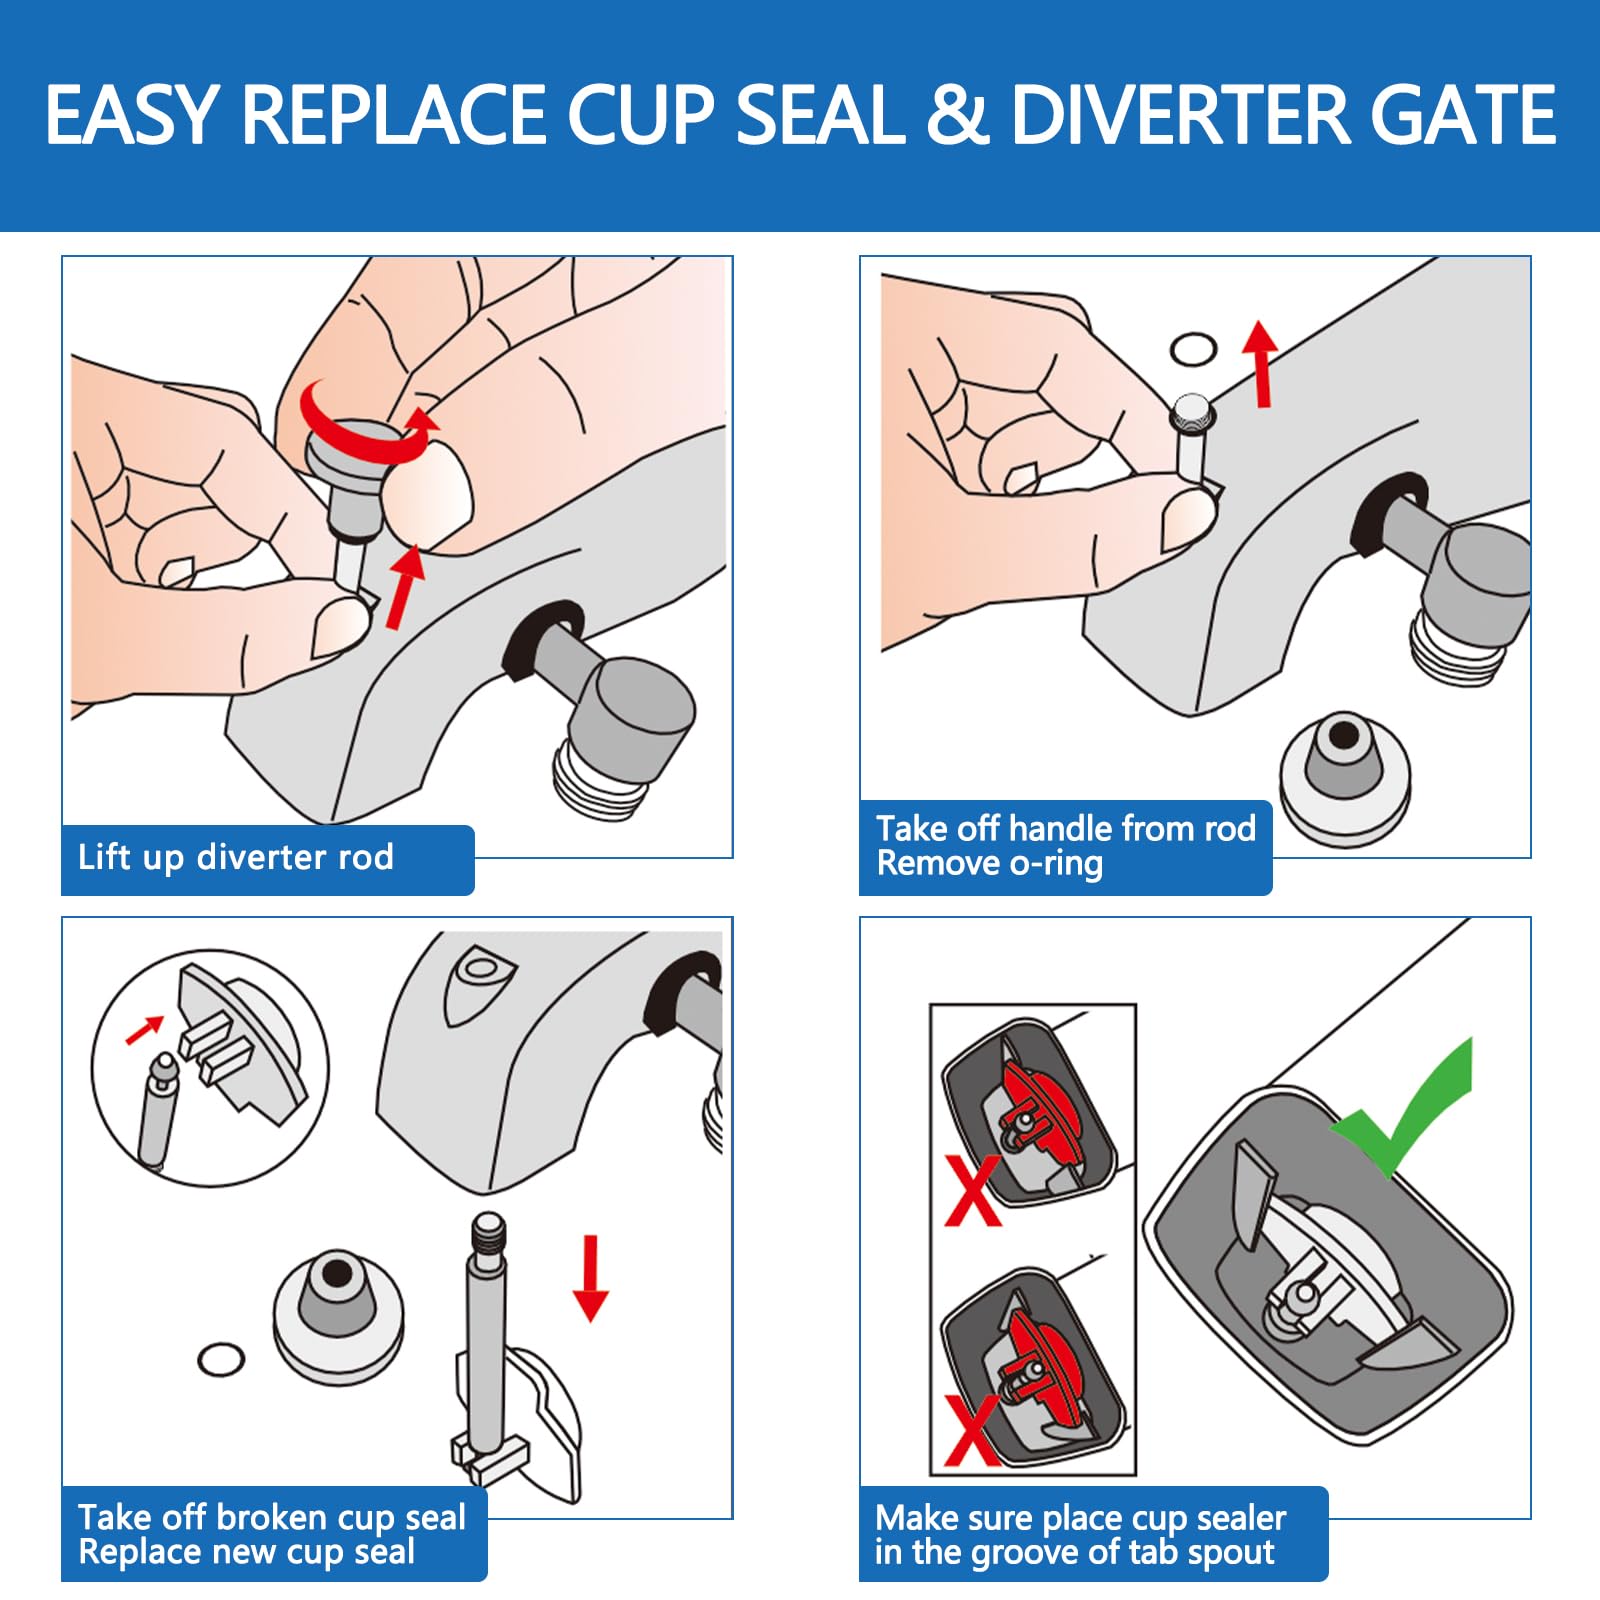
Credit: melkshamdentalpractice.com
Preventing Future Issues
Fixing a shower diverter gate prevents future plumbing issues. Regular maintenance ensures smooth water flow and avoids costly repairs. Simple checks and adjustments can save time and money.
Preventing future issues with your shower diverter gate is key to avoiding unexpected and costly repairs. A well-maintained diverter not only extends its lifespan but also ensures a smooth showering experience. By following some straightforward tips, you can keep your shower in top-notch condition and prevent those frustrating moments when the water just won’t switch properly.Regular Maintenance Tips
Regular maintenance is your best friend when it comes to preventing diverter gate issues. Make it a habit to clean your showerhead and diverter every few months. Mineral deposits and soap scum can build up, causing blockages. Use a mixture of vinegar and water to soak the diverter and showerhead. This helps dissolve any deposits. After soaking, gently scrub with an old toothbrush to remove any stubborn residue. Check for any signs of rust or corrosion. If you spot any, use a rust remover to clean the area. Applying a light coat of silicone grease can also help protect moving parts and keep them functioning smoothly.Signs Of Wear To Watch
Spotting wear early can save you from bigger problems later. Listen for unusual sounds when you operate the diverter. Grinding noises might indicate something is not right. Feel for any resistance when pulling or pushing the diverter. It should move smoothly without any sticking. If it feels stiff, it might be time to investigate further. Look for water leaks around the diverter or near the base of the showerhead. Even small leaks can indicate a worn-out washer or seal that needs attention. Have you ever noticed a drop in water pressure when you switch to the shower? This could be another sign of a faulty diverter that needs fixing. Addressing these signs promptly can help maintain your shower’s performance and avoid more serious issues. How often do you check your shower diverter? It might be worth setting a reminder to keep everything in check.Frequently Asked Questions
What Causes A Shower Diverter Gate To Malfunction?
A diverter gate can fail due to mineral buildup. Worn-out parts and improper installation are also common causes.
How Can I Identify A Faulty Diverter Gate?
Signs include water not switching between the tub and shower. Reduced water pressure is another indicator of an issue.
Can I Fix A Shower Diverter Gate Myself?
Yes, you can. It’s often a simple fix. Basic tools and instructions are usually enough.
What Tools Do I Need To Fix A Diverter Gate?
You need pliers, a wrench, and a screwdriver. Replacement parts may also be required for repairs.
How Often Should I Maintain My Shower Diverter Gate?
Regular maintenance every six months helps prevent issues. Check for leaks and mineral buildup during routine checks.
Conclusion
Fixing a shower diverter gate can be simple. Follow the steps carefully. Tools make the job easier. Check for leaks after fixing. Regular maintenance prevents future problems. Clean the diverter gate regularly. It keeps water flowing smoothly. Don’t ignore small issues.
They become big problems later. A working shower adds comfort to your home. Enjoy your showers without interruptions. Make sure everything works as it should. A little effort saves money and time. Keep your shower efficient and enjoyable. Happy fixing and happy showering!