A leaky faucet can be incredibly frustrating, especially when you’ve just replaced the stem, expecting a quick fix. But don’t worry, you’re not alone in this struggle.
Many homeowners face the same issue, and the good news is, there are simple solutions that can help you tackle this problem effectively. Imagine the sense of satisfaction and peace you’ll feel once you hear the drip finally stop. That’s what we’re aiming for.
We’ll guide you through straightforward steps to pinpoint and resolve the leak, saving you from unnecessary water wastage and costly repairs. With your confidence boosted, you’ll have the skills to ensure your faucet runs smoothly. So, let’s dive in and get that faucet fixed for good!
Identifying The Leak
Identifying the source of a faucet leak can be tricky. Even after replacing the stem, leaks may persist. Understanding the root cause is key. This guide will help you pinpoint the leak’s origin. We’ll explore common indicators and causes of faucet leaks. Read on to learn how to diagnose and fix your leaky faucet.
Signs Of A Leaking Faucet
A leaking faucet is more than just a drip. Listen for sounds of water escaping. Check for water pooling around the faucet base. Watch for water stains under the sink. These are telltale signs of a leak. Also, a sudden increase in water bills may signal a leak.
Common Causes Of Faucet Leaks
Several issues might cause a faucet to leak. Worn-out washers are a frequent culprit. Over time, they become brittle and fail to seal properly. Damaged O-rings can also lead to leaks. O-rings are essential for controlling water flow. Corroded valve seats can cause leaks around the spout. Mineral deposits build up and weaken the seal. Faulty installation can also result in leaks. Ensure all components are correctly fitted and secured.
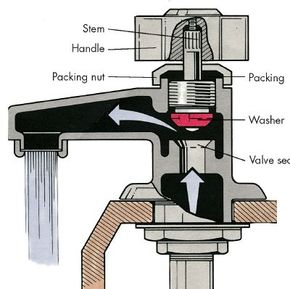
Credit: home.howstuffworks.com
Tools And Materials Needed
Fixing a faucet that leaks after replacing the stem can be a simple task with the right tools and materials. Understanding what you need ensures a smooth repair process. Gathering the necessary items before starting will save time and frustration.
Essential Tools
You’ll need a few basic tools. First, a wrench. This helps in loosening and tightening nuts. A screwdriver is also necessary. Choose one that fits the screws on your faucet. Pliers are useful for gripping small parts. A utility knife may be needed to cut away any old seals or tape. Finally, have a bucket or bowl ready. This will catch any water that drips during the repair.
Recommended Materials
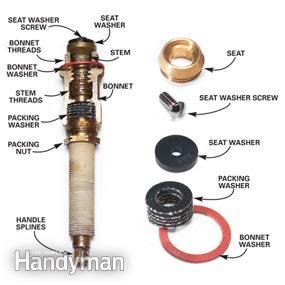
Have some materials on hand for the best results. Plumber’s tape is important. It helps create a watertight seal around threads. A replacement stem washer might be needed if the old one is worn. O-rings are also essential. They help prevent leaks by sealing gaps. Consider keeping some silicone grease. This can lubricate parts and prevent wear. Having these materials ready will make the task easier.
Preparing For Stem Replacement
Fixing a leaking faucet can be a simple task. Preparing for stem replacement is crucial. This preparation ensures smooth work and prevents damage. Before starting, gather necessary tools and materials. A wrench, screwdriver, and replacement stem are essential. Proper preparation saves time and reduces frustration.
Turning Off The Water Supply
Begin by shutting off the water supply. Locate the valve under the sink. Turn it clockwise until it’s tight. This step prevents water flow during repairs. Check if the water is completely off. Turn the faucet on to confirm no water comes out. If water flows, tighten the valve more. Safety is key, so be thorough.
Removing Faucet Handles
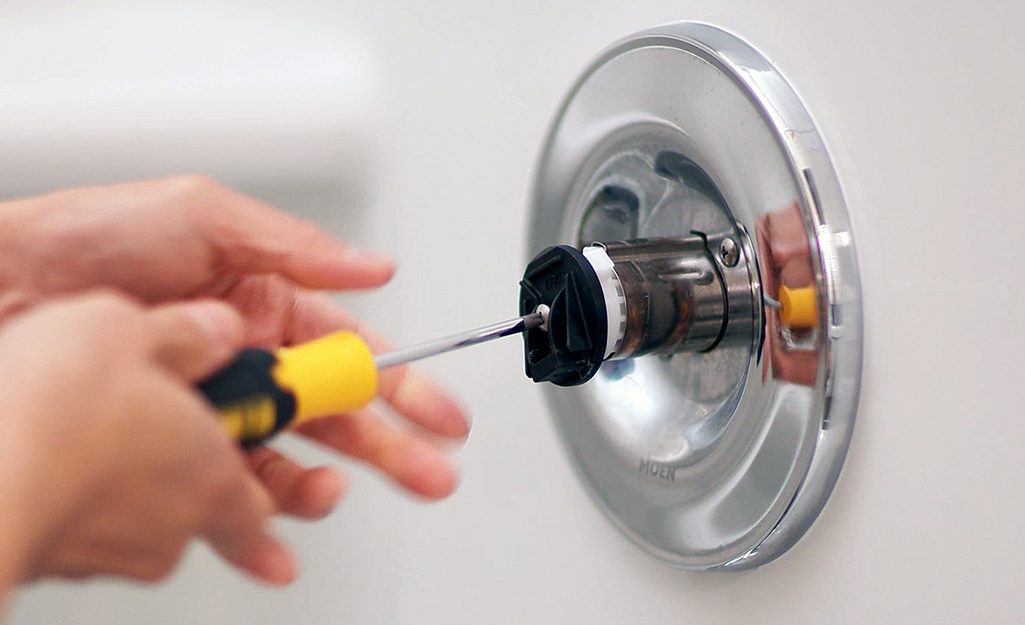
Next, remove the faucet handles. Use a screwdriver to loosen the screw beneath the handle. Once loose, pull the handle off gently. Sometimes, the handle sticks. Apply gentle force to avoid breaking it. Look for hidden screws if the handle resists. Removing handles gives access to the stem. It’s an essential step in the repair process.
Removing The Old Stem
Fixing a leaky faucet often involves removing the old stem. Carefully detach the stem using a wrench, ensuring not to damage surrounding parts. Once removed, inspect for wear or corrosion before replacing with a new stem to prevent further leaks.
When dealing with a leaky faucet after replacing the stem, one essential step is removing the old stem. This process, while seemingly straightforward, can be a bit tricky. But with the right approach and some patience, you’ll be able to tackle it like a pro. Let’s walk through the steps, ensuring you have the confidence and know-how to get the job done efficiently.Accessing The Stem
To access the stem, begin by turning off the water supply. This prevents any unexpected sprays and keeps your workspace dry. Next, remove the faucet handle. This usually involves unscrewing a visible screw or popping off a cap to reveal a hidden screw beneath. Keep these screws in a safe place, as they are easy to lose. Once the handle is off, you should see a packing nut. Use an adjustable wrench to loosen it. This will expose the stem, allowing you to proceed with its removal.Careful Removal Techniques
With the stem exposed, it’s time to carefully remove it. Use pliers to grip the stem and twist it counterclockwise. If it’s stuck, a gentle rocking motion can help loosen it without causing damage. Sometimes, corrosion can make the stem stubborn. Applying a penetrating oil can help break the bond. Allow it to sit for a few minutes before attempting to turn the stem again. While removing the stem, notice any worn or damaged washers. These could be the culprits behind the leak and may need replacing. Keep an eye out for any surprises, like unexpected debris or buildup, which can affect performance. Removing the old stem can initially feel daunting, but it’s a task within your reach. Have you ever found a seemingly simple task to be more complex than expected? It’s all part of the learning process. Taking it step by step, and being mindful of each component, transforms a challenge into an opportunity to gain new skills. Now, you’re one step closer to a fully functional faucet, free from leaks.Installing The New Stem
A leaking faucet persists even after replacing the stem. Check for worn-out washers or seals. Ensure the new stem is tightly secured.
Replacing a faucet stem is a task that many homeowners face. After replacing the stem, you might find that the leak persists. This can be frustrating, but the solution often lies in ensuring the new stem is installed correctly. Let’s dive into the process of installing the new stem with precision and care.Choosing The Right Replacement Stem
Selecting the appropriate replacement stem is crucial. Start by identifying the brand and model of your faucet. This information is often found on the faucet itself or in the user manual. If you’re unsure, take the old stem to a hardware store. A knowledgeable staff member can assist you in finding the exact match. The right fit ensures a snug seal, preventing leaks.Step-by-step Installation Process
1. Turn Off Water Supply Before you begin, ensure the water supply is turned off. This prevents any unwanted water flow during the installation. 2. Remove the Old Stem Gently unscrew the retaining nut using a wrench. Carefully extract the old stem. If it’s stuck, a bit of penetrating oil can help loosen it. 3. Inspect the Faucet Body Check the faucet body for any debris or mineral buildup. Clean it thoroughly to ensure the new stem fits properly. 4. Install the New Stem Align the new stem with the faucet body. Gently push it into place, ensuring it fits snugly. Tighten the retaining nut securely but avoid over-tightening, which can cause damage. 5. Reattach the Handle Once the stem is in place, reattach the handle. Test the handle for smooth operation, indicating proper alignment. 6. Restore Water Supply Turn the water supply back on. Check for leaks by running the faucet. If you notice any drips, double-check the stem installation. Installing a new stem might seem daunting, but with careful attention to detail, you can tackle it with confidence. Remember, ensuring each step is followed diligently can save you from further leaks. Have you ever tackled a home repair that seemed simple but turned out to be more complex? Share your experiences in the comments below!Testing The Repair
Fixing a faucet leak after stem replacement involves careful testing. Check connections for tightness and inspect the stem for damage. Ensure washers and seals are properly aligned to stop the drip.
Testing the repair is a crucial step in fixing a leaking faucet. After replacing the stem, ensure everything works correctly. This step saves time and prevents future problems. Verify the repair by following simple steps. Let’s dive into the process.Turning On The Water Supply
Begin by slowly turning on the water supply. This prevents sudden pressure that might damage the faucet. Turn the valve counterclockwise to open it. Listen for any unusual noises. If there are none, proceed to the next step.Checking For Leaks
Inspect the faucet for any signs of leaking. Focus on the base and joints. Use a dry cloth to wipe around the faucet. This helps in spotting any moisture easily. If you see water, tighten the connections. Ensure all parts are correctly fitted. Repeat the process until no leaks are detected.Maintenance Tips
Keeping a faucet in top condition is essential. Regular maintenance can prevent leaks and extend its life. Even after replacing the stem, a faucet might leak. Follow these maintenance tips to ensure your faucet remains leak-free.
Regular Inspection
Check your faucet regularly. Look for any signs of leaks or wear. Inspect the handle and stem for any loose parts. Tighten any loose screws or connections. This can prevent minor issues from becoming major problems.
Preventive Measures
Use a soft cloth to clean the faucet. Avoid harsh chemicals that can damage parts. Turn the faucet on and off gently to reduce wear. Install a water softener if your water is hard. This can prevent mineral build-up that leads to leaks.
Credit: diy.stackexchange.com
Credit: www.homedepot.com
Frequently Asked Questions
Why Is My Faucet Still Leaking After Stem Replacement?
A faulty washer or O-ring may cause leaks. Check for incorrect installation or damaged parts.
How Do I Check For Installation Errors?
Ensure the stem is tightened properly. Verify if all washers and O-rings are correctly placed.
Can A Worn-out O-ring Cause Leaks?
Yes, a worn or damaged O-ring can lead to leaks. Replace it if needed.
What Tools Do I Need To Fix A Leaking Faucet?
Basic tools include an adjustable wrench, screwdriver, and plumber’s tape. These help in fixing common issues.
How Often Should I Replace Faucet Parts?
Inspect every few years. Replace parts showing wear or damage to prevent leaks.
Conclusion
Fixing a leaky faucet can be simple. First, double-check the stem installation. Ensure it’s tight and properly aligned. Next, inspect washers and O-rings for damage. Replace them if worn out. Sometimes, debris can block water flow. Clean the faucet parts thoroughly.
If leaks persist, consider consulting a professional plumber. Regular maintenance helps prevent future leaks. Keep an eye on faucet performance. Listening for unusual sounds can signal issues. Proper care ensures a long-lasting faucet. No more annoying drips. Enjoy a quiet, efficient kitchen or bathroom.