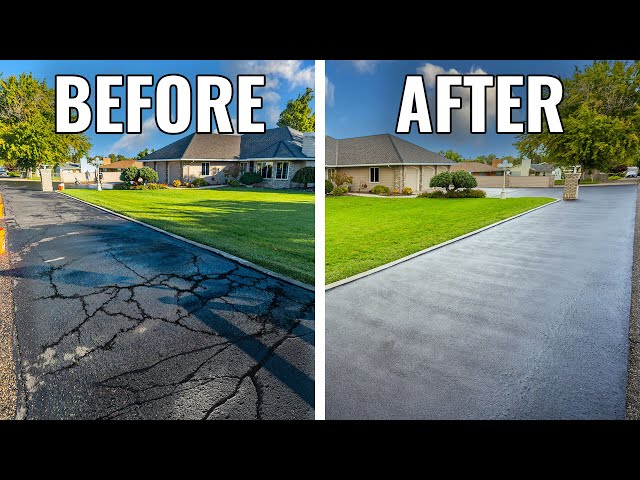
Your driveway is more than just a path to your home; it’s a key part of your property’s curb appeal. But what happens when your once-smooth asphalt starts to crumble?
It can be frustrating, and you might wonder what you can do to fix it without breaking the bank. Fortunately, you’re not alone in this, and there are effective solutions that can restore your driveway to its former glory. Imagine driving up to a home with a flawless driveway, where every detail reflects care and attention.
Doesn’t that sound appealing? By learning how to fix a crumbling asphalt driveway, you can achieve this. This guide will provide you with simple, step-by-step methods to bring back the pristine look of your driveway. Keep reading to discover how you can transform your driveway into a stunning entrance that enhances your home’s appearance and value.

Credit: bootsonenterprises.com
Assessing Damage
Spot cracks or potholes to assess asphalt driveway damage. Examine the depth and size of crumbling areas. Identify underlying issues before planning repairs for a smoother, longer-lasting surface.
Assessing damage on your asphalt driveway is the first crucial step in restoration. It’s like diagnosing an ailment before treatment; you need to know what you’re dealing with. Being proactive in identifying the extent of the damage can save you time, money, and hassle in the long run.Identifying Cracks
Cracks are the most common issue you might face. They can start small and grow quickly if not addressed. Look for hairline fractures or larger gaps. Consider how long they’ve been there. If you park on your driveway every day, those cracks might have quietly expanded without you noticing. It’s often surprising how quickly they can develop into bigger problems. Think about what could have caused them. Was it the heavy truck you parked last week? Or maybe the relentless sun beating down in summer? Knowing this helps in choosing the right repair method.Spotting Potholes
Potholes are a bigger, more visible problem. You can spot them easily, but fixing them is another story. They could be a result of poor drainage or heavy traffic. Inspect their size and depth. Are they small enough to fix with a simple patch, or do they resemble a mini crater? This determines the amount of material and effort required. Ask yourself why they formed. Is your driveway sloping in a way that water pools during rainstorms? If yes, you’ll need to address drainage issues to prevent future potholes. Repairing these issues is not just about aesthetics. It’s about maintaining your driveway’s longevity and ensuring safety for everyone using it. What hidden surprises does your driveway hold?Preparing The Area
Before fixing a crumbling asphalt driveway, prepare the area properly. This step ensures the repair lasts longer. A clean and clear surface is crucial. It allows the new asphalt to bond well. Begin with cleaning and removing debris from the area.
Cleaning The Surface
First, sweep the driveway to remove dust and dirt. Use a stiff broom for best results. Pay attention to cracks and crevices. Dirt often hides there. After sweeping, rinse the area with a garden hose. Water helps wash away fine particles. For stubborn stains, consider using a mild detergent. Scrub gently to avoid damaging the surface.
Removing Debris
Next, remove any debris from the driveway. Pick up loose rocks, leaves, and branches. These can interfere with the repair process. Ensure that no large objects remain on the surface. Use a leaf blower to clear smaller debris. This tool helps reach tight spots effectively. Check for weeds growing through the cracks. Pull them out completely. This step prevents future damage.
Repairing Cracks
Fixing a crumbling asphalt driveway involves sealing cracks and applying a fresh coat of asphalt. Begin by cleaning the surface and removing loose debris. Fill cracks with asphalt filler, then apply a sealant to protect and restore the driveway’s appearance.
Regular maintenance ensures lasting results.
Repairing the cracks in your asphalt driveway is a crucial step in maintaining its longevity and appearance. As someone who once ignored those pesky small cracks on my driveway, thinking they were harmless, I learned the hard way when they expanded into larger fissures. You don’t want to fall into the same trap. It’s best to address these issues early on to prevent costly repairs later. Let’s dive into how you can efficiently tackle small and large cracks in your asphalt driveway.Filling Small Cracks
Small cracks are like little warning signs, telling you that your driveway needs attention. Start by cleaning the area thoroughly. Use a wire brush to remove dirt and debris, ensuring the crack is free of loose material. Next, apply a crack filler designed for asphalt. These fillers are easily available at local hardware stores. They are often packaged in convenient squeeze bottles for easy application. Simply fill the crack, making sure the filler is level with the surface. Allow the filler to dry according to the manufacturer’s instructions. I remember one time I was impatient and drove over the freshly filled cracks, leading to more problems. Patience is key here!Addressing Larger Cracks
Larger cracks require a bit more attention. Begin by cleaning the area just as you would for small cracks. You might need a broom to sweep away loose asphalt pieces. For these bigger cracks, you’ll need a more robust solution. Cold asphalt patch can be a lifesaver here. It’s a ready-to-use mix that you can tamp down into the crack, ensuring it’s tightly packed. Use a tamper or the back of a shovel to compact the patch material. This ensures stability and prevents future cracking. I once used my foot, thinking it would suffice, only to find the patch uneven and prone to further damage. A little elbow grease goes a long way! Have you ever noticed how a small crack can expand into a larger problem? Addressing them early is not just about aesthetics; it’s about preserving your driveway and saving money in the long run. What steps will you take to keep your driveway in top shape?Fixing Potholes
Repairing a crumbling asphalt driveway involves filling potholes and sealing cracks to prevent further damage. Clean the area, apply patching compound, and compact it for a smooth finish. Regular maintenance ensures longevity and enhances curb appeal.
Fixing potholes in your driveway can seem daunting, but it’s a manageable task with the right approach. Potholes not only make your driveway look unattractive, but they can also damage your car. Tackling this issue head-on can restore both the functionality and beauty of your driveway.Removing Loose Asphalt
Begin by clearing out any loose asphalt and debris from the pothole. Use a sturdy shovel or a steel rake for this task. Ensure that you remove all loose materials as they can prevent the patch material from adhering properly. You might find some hidden stones or weeds; remove these as well. A clean surface is crucial for a successful repair. If you’re unsure about the depth, dig a little deeper to ensure a stable foundation.Applying Patch Material
Select a quality patch material from your local hardware store. Cold patch asphalt is a popular choice for DIY repairs. Before applying, read the instructions on the packaging carefully. Pour the patch material into the pothole, filling it slightly above the surface level. Use a tamper to compact the material firmly. This compression is vital to ensure that the patch holds up over time. After applying, allow the patch to set for the recommended time on the product label. This waiting period can be a test of patience, but it’s crucial for a durable finish. Once set, your driveway will be as good as new. Have you ever fixed a pothole before? What challenges did you encounter? Share your experiences, and let’s learn from each other.Sealing The Driveway
Sealing an asphalt driveway protects it from damage. It extends the life of the surface. A well-sealed driveway also enhances its appearance. This process involves choosing the right sealant and applying it correctly. Let’s explore these steps in detail.
Choosing Sealant
Selecting the right sealant is crucial. Consider the climate in your area. Some sealants work better in cold regions. Others are ideal for hot climates. Check for sealants that resist oil and gas spills. They offer better protection. Look for products designed for asphalt. These provide a superior finish. Compare different brands. Read reviews and ratings. Choose a sealant with good user feedback.
Application Techniques
Proper application ensures the best results. Start by cleaning the driveway thoroughly. Remove dirt, debris, and grease. Use a brush or blower for this task. Apply the sealant on a dry day. Avoid days with rain forecasts. Use a squeegee or a brush to spread the sealant. Work in small sections. This prevents the sealant from drying too quickly. Ensure an even coat across the surface. Let the sealant dry completely before use. Follow the manufacturer’s instructions for drying time.

Credit: www.reddit.com
Preventive Maintenance
Preventive maintenance is the key to keeping your asphalt driveway in top condition and avoiding costly repairs. By taking simple steps throughout the year, you can extend its lifespan and maintain its appearance. Keeping a watchful eye on your driveway and acting promptly can save you time and money.
Regular Inspections
Regular inspections of your driveway should be part of your routine. Walk around and check for cracks, potholes, or areas that look worn out. These are often early signs of damage.
Think of these inspections like giving your driveway a health check. Catching issues early can prevent them from escalating into major problems.
Don’t wait for visible damage. Schedule inspections every few months or after extreme weather conditions. This proactive approach helps you stay ahead of potential issues.
Seasonal Tips
Seasonal changes can affect your asphalt driveway. During winter, snow and ice can cause significant damage. Consider using a plastic shovel instead of a metal one to avoid scraping your driveway.
In summer, intense heat can soften asphalt, leading to indentations. Consider parking in different spots to distribute weight evenly.
Keep your driveway clean from debris and leaves. They can hold moisture, leading to mold or moss growth, which deteriorates the surface.
Have you ever noticed how some driveways always look pristine while others deteriorate quickly? The secret often lies in preventive maintenance. It’s not just about fixing problems—it’s about stopping them before they start.
What steps will you take today to protect your driveway? A little effort now can save a lot of hassle later.
Credit: www.youtube.com
Frequently Asked Questions
What Causes Asphalt Driveways To Crumble?
Weather, heavy loads, and poor drainage damage asphalt. Cracks form, leading to crumbling. Regular maintenance can prevent this.
Can I Repair Small Cracks Myself?
Yes, you can. Use asphalt crack filler for small cracks. Clean the area first. Apply filler evenly.
How Often Should I Seal My Driveway?
Seal every 2 to 3 years. It protects from moisture and UV rays. Extends lifespan. Keeps it looking good.
What Is The Best Way To Patch Potholes?
Use cold patch asphalt. Clean debris first. Fill the hole. Compact it tightly. This ensures durability and smoothness.
Is Resurfacing Better Than Replacing The Driveway?
Resurfacing is cheaper and faster. Good for minor damage. Replacement is best for major issues. Assess the condition first.
Conclusion
Fixing a crumbling asphalt driveway is simpler than you think. Start by cleaning the surface. Remove dirt, debris, and loose pieces. Next, fill the cracks with asphalt filler. Ensure it’s even and smooth. Apply a sealant to protect the surface.
This adds a fresh, new look. Regular maintenance helps avoid future issues. Inspect your driveway often. Catch problems early and save time and money. A well-maintained driveway boosts your home’s curb appeal. Enjoy a smooth, sturdy entrance to your home.
Follow these steps for lasting results. Your driveway can look great again!