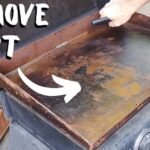
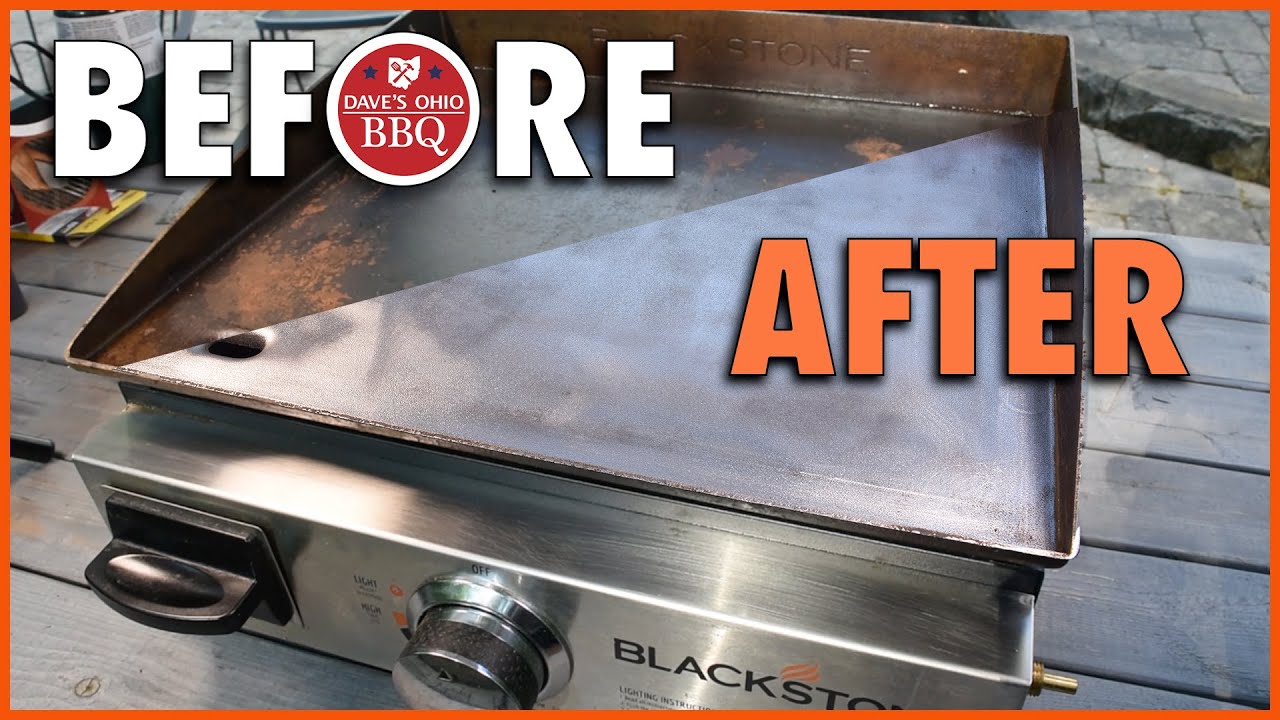
A rusted Blackstone griddle can turn outdoor cooking from a joy into a headache. Many people worry that rust means the end of their griddle’s life. But with the right approach, you can restore your Blackstone griddle and bring back its non-stick, glossy surface.
Cleaning a rusty griddle is not just about looks—it’s about food safety and long-term performance too. Let’s explore how to clean a rusted Blackstone griddle completely, why rust happens, and what you need to do to keep your griddle in top shape for years.
Why Blackstone Griddles Rust
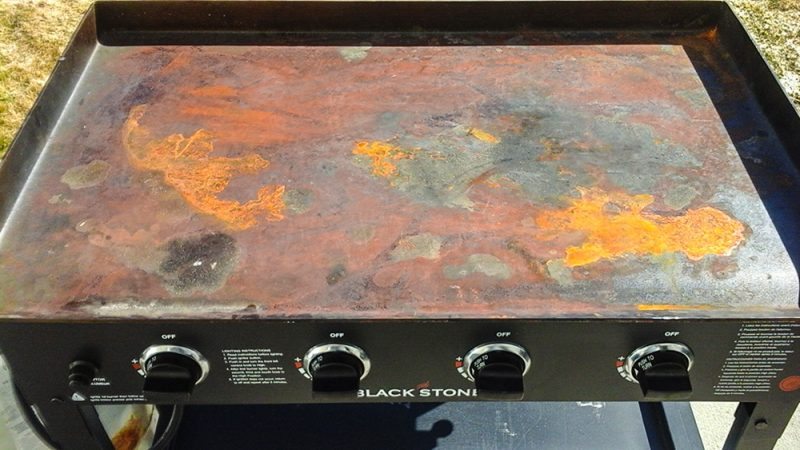
Blackstone griddles are made from cold-rolled steel, which gives excellent heat retention and a great cooking surface. However, steel reacts with moisture and air, leading to rust if not properly cared for. Outdoor cooking means your griddle faces rain, humidity, and even condensation under the cover. Often, a simple mistake—like leaving it uncovered overnight or forgetting to season it—can invite rust. Even a few drops of water under the cover can start the process.
Rust isn’t just ugly—it can affect the taste of your food and weaken the metal surface. If ignored, it can spread and eventually cause permanent damage. However, almost every Blackstone owner faces a rusty griddle at some point, especially if you live in a humid climate or near the sea. The good news: you can always fix it unless the rust has eaten deep holes.
Many owners are surprised to find rust even when the griddle is covered. This often happens because covers can trap humidity inside, especially after rain or if the griddle was not fully cooled before covering. Sometimes, condensation forms under the cover overnight, especially during temperature changes.
Even a small amount of trapped moisture can start rust, showing how careful you must be with storage.
Another detail beginners often miss: salt in the air (especially near the ocean) speeds up rust. If you live by the sea, your griddle needs extra attention and more frequent checks. Salt acts as a catalyst, making the steel corrode faster. Also, cooking acidic foods like tomatoes or vinegar-based sauces without proper cleaning afterward can weaken the seasoning layer, exposing steel to moisture and leading to rust.
Tools And Materials You’ll Need
Before you start, gather all your supplies. Having the right tools makes the job faster, safer, and more effective. Here’s what you need:
- Metal scraper (Blackstone or similar)
- Grill stone, pumice stone, or steel wool (for heavy rust)
- Cooking oil (like canola, vegetable, or flaxseed)
- Paper towels or clean rags
- Spray bottle (filled with water)
- Heat-resistant gloves
- Mild dish soap (optional, for tough jobs)
- Bucket of warm water
- Plastic spatula (for loose debris)
- Protective cover (for after cleaning)
- Mask (optional, if rust dust is heavy)
Don’t use harsh chemicals or wire brushes, as these can scratch the surface or leave residues unsafe for cooking.
For tougher jobs, some people use a soft-bristled brush for scrubbing corners. If your rust is severe, you might also keep medium-grit sandpaper handy (120–150 grit). But only use sandpaper for deep, stubborn rust—too much sanding can thin the steel.
Extra tip: Always use dedicated tools for your griddle. If you use a scraper or stone that has cleaned other surfaces (like grills or pans with chemical cleaners), residue can transfer and affect your griddle’s seasoning or safety.
Step-by-step: Cleaning A Rusted Blackstone Griddle
Restoring your griddle takes time and effort but can be done in a few hours. Follow these steps carefully for the best results.
1. Heat The Griddle
Turn your griddle burners to high and let it heat up for 15-20 minutes. This step:
- Loosens stuck-on rust and food bits
- Makes scraping easier
- Evaporates moisture that can mix with rust
Wear heat-resistant gloves to protect your hands.
Heating does more than just loosen debris—it helps you see where the rust is thickest. As the griddle heats, rusted spots may change color, making it easier to target problem areas. If you notice uneven heating, this can also signal where rust is affecting the steel’s conductivity.
2. Scrape Away Loose Rust
Use a metal scraper to push off the loose rust and debris. Hold the scraper at a slight angle and work in straight lines. Be patient—this may take several passes.
- Focus on rusty patches first
- Don’t dig into the steel
- Wipe away debris with paper towels as you go
If you see shiny steel beneath the rust, that’s good. Don’t worry if some stubborn spots remain; you’ll tackle these next.
For best results, work from one side to the other, scraping in overlapping sections. Avoid pressing too hard; slow, steady pressure removes rust without scratching the steel. After scraping, use a plastic spatula to collect loose debris and discard it.
Beginners sometimes skip this step and leave rust flakes, which can burn and stick during seasoning.
3. Use A Grill Stone Or Steel Wool
A grill stone or pumice stone is designed for cleaning griddles and removes stubborn rust without damaging the steel. For smaller patches, use steel wool. Wet the stone slightly for smoother action.
- Scrub in small circles
- Use light pressure
- Rinse the stone often to remove rust buildup
For extra-tough spots, you can add a drop of mild dish soap to the stone. Wipe off all soap with a damp rag afterward.
If you’re cleaning corners or edges, steel wool works well, but check for leftover bits. Fine steel wool strands can stick to the griddle and may burn or rust later. Make sure to rinse the surface thoroughly after scrubbing.
Some owners use a grill stone for the main area and switch to steel wool for corners or around burners. The grill stone wears down evenly, so rotate it occasionally for a smooth finish.
4. Wipe Clean
Soak a few paper towels in water and wipe the surface to remove rust dust and residue. Repeat until towels come away mostly clean. This helps you see what rust remains and prevents old debris from burning during the next steps.
For persistent spots, use a damp rag and wipe in circles. Some people use a second bucket of clean water for rinsing, especially after using dish soap. The goal: remove every bit of dust or loose rust, so seasoning sticks well.
5. Repeat If Needed
If rust remains, repeat scraping and scrubbing. Some griddles need 2-3 rounds, especially if rust has built up over months. Don’t rush—thorough cleaning now means easier care later.
Check progress by lightly rubbing the surface with a dry paper towel. If brown or orange dust appears, more cleaning is needed. Deep rust may require another round with sandpaper (medium grit), but always finish with a grill stone to smooth the surface.
6. Dry Thoroughly
Water left on the griddle can restart rust, so dry the surface completely with clean towels. Turn the burners back on for a few minutes to evaporate any hidden moisture. The steel should look dull but clean.
Extra step: After drying, let the griddle cool to room temperature before seasoning. This prevents uneven oil application and reduces risk of condensation under the cover.
7. Season The Griddle
This is the most important step. Seasoning creates a protective, non-stick layer. Here’s how:
- Pour 2-3 tablespoons of cooking oil onto the griddle.
- Use tongs and a wad of paper towels to spread oil evenly over the entire surface, including corners and sides.
- Let the griddle heat until the oil smokes, then turn off the burners.
- Allow the griddle to cool, then repeat oiling and heating 2-3 more times.
Each layer of seasoning darkens the steel. Well-seasoned griddles turn black and glossy.
For best results, apply thin layers of oil each time. Thick oil pools can create sticky spots or uneven seasoning. Flaxseed oil produces a hard, glass-like finish but must be spread very thinly. Beginners often miss this detail and end up with flaking seasoning.
8. Final Wipe And Protection
Once cool, wipe the surface with a thin layer of oil. This prevents moisture from starting new rust. Cover your griddle with a weatherproof cover and store it in a dry place if possible.
If you cook daily, you can skip the heavy oiling, but always wipe down after use. For long-term storage, apply a generous oil layer and check every few weeks for signs of moisture or rust under the cover.
How To Prevent Rust From Returning
Cleaning rust is hard work. Prevention is much easier if you follow these habits:
- Clean after every use: Scrape, wipe, and lightly oil the surface.
- Store covered: Use a fitted, waterproof cover, even if your griddle is on a patio.
- Avoid standing water: Empty grease trays and check for puddles after rain.
- Reseason regularly: Add a thin layer of oil after each cook.
- Store indoors in winter: If possible, move your griddle to a shed or garage during wet months.
Griddles in humid or coastal areas need extra attention. Even a few drops of water under the cover can cause rust, so check your griddle often.
A non-obvious tip: After rain or humid weather, lift the cover and let the griddle air out for a few hours. This helps evaporate hidden moisture and reduces condensation risk. Also, if your cover has vents, make sure they are not blocked. Proper airflow prevents trapped humidity.
Another helpful habit: Label your griddle tools and keep them separate. Using the same scraper or brush on other surfaces (especially rusty or dirty grills) can transfer contaminants. Dedicated tools keep your griddle cleaner and seasoning stronger.
Credit: www.youtube.com
When Rust Gets Out Of Hand: Deep Restoration
Sometimes, rust is thick, flaky, or has been ignored for months. If normal cleaning isn’t enough, a deeper restoration may be needed. Here’s what to do:
Assess The Damage
Check if rust is only on the surface or has eaten deep pits into the steel. Surface rust can always be fixed; deep rust with holes means the griddle might be unsafe.
Inspect the underside and corners carefully. Deep rust often starts in hidden spots, especially around burner holes or edges. If the steel feels soft, bends, or flakes in large pieces, replacement may be needed.
Sanding
If rust is thick, use medium-grit sandpaper (120-150 grit) and sand in circles until you see clean steel. This step is messy—wear a mask and work outdoors.
- Avoid using a power sander unless you’re skilled, as it can create uneven spots.
- Wipe away all dust before seasoning.
After sanding, always finish with a grill stone or steel wool to smooth out rough areas. This prepares the surface for proper seasoning and prevents food from sticking.
Rust Removers (last Resort)
Special food-safe rust removers exist but use them only if normal methods fail. Always rinse the griddle several times after using any chemical product. Never use regular rust removers designed for tools or cars.
If you choose a food-safe remover, follow instructions exactly and rinse thoroughly. These products usually dissolve rust but can strip seasoning, so deep reseasoning is needed afterward.
Reseason Deeply
After deep cleaning, season the griddle 3-4 times. The steel will be more porous and need extra oil layers. Don’t cook food until the seasoning looks even and black.
If you notice uneven coloring after seasoning, don’t worry. Over time, cooking and regular seasoning will blend the surface. Avoid heavy, sticky oils; thin layers build stronger protection.
Comparing Cleaning Tools For Rust Removal
Choosing the right tool makes rust removal faster and safer. Here’s how the most common tools stack up:
| Tool | Effectiveness | Surface Safety | Best For |
|---|---|---|---|
| Metal Scraper | High (for loose rust) | Safe if used gently | Initial scraping |
| Grill Stone/Pumice | Very High | Very Safe | Stubborn rust spots |
| Steel Wool | Moderate | Safe for small areas | Light rust |
| Sandpaper | Very High | Risky if overused | Heavy, deep rust |
Non-obvious insight: Grill stones are preferred for large areas, as they cover more space and wear down evenly. Steel wool is best for corners but can leave behind fine metal bits if not cleaned up fully.
Another practical detail: Metal scrapers work well on flat surfaces but are less effective on curves or edges. Grill stones can shape themselves to the griddle, making them ideal for uneven areas.
The Science Behind Seasoning And Rust Prevention
Seasoning is more than just oiling the griddle. When you heat oil until it smokes, polymerization happens—the oil turns into a hard, plastic-like layer that bonds to the steel. This layer:
- Blocks moisture and air from touching the steel
- Gives a natural non-stick finish
- Gets better with each use
Different oils create slightly different finishes:
| Oil Type | Smoke Point | Seasoning Quality | Common Use |
|---|---|---|---|
| Canola Oil | 400°F (204°C) | Very Good | Most popular |
| Vegetable Oil | 400°F (204°C) | Good | Affordable, easy to find |
| Flaxseed Oil | 225°F (107°C) | Excellent (hardest layer) | Premium seasoning |
| Olive Oil | 375°F (191°C) | Fair | OK for cooking, not seasoning |
Non-obvious insight: Flaxseed oil produces the hardest, longest-lasting seasoning layer, but it’s more expensive and can flake if applied too thickly. Canola oil is the best balance for most users.
Also, the seasoning process gets easier with time. The more you cook and reapply oil, the stronger and more even your seasoning layer becomes. New griddles may need several rounds of seasoning, but after restoration, regular use will improve the finish.
Mistakes To Avoid When Cleaning A Rusted Griddle
Many beginners make errors that can damage the griddle or make rust return. Here are the most common mistakes:
- Using harsh chemicals: Products like oven cleaner or bleach can leave residues that are unsafe for food.
- Skipping seasoning: Cleaning alone is not enough; seasoning is essential to prevent new rust.
- Letting water sit: Even a few minutes of standing water can start rust.
- Scrubbing too hard: Over-scrubbing with sandpaper or wire brushes can gouge the steel.
- Cooking before seasoning: Food will stick to bare steel and taste metallic.
If you’re unsure, always go gentle and repeat steps rather than trying to fix everything in one go.
Another mistake: Using a cover before the griddle is fully cool. Even slight warmth can cause condensation, which leads to rust under the cover. Wait until the griddle is room temperature before covering.
Credit: blackstoneproducts.com
Realistic Expectations: What A Restored Griddle Looks Like
After cleaning and seasoning, your Blackstone griddle may not look brand new. There may be some color differences or faint marks from old rust. That’s normal—seasoning covers small flaws, and over time, the surface will darken and smooth out with use.
If you see deep pits or holes, the griddle’s structure may be weakened, and it might not be safe for high-heat cooking. Most surface rust, however, can be completely removed, and the non-stick finish restored.
Don’t expect a perfect, mirror finish after restoration. Even professional cleaning leaves minor marks. The goal is a safe, non-stick surface, not cosmetic perfection. Over time, regular cooking and seasoning will build a glossy, black finish that improves with age.
How Often Should You Clean And Reseason?
Frequency depends on how often you use your griddle and your local climate.
- After each cook: Scrape, wipe, and lightly oil.
- Monthly: Inspect for rust, especially in corners and under the cover.
- Season deeply: Every 2-3 months, or after a major cleaning.
If your griddle lives outdoors, check it after every rain or humid spell. In dry climates, you can go longer between deep cleans.
For heavy use (like daily cooking), reseason every few weeks. For occasional use, every couple of months is enough. If you notice food starting to stick or dull patches, add another layer of seasoning.
Extra Tips For Long-term Griddle Care
- Use a dedicated oil bottle: Keep oil by the griddle for easy seasoning.
- Check under the cover: Covers can trap moisture—lift the cover after rain.
- Label your tools: Use a separate scraper and stone for your griddle to avoid cross-contamination with other tools.
- Cool before covering: Never cover a hot griddle; condensation will form and invite rust.
- Invest in a good cover: Cheap covers often leak. Choose one with vents and waterproof seams.
Another tip: Place a folded towel or absorbent pad under the cover during wet seasons. This can help soak up condensation and protect the griddle. Change the towel regularly and check for signs of moisture.
If storing indoors, leave the cover off for a few hours after cleaning. This helps air out the griddle and strengthens the seasoning layer.
When To Replace Your Blackstone Griddle
If your griddle has deep holes or the steel feels thin and flexible, it may be time to replace the cooktop. Blackstone offers replacement tops, or you can upgrade to a new model. Most griddles last many years with good care, but severe neglect or extreme rust can shorten their lifespan.
For information on replacement parts and griddle maintenance, the official Blackstone Support page is an excellent resource.
Replacement is rare, but if you notice uneven heating, warping, or food sticking in one area, check for deep rust. If repairs don’t fix the problem, a new cooktop restores performance and safety.

Credit: blackstoneproducts.com
Frequently Asked Questions
What Causes Rust On My Blackstone Griddle?
Rust forms when moisture and air react with the steel surface. Common causes include leaving the griddle wet, storing it uncovered, or not seasoning regularly. Even humidity under a cover can cause rust.
Cooking acidic foods and not cleaning afterward also exposes steel, speeding up rust. Always clean and reseason after cooking sauces or tomato-based dishes.
Is It Safe To Cook On A Rusty Griddle?
No. Cooking on rust can affect food taste and safety. Small surface rust is not toxic but should be cleaned off before use. Deep rust can weaken the steel and may flake into food.
If you find rust just before cooking, scrape and wipe thoroughly. Don’t cook until the surface is clean and seasoned.
Can I Use Vinegar Or Lemon Juice To Clean Rust?
Mild acids like vinegar can help loosen light rust, but they must be rinsed off completely. Never soak your griddle in vinegar, as it can damage seasoning and steel. Always reseason after using any acid-based cleaner.
If using vinegar, apply with a cloth and scrub gently, then rinse with warm water and dry fully before seasoning.
How Can I Stop Rust From Returning?
Keep the griddle dry, seasoned, and covered. Add oil after each use, and store indoors during wet months if possible. Check often for early signs of rust and address them quickly.
Check corners and edges regularly—these are rust-prone spots. If you spot any orange or brown patches, clean and reseason immediately.
Do I Need A Special Oil For Seasoning?
No, most cooking oils work. Canola, vegetable, or flaxseed oil are best for seasoning. Avoid butter, margarine, or animal fats, as these can go rancid and don’t form a strong protective layer.
If you want a harder finish, try flaxseed oil, but apply very thin layers and heat until fully smoked.
Taking care of your Blackstone griddle is easier than it seems. With the right steps, you can remove rust, restore the cooking surface, and enjoy delicious meals for years. Regular cleaning, proper seasoning, and smart storage are the keys to a rust-free griddle—so you spend less time fixing and more time cooking.