Changing the time on your GE stove may seem simple, but for many, it’s not always straightforward. Whether you just moved into a new home, experienced a power outage, or daylight saving time just started, knowing how to set the correct time is essential. The clock on your stove is not just for looks—it affects cooking timers, scheduled baking, and even safety features. Small mistakes can lead to burnt meals or frustration if the appliance doesn’t behave as expected.
Many GE stove owners find themselves hunting for manuals or pressing random buttons, hoping something works. You don’t have to guess. This guide offers a clear, complete walk-through for all major GE stove clock types and models, with practical tips, troubleshooting advice, and expert insights.
Whether your stove is new, old, has a digital display, or uses knobs, you’ll find the right method here. Let’s help you get back to cooking with confidence.
Understanding Your Ge Stove Clock Type
Before you start, it’s important to identify which clock type your GE stove uses. Not all models have the same interface, and using the wrong method can cause errors or even lock the control panel.
GE stoves generally use one of these clock types:
- Electronic Digital Clock (Touchpad)
- Electronic Digital Clock (Keypad)
- Manual Knob Clock
- Oven Control with Display
- Wi-Fi Connected Smart Stove
How To Identify Your Clock Type
- Touchpad: Flat, glass-like buttons; responds to touch.
- Keypad: Physical, raised buttons you press down.
- Manual Knob: Small dial or knob, usually near the display.
- Oven Control with Display: Buttons and a digital screen, but may also control oven functions.
- Smart Stove: Features Wi-Fi icons or connects to a mobile app.
If you’re unsure, check your user manual or look for the model number, usually found inside the oven door. Enter the model number on the official GE Appliances website for precise instructions.
Changing The Time On A Ge Stove: Step-by-step Methods
Every GE stove model will fall into one of these categories. Find your clock type below and follow the matching steps.
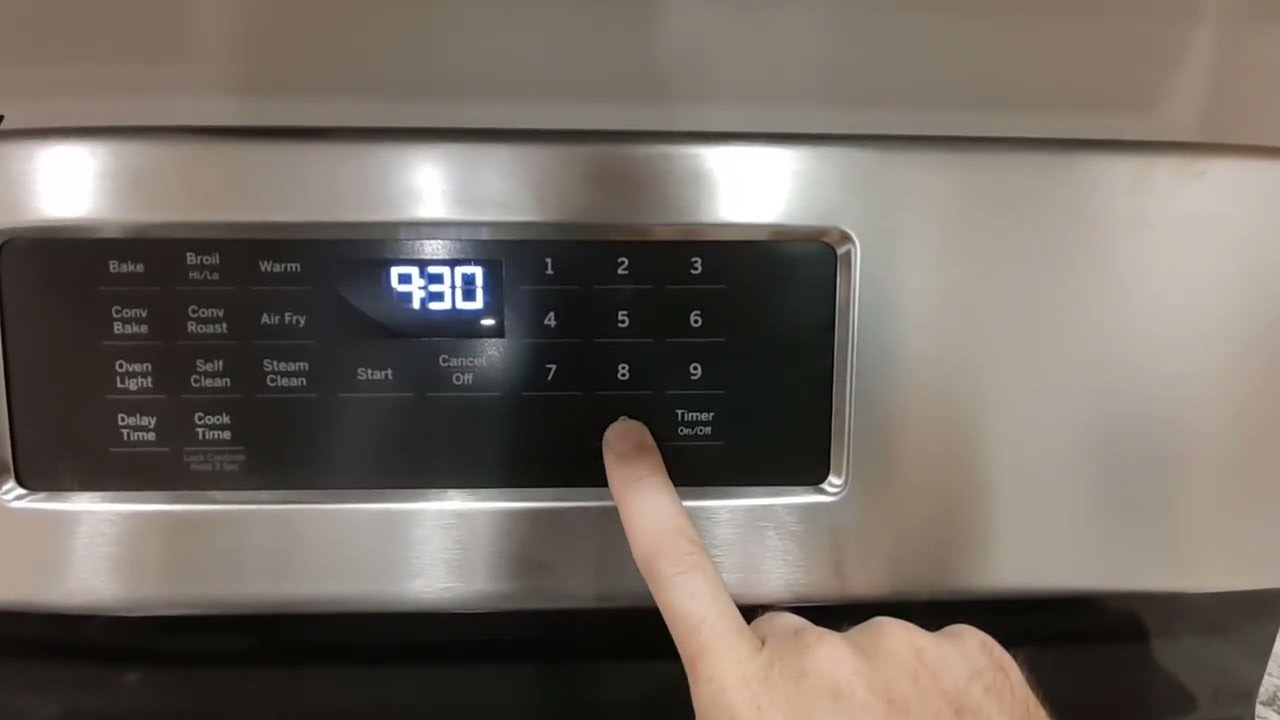
Electronic Digital Clock (touchpad)
- Press the “Clock” or “Set Clock” button.
- On some models, you may need to hold the button for 3 seconds.
- Use the “+” and “-” or “Up/Down” arrows to set the correct time.
- Time may be in 12-hour or 24-hour format.
- Press “Start” or “Clock” again to confirm.
- If you don’t press anything, some models will auto-set after 10 seconds.
Tip: If the display flashes or you hear a beep, the clock is in set mode.
Electronic Digital Clock (keypad)
- Find the “Clock” or “Set Clock” button and press it.
- Enter the time using the number keys.
- For example, for 2: 30, press 2, 3, 0.
- Press “Start” or “Clock” to save.
Non-obvious Insight: If your keypad lacks a dedicated “Start” key, try pressing “Clock” or simply wait a few seconds.
Manual Knob Clock
- Turn the knob gently to the correct time.
- Usually, this is a small round dial with hour and minute markings.
- Do not force the knob; if it’s stuck, it may be in oven lock mode.
- Check alignment. Knob clocks are often less precise—set as close as possible.
Practical Tip: Some manual knobs can be accidentally moved when cleaning. Always recheck after wiping the control panel.
Oven Control With Display
- Press “Clock” or “Settings” (may require holding for 3 seconds).
- Use the arrows or number pad to adjust the time.
- Press “Start” or “Enter” to confirm.
Extra Detail: Some oven controls have a dual function. If “Clock” doesn’t work, try “Bake Time” or check for a secondary function printed on the button.
Wi-fi Connected Smart Stove
- Open the GE Appliances app on your smartphone.
- Connect to your stove via Wi-Fi (see your manual for how to pair).
- Select “Clock” or “Set Time” in the app.
- Enter the desired time and tap “Save” or “Update.”
Pro Insight: If your phone and stove are in different time zones, the app may auto-sync time based on your phone. Always verify after setting.
Why The Correct Time Matters On Your Ge Stove
Setting the right time is not just about convenience. Here are key reasons why it’s important:
- Cooking Accuracy: Timers and delayed start features rely on the clock.
- Scheduled Cleaning: Self-cleaning cycles start at the programmed time.
- Energy Saving: Some models offer “off-peak” cooking times.
- Safety: Alerts and lockouts depend on the internal clock.
Example: If the time is wrong, your lasagna might finish at midnight instead of 6 PM, or the oven could lock during a scheduled clean.
Common Problems When Changing The Time
Even when you follow the steps, things can go wrong. Here’s a look at frequent issues and solutions.
Display Is Blank Or Flashing
- Possible Causes: Power outage, tripped circuit, loose plug.
- Solution: Reset the breaker, plug stove in securely, wait for display to reappear.
Buttons Don’t Respond
- Possible Causes: Control lock is on, child lock activated.
- Solution: Hold the “Lock Controls” or “Control Lock” button for 3 seconds.
Can’t Enter Pm Or Am
- Possible Causes: Some models only support 24-hour (military) time.
- Solution: Check manual for format options. If unsupported, adjust your expectations.
Clock Resets After Power Outage
- Possible Causes: No internal battery backup.
- Solution: Always reset the clock after any power interruption.
Non-obvious Insight: Frequent clock resets could indicate a failing power supply or surge issues.
How To Set The Time After A Power Outage
A power cut will almost always reset the clock. Here’s what to do:
- Wait for power to restore and the display to return.
- Follow the steps for your clock type as described above.
- Double-check other settings (timers, delayed starts) as they may also reset.
Expert Tip: Consider plugging your stove into a surge protector if your kitchen wiring allows it (consult an electrician first).
Changing The Time For Daylight Saving
When clocks change in spring and fall, you’ll need to update your stove’s time manually (unless you have a smart model).
- Spring Forward: Add one hour.
- Fall Back: Subtract one hour.
How-to Example: If your current time is 6:30 AM and daylight saving starts, set it to 7:30 AM.
Smart models may update automatically if connected to Wi-Fi and the GE Appliances app.
Changing The Time On Double Oven Or Range Models
Some GE stoves have two ovens with a shared or separate clock.
- Shared Clock: One clock controls both ovens. Set as usual.
- Separate Clocks: Each oven has its own display and buttons. Set each one following the steps for your clock type.
If you’re unsure, try setting one oven’s clock—if both change, you have a shared system.
How Ge Stove Clocks Compare To Other Brands
Understanding how GE’s system stacks up can help if you switch homes or assist friends. Here’s a comparison:
| Brand | Clock Type | Ease of Setting | Smart Features |
|---|---|---|---|
| GE | Touchpad/Keypad/Manual/Smart | Easy to Moderate | App Sync (some models) |
| Whirlpool | Touchpad/Keypad/Manual | Easy | Limited |
| Samsung | Touchscreen/Smart | Moderate | App, Voice Control |
| LG | Touchpad/Smart | Easy | App, Voice Control |
Key Takeaway: GE’s system is user-friendly but can be confusing if you don’t know your clock type. Smart models add convenience but require app setup.
Troubleshooting: When The Clock Won’t Set
If your GE stove clock refuses to change, try these steps:
- Check if the stove is in Sabbath Mode. This mode disables clock and oven functions for religious observance.
- To exit, hold the “Bake” and “Broil” buttons together for 3 seconds (consult your manual for details).
- Power cycle the stove. Turn off the circuit breaker for 1 minute, then restore power.
- Inspect buttons for wear or damage. If physical buttons stick or don’t click, they may need replacement.
- Update the app (for smart stoves). Outdated apps may not sync correctly.
- Contact GE customer support if all else fails.
Insider Tip: Some older models have fuses near the clock module. A blown fuse can stop the clock from working entirely.
Setting The Clock With No Visible “clock” Button
Some GE models hide the clock function under other buttons.
- Try holding “Settings” or “Bake Time” for 3 seconds.
- Look for small print above or below buttons indicating a secondary function.
- Consult your manual or the GE Appliances support page if you’re stuck.
Real Example: On some Profile Series models, you set the clock by holding the “9” button for 3 seconds.

Credit: www.abt.com
How To Change The Time Using The Ge Stove App
For Wi-Fi-enabled stoves, the process is fast and can be done remotely.
- Download and open the GE Appliances app.
- Register your stove using the model and serial number.
- Connect to Wi-Fi. The app will guide you step-by-step.
- Tap on “Oven Controls,” then “Clock.”
- Set the new time and confirm.
Pro Tip: If your app has a “Sync Time” option, it will match the clock to your phone’s time automatically.
Table: Error Codes Related To Clock Setting
Sometimes, an error code appears when you try to set the time. Here are the most common:
| Error Code | Meaning | What To Do |
|---|---|---|
| F0 | Stuck Button | Clean keypad, try again |
| F7 | Clock/Timer Issue | Power cycle stove |
| F9 | Lock Error | Check oven door |
| F2 | High Temp Detected | Let oven cool, reset clock |
If codes persist, call GE support or a qualified technician.

Credit: www.youtube.com
How To Avoid Common Mistakes When Setting The Time
Many users make small errors that lead to frustration. Here’s what to watch for:
- Pressing buttons too quickly. Some models need a slow, firm press.
- Forgetting to confirm the new time. Always press “Start” or “Clock” after entering the time.
- Ignoring AM/PM settings. If your model supports both, double-check you’re not setting the wrong half of the day.
- Skipping manual review. Always check the display after setting, especially after a power outage.
Advanced Tip: If your stove has a “Demo Mode,” it may ignore clock changes. Disable Demo Mode before setting the time.
What To Do If The Clock Runs Fast Or Slow
A clock that drifts can cause cooking errors.
- Check for power fluctuations. Unstable voltage can affect timekeeping.
- Update firmware (for smart models) via the GE Appliances app.
- If the problem persists, schedule a service call. The internal clock module may need replacement.
Uncommon Insight: In rare cases, using the oven during self-cleaning can cause clock drift due to high internal temperatures.
How To Change From 12-hour To 24-hour Time Format
Some GE stoves let you switch between AM/PM (12-hour) and military time (24-hour).
- Press and hold the “Clock” button for 3-5 seconds.
- Wait for the format to flash.
- Use arrows or number keys to toggle between formats.
- Press “Start” or “Clock” to confirm.
Note: Not all models support this feature. If your clock doesn’t switch formats, it is likely locked to one mode.
Cleaning And Maintaining The Clock Interface
Dust, grease, and spills can interfere with clock buttons and displays.
- Use a soft, damp cloth to clean the control panel.
- Never spray cleaner directly onto the buttons or display.
- Avoid harsh chemicals that can erode markings.
Maintenance Insight: Clean the control panel once a week, especially after cooking greasy foods.
Credit: rightfix.ca
When To Call A Professional
If you’ve tried all steps and your clock still won’t set, it’s time to contact a pro.
- Signs you need help:
- Display is dead
- Buttons don’t work after cleaning and power cycling
- Error codes won’t clear
- Clock loses time constantly
- Who to call:
- GE customer support
- Licensed appliance repair technicians
Fact: Attempting DIY repairs on electronic control boards can void your warranty.
Safety Tips When Changing Clock Settings
- Unplug the stove or turn off the breaker if you need to open the control panel (rarely necessary).
- Keep liquids away from the buttons and display.
- Watch for hot surfaces if you need to reach near the oven after cooking.
Important: Never use sharp objects to press buttons or adjust knobs.
Quick Reference: Setting The Clock On Popular Ge Stove Models
Here’s a handy chart for the most common GE models:
| Model Line | Clock Type | How to Set |
|---|---|---|
| GE Profile | Touchpad | Press “Set Clock,” use arrows, press “Start” |
| GE Café | Smart (App) | Use GE Appliances app |
| GE Adora | Keypad | Press “Clock,” enter time, press “Start” |
| GE JGB Series | Manual Knob | Turn knob to set time |
Always check your model’s manual for small differences.
Where To Find Official Support
If you’re stuck or your model is missing the “Clock” button, visit the official GE Appliances Support page for downloadable manuals and troubleshooting.
Frequently Asked Questions
How Do I Reset My Ge Stove Clock After A Power Outage?
After power returns, the display may flash. Press the “Clock” or “Set Clock” button, use the arrows or number pad to enter the correct time, then press “Start” or “Clock” to confirm. Always check if your timers or delayed bake settings also need resetting.
Why Does My Ge Stove Clock Keep Resetting?
This usually happens after power outages or electrical surges. Some models lack battery backup. If it happens often without a clear cause, your home’s wiring or the stove’s power supply may need checking. Consider using a surge protector.
Can I Set My Ge Stove Clock Using My Smartphone?
If your model supports Wi-Fi and is connected to the GE Appliances app, you can set or sync the clock from your phone. Download the app, register your stove, and follow the prompts to set the time.
What Should I Do If My Ge Stove Clock Buttons Don’t Work?
First, check if the control lock or child lock is active. Hold the “Lock Controls” button for 3 seconds to unlock. If buttons remain unresponsive, try power cycling your stove. Persistent issues may require professional repair.
Is It Safe To Change The Clock On My Stove Myself?
Yes, it’s safe if you follow the manufacturer’s instructions and avoid opening the control panel. Never use sharp objects or excessive force. If you suspect an electrical fault, unplug the stove and call a technician.
Changing the time on your GE stove is a simple but important task that keeps your kitchen running smoothly. By identifying your clock type, following the right steps, and avoiding common mistakes, you can ensure accurate cooking, safety, and convenience. If you run into trouble, GE support is just a click or call away. With this guide, you’ll never have to worry about mistimed meals or confusing controls again.