To attach a shed roof to an existing roof, start by removing the shingles and sheathing to expose the roof framing. Then, attach the porch rafters to the house roof rafters and replace the roofing and flashing.
This method allows for a seamless integration between the shed roof and the existing roof, ensuring a secure and weatherproof connection. When it comes to adding a shed roof to an existing roof, it’s important to follow the proper steps to ensure a secure and durable attachment.
By removing the shingles and sheathing, you can expose the roof framing and create a solid foundation for attaching the porch rafters. This integration requires careful attention to detail and the replacement of roofing and flashing to ensure a watertight seal. In this blog post, we will provide a step-by-step guide on how to attach a shed roof to an existing roof, allowing you to expand your space and enhance the functionality of your property.
Introduction To Shed Roof Attachment
To attach a shed roof to an existing roof, begin by exposing the roof framing and attaching the porch rafters to the house roof rafters. After that, replace the roofing and flashing to ensure a secure and watertight connection between the two roofs.
It’s essential to remove the shingles and sheathing to properly tie the shed roof into the existing house roof.
The Appeal Of Adding A Shed Roof
Adding a shed roof to an existing structure can significantly enhance the aesthetic appeal and functionality of the space. The unique design of a shed roof offers a modern and stylish look while providing additional headroom and natural light. This type of roof is also ideal for shedding snow and water efficiently, making it a practical choice for regions with heavy precipitation. With its versatility and contemporary appeal, a shed roof can transform a plain roofline into a striking architectural feature.
Safety Considerations Before Starting
Prior to commencing the attachment of a shed roof to an existing structure, it is crucial to prioritize safety considerations. Inspect the existing roof for any signs of damage or structural issues that may compromise the integrity of the attachment. Ensure that all necessary safety equipment, such as harnesses, ladders, and fall protection gear, is readily available. Additionally, verify that the materials and tools required for the project are of high quality and suitable for the specific roof attachment. By prioritizing safety measures, you can mitigate potential risks and create a secure working environment for the construction process.
Tools And Materials Needed
When it comes to attaching a shed roof to an existing roof, having the right tools and materials is crucial to ensure a successful and secure connection. Here is a list of essential tools and a materials checklist that you will need for this project.
List Of Essential Tools
- Hammer: for driving nails and securing components
- Tape Measure: to accurately measure dimensions
- Level: for ensuring straight and even surfaces
- Chalk Line: for marking guidelines on the roof
- Roofing Nailer: for efficient and secure attachment of roofing materials
- Circular Saw: for cutting lumber and plywood
- Roofing Shovel: for removing existing shingles and sheathing
- Ladder: for safe access to the roof
- Safety Gear: including gloves, goggles, and a hard hat for personal protection
Materials Checklist
| Materials | Quantity |
|---|---|
| Lumber (pressure-treated): for framing and structural support | As per project requirement |
| Plywood: for sheathing the roof | As per project requirement |
| Roofing Shingles: for weatherproofing the roof | As per project requirement |
| Flashing: for preventing water seepage | As per project requirement |
| Nails and Fasteners: for securing components | As per project requirement |
| Roofing Adhesive: for additional weatherproofing | As per project requirement |
| Rafter Ties and Hangers: for connecting roof structures | As per project requirement |
Preparation Of The Existing Roof
To attach a shed roof to an existing roof, start by removing the shingles and sheathing to expose the roof framing. Then, attach the porch rafters to the house roof rafters and replace the roofing and flashing. This ensures a secure and weatherproof connection between the two roofs.
Inspecting The Existing Structure
Before attaching a shed roof to an existing roof, it is crucial to inspect the structural integrity of the existing roof. This step ensures that the roof can support the additional weight and provides a solid foundation for the shed roof attachment.
Here are some key factors to consider during the inspection process:
1. Check For Damages:
Carefully examine the existing roof for any signs of damage, such as cracks, sagging, or rot. Addressing these issues before attaching the shed roof is essential to maintain the overall stability and safety of the structure.
2. Evaluate Roof Framing:
Inspect the roof framing to ensure it is strong enough to bear the weight of the shed roof. Look for signs of deterioration or weakness, such as loose or damaged rafters or joists. Reinforcing or replacing any compromised framing will ensure a solid base for the shed roof attachment.
Removing Shingles And Sheathing
Once the inspection is complete and any necessary repairs have been made, the next step is to remove the shingles and sheathing from the area where the shed roof will be attached. This process allows for a seamless integration between the two roofs.
Follow these steps to remove the shingles and sheathing:
1. Prepare The Work Area:
Clear the area of any debris or obstacles that may hinder the removal process. This includes removing any loose nails or other fasteners.
2. Start With Shingle Removal:
Begin by carefully prying up the shingles using a pry bar or shingle removal tool. Work from the bottom up, being cautious not to damage the underlying roof structure.
3. Remove The Sheathing:
Once the shingles have been removed, proceed to take off the sheathing. This can be done by prying up the nails securing it to the roof trusses or rafters. Take care not to damage the sheathing or underlying structure during this process.
4. Clean And Prepare The Exposed Roof:
After the shingles and sheathing have been removed, thoroughly clean the exposed roof surface. Remove any remaining debris and ensure the area is free from dust, dirt, and loose materials.
5. Replace The Roofing And Flashing:
Before attaching the shed roof, it is necessary to replace the removed shingles and install new flashing. This step ensures proper waterproofing and protects against potential leaks.
By following these preparation steps, you can ensure a smooth and secure attachment of a shed roof to an existing roof. It is important to prioritize safety, structural integrity, and proper installation techniques throughout the process.

Credit: www.finehomebuilding.com
Installing The Ledger
To attach a shed roof to an existing roof, start by removing the shingles and sheathing to expose the roof framing. Then, attach the porch rafters to the house roof rafters and replace the roofing and flashing. This will ensure a secure and seamless connection between the two roofs.
Attaching a shed roof to an existing roof requires careful installation of the ledger. The ledger acts as the main support for the shed roof, connecting it securely to the existing roof. Follow these steps to properly install the ledger for a seamless and sturdy attachment.
Measuring And Cutting The Ledger
Start by measuring the length of the shed roof and cutting the ledger board to the appropriate size. Use a tape measure to accurately measure the length needed, and then use a saw to cut the ledger board accordingly. It’s crucial to ensure precise measurements and a straight cut to ensure a proper fit.
Securing The Ledger To The Existing Roof
Once the ledger board is cut to size, it’s time to secure it to the existing roof. Here’s how:
- Clean the area where the ledger will be installed, removing any debris or loose materials.
- Position the ledger against the existing roof, making sure it is level and flush with the roof surface.
- Use a pencil to mark the locations where the ledger will be attached to the roof.
- Pre-drill pilot holes at each marked location to prevent splitting the wood.
- Secure the ledger to the existing roof by driving lag screws or structural screws through the pilot holes and into the roof framing. Make sure to use screws that are suitable for outdoor use and can withstand the weight and weather conditions.
- Check the level and stability of the ledger, making any necessary adjustments to ensure a secure attachment.
By following these steps, you can successfully install the ledger for attaching a shed roof to an existing roof. Remember to take accurate measurements, make precise cuts, and securely fasten the ledger to ensure a strong and durable connection.
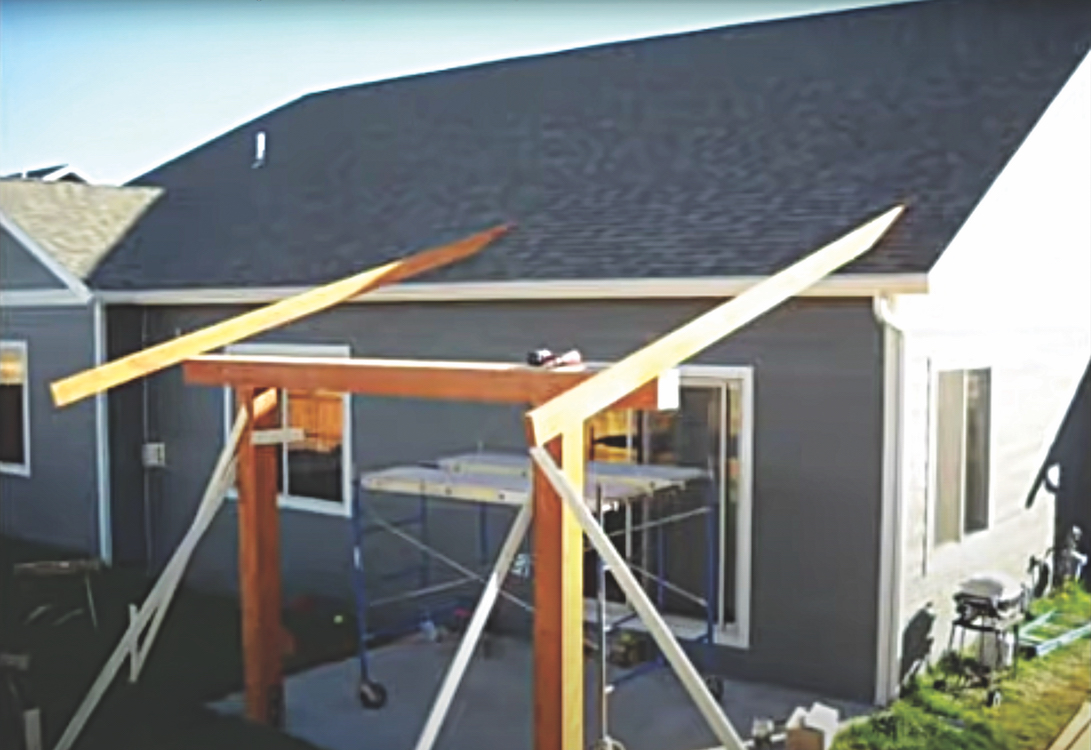
Setting Up Rafters
To attach a shed roof to an existing roof, you will need to remove the shingles and sheathing to expose the roof framing. Then, attach the porch rafters to the house roof rafters and replace the roofing and flashing. It’s important to follow the proper steps to ensure a secure and safe connection between the two roofs.
Cutting Rafters To Size
Before attaching rafters to the ledger, it is important to cut them to the right size. Measure the distance from the ledger board to the ridge board and subtract the width of the ridge board to determine the length of the rafters. Use a framing square to mark the angles on the rafter board and then cut along the lines using a circular saw.
Attaching Rafters To The Ledger
Once the rafters are cut to the correct size, it’s time to attach them to the ledger. Position the rafters on the ledger, ensuring they are evenly spaced and plumb. Secure each rafter to the ledger using structural screws or nails, making sure to follow local building codes.
To ensure that the rafters are securely attached to the ledger, it is recommended to use hurricane ties. These metal connectors are designed to prevent uplift and provide extra strength to the roof structure.
It’s important to note that each rafter must be attached to the ledger using a joist hanger or other approved method. This ensures that the weight of the roof is evenly distributed and prevents any structural issues in the future.
By cutting rafters to size and attaching them to the ledger using proper methods, you can successfully set up the rafters for your shed roof. Remember to always follow local building codes and guidelines to ensure a safe and sturdy structure.

Credit: www.pinterest.com
Joining The Roofs
Joining the roofs of a shed and an existing roof can be done by removing the shingles and sheathing to expose the roof framing. The porch rafters can then be attached to the house roof rafters, followed by replacing the roofing and flashing.
This ensures a secure and seamless connection between the two roofs.
Joining the Roofs
Attaching a shed roof to an existing roof can be a challenging task, but with the right tools and techniques, you can accomplish it with ease. One of the most crucial steps in the process is joining the roofs. This involves aligning the new shed roof with the existing roof and ensuring a seamless transition between the two. In this section, we will discuss how to align the new shed roof with the existing roof and ensure a seamless transition.
Aligning the new shed roof with the existing roof
To align the new shed roof with the existing roof, you need to follow these steps:
1. Start by determining the pitch of the existing roof. This will help you determine the pitch of the new shed roof.
2. Install a ledger board on the existing roof to support the new shed roof. The ledger board should be level and securely fastened to the existing roof.
3. Install the rafters for the new shed roof, ensuring that they are aligned with the rafters on the existing roof. Use a level to ensure that the rafters are plumb and straight.
4. Install a ridge board to connect the two roofs. The ridge board should be level and securely fastened to the top of the new shed roof rafters and the existing roof rafters.
Ensuring a seamless transition
To ensure a seamless transition between the new shed roof and the existing roof, you need to follow these steps:
1. Install flashing around the perimeter of the new shed roof to prevent water from penetrating the joint between the two roofs.
2. Install roofing material on the new shed roof, ensuring that it overlaps the existing roof by at least 6 inches.
3. Install roofing material on the existing roof, ensuring that it overlaps the new shed roof by at least 6 inches.
4. Install additional flashing at the joint between the two roofs to ensure that water is directed away from the joint and does not penetrate the roof.
By following these steps, you can successfully join the roofs and ensure that your new shed roof is securely attached to the existing roof. With proper installation and maintenance, your shed roof will provide years of protection and durability.
Flashing And Waterproofing
To attach a shed roof to an existing roof, you’ll need to remove the shingles and sheathing to expose the roof framing. Then, you can attach the porch rafters to the house roof rafters and replace the roofing and flashing.
This process ensures a secure and waterproof connection between the two roofs.
Flashing and waterproofing are crucial steps when attaching a shed roof to an existing roof. These measures ensure that water does not penetrate the connection point, preventing any potential leaks or damage. Properly applying flashing will create a watertight seal between the two roofs.
Types Of Flashing Required
To achieve a strong and secure connection, several types of flashing are required. Here are the main types you will need to consider:
1. Drip Edge Flashing: This is installed along the eaves of the existing roof to prevent water from seeping underneath the shed roof. It helps redirect water away from the connection point.
2. Step Flashing: Step flashing is used along the sides of the shed roof where it meets the existing roof. It consists of individual metal pieces that are layered and interwoven with the shingles. This design ensures that water flows down and away from the connection, keeping it dry and protected.
3. Valley Flashing: If the shed roof is connected to the existing roof in a valley, valley flashing is necessary. It is installed in the valley to channel water away and prevent accumulation.
4. Chimney Flashing: If there is a chimney near the connection point, chimney flashing is needed to create a watertight seal around it. This prevents water from seeping through the gap between the chimney and the shed roof.
Applying Flashing For Water Tightness
To ensure a watertight connection, follow these steps when applying flashing:
1. Start by removing any existing shingles and sheathing from the area where the shed roof will be attached. This exposes the roof framing and allows for a solid connection.
2. Install the drip edge flashing along the eaves of the existing roof. Make sure it extends beyond the edge of the shed roof to divert water away.
3. Secure the step flashing along the sides of the shed roof. Each piece should overlap the previous one, starting from the bottom and working your way up. Secure the step flashing with roofing nails or screws.
4. If there is a valley where the shed roof meets the existing roof, install valley flashing to guide water down and away. Ensure that the valley flashing overlaps the step flashing for a seamless connection.
5. If there is a chimney near the connection point, carefully install chimney flashing to create a waterproof seal. This involves wrapping the chimney with flashing and sealing it with roofing cement or silicone.
By following these steps and using the appropriate types of flashing, you can ensure a water-tight connection between the shed roof and the existing roof. This will help protect your shed and the structure beneath it from any potential water damage.
Finishing Touches
Attaching a shed roof to an existing roof requires removing the shingles and sheathing to expose the roof framing. Then, porch rafters need to be attached to the house roof rafters and the roofing and flashing replaced. It’s important to follow the correct steps to ensure a successful and secure attachment.
Once you have successfully attached the shed roof to your existing roof, there are a few final touches you need to consider. These finishing touches will ensure that your roof is secure, aesthetically pleasing, and ready for any weather conditions.
Replacing Shingles And Sheathing
To begin, you will need to remove the shingles and sheathing from the area where the shed roof is attached to the existing roof. This step is important as it allows you to expose the roof framing and properly attach the porch rafters to the house roof rafters. Make sure to handle the shingles and sheathing with care to prevent any damage.
Once the shingles and sheathing have been removed, you can proceed with replacing them. Install new shingles that match the existing roof to create a seamless appearance. Ensure that the sheathing is securely attached to the roof framing to provide a solid foundation for the new roof.
Final Inspections And Clean-up
After replacing the shingles and sheathing, it is essential to conduct final inspections to ensure that everything is in place and functioning correctly. Check for any loose or damaged materials, leaks, or gaps that may compromise the integrity of the roof. Address any issues immediately to prevent further damage.
Once you have completed the necessary inspections, it is time for clean-up. Remove any debris, tools, or materials from the work area to ensure a safe and tidy environment. Proper clean-up not only enhances the overall appearance of the roof but also reduces the risk of accidents or damage caused by loose objects.
In conclusion, the finishing touches of attaching a shed roof to an existing roof involve replacing the shingles and sheathing and conducting final inspections and clean-up. These steps are crucial for the structural integrity, aesthetic appeal, and longevity of your roof. By paying attention to these details, you can ensure that your newly attached shed roof is well-prepared to withstand any weather conditions and provide you with a functional and visually appealing addition to your home.
Credit: www.41lumber.com
Frequently Asked Questions
How Do You Attach A Shed Roof To An Existing House?
To attach a shed roof to an existing house, remove shingles and sheathing, exposing the roof framing. Attach porch rafters to the house roof rafters, then replace roofing and flashing. It’s important to secure the connection properly to ensure structural integrity.
How To Join A New Roof To An Existing Roof?
To join a new roof to an existing one, tie the shed roof into the house roof framing. Remove shingles and sheathing, then attach the porch rafters to the house roof rafters. Replace the roofing and flashing for a secure connection.
Can You Put A Roof On Top Of Another Roof?
Yes, you can put a new roof over an old one, as long as the existing shingles are in good condition.
How To Attach 6×6 Post To Existing Deck For Roof?
To attach a 6×6 post to an existing deck for a roof, follow these steps:1. Remove any existing decking or sheathing to expose the roof framing. 2. Attach the porch rafters to the house roof rafters using appropriate connectors. 3.
Replace the roofing and flashing to ensure a watertight seal. 4. Securely fasten the 6×6 post to the deck using suitable hardware. 5. Ensure proper reinforcement and stability for the post to support the roof structure. Remember to consult with a professional or structural engineer for specific instructions and to ensure the safety and stability of your project.
How Do I Attach A Shed Roof To An Existing House?
To attach a shed roof to an existing house, you will need to remove the shingles and sheathing to expose the roof framing. Then, attach the porch rafters to the house roof rafters and replace the roofing and flashing.
Conclusion
Attaching a shed roof to an existing roof requires careful planning and execution. It is important to remove the shingles and sheathing to expose the roof framing and properly attach the porch rafters to the house roof rafters. Additionally, replacing the roofing and flashing is necessary for a successful installation.
While it may seem like a daunting task, with the right tools and knowledge, anyone can successfully attach a shed roof to an existing roof and create a functional and aesthetically pleasing addition to their home.