To apply polyurea garage floor coating, first clean and prep the surface, then mix and apply the coating according to manufacturer instructions. Creating a durable, resistant, and visually appealing garage floor is achievable with polyurea garage floor coating, a task that many homeowners and professionals undertake to protect and enhance their garage spaces.
This type of coating offers benefits such as rapid curing times, resistance to abrasions, chemicals, and stains, making it an ideal choice for high-traffic areas. The application process requires attention to detail and adherence to specific steps to ensure a successful outcome.
With the right preparation and application techniques, transforming your garage floor into a tough, long-lasting surface is straightforward. Emphasizing the importance of surface preparation and precise application will help achieve the best results, ensuring a smooth, durable finish that stands the test of time.
Introduction To Polyurea Garage Floor Coating
Polyurea garage floor coating is a cutting-edge solution. It shields and beautifies your concrete floor. Unlike traditional coatings, polyurea offers quick cure times. It is highly resistant to various chemicals and wear. It’s perfect for garage floors that see heavy use. Learn how to apply this durable coating to your garage floor with ease.
Benefits Of Polyurea For Garage Floors
- Fast curing time: Resume using your garage quickly.
- High durability: Resists stains, impacts, and abrasions.
- UV stability: Maintains color without yellowing over time.
- Flexible: Adapts to temperature changes without cracking.
- Moisture resistance: Prevents damage from water and spills.
Comparison With Epoxy And Other Coatings
| Feature | Polyurea | Epoxy |
|---|---|---|
| Cure Time | Fast | Slow |
| Durability | Very High | High |
| UV Stability | Excellent | Poor |
| Flexibility | High | Low |
| Moisture Resistance | Excellent | Good |
Credit: allgaragefloors.com
Essential Tools And Materials
Essential Tools and Materials for applying polyurea garage floor coating ensure a smooth process. This section covers the tools you need and tips for selecting the right polyurea product for your garage floor.
List Of Required Tools
Before starting your polyurea garage floor coating project, gather these necessary tools:
- Floor grinder or shot blaster – for surface preparation
- Pressure washer – to clean the floor
- Concrete etcher – for profiling the surface
- Squeegee – to spread the coating evenly
- Roller – for smooth application
- Mixing paddle – to mix the product thoroughly
- Safety gear – gloves, goggles, and respirator
Selecting The Right Polyurea Product
Choosing the correct polyurea product is crucial:
- Assess durability needs – Consider the floor’s usage.
- Check cure time – Shorter cure times allow quicker use.
- Verify coverage – Ensure the product covers your floor area.
- Read reviews – Look for feedback from other users.
- Consult professionals – Get expert advice if needed.
Preparation Of The Garage Floor
Preparation of the Garage Floor is a crucial step before applying a polyurea coating. A well-prepared surface ensures a strong bond and a flawless finish. Follow these essential steps to get your garage floor ready for a transformation.
Cleaning The Surface
Start with a clean slate. Remove all items from your garage. Sweep away debris. Use a degreaser and a stiff brush to tackle oil stains. Rinse the floor thoroughly. Ensure the floor is completely dry before moving to the next step.
Repairing Cracks And Chips
Inspect the floor for cracks and chips. Use a concrete repair compound for any imperfections. Fill cracks and chips carefully. Let the compound dry according to product instructions. A smooth surface is key for an even coating application.
Floor Etching Process
Etching helps the coating adhere better. Mix the etching solution as per the manufacturer’s directions. Apply the solution evenly across the floor. Use a scrub brush to work the solution into the concrete. Rinse the floor well after etching. Allow the floor to dry completely before applying the polyurea coating.
Safety Measures
Before applying polyurea garage floor coating, safety comes first. This section covers essential safety steps. Follow these to keep safe.
Protective Gear
Wearing the right gear is key. It protects you from chemicals.
- Gloves: Choose chemical-resistant ones.
- Goggles: Protect your eyes from splashes.
- Respirator: Use it to avoid inhaling fumes.
- Long sleeves and pants: Cover your skin well.
Proper Ventilation
Good air flow is a must. It keeps harmful fumes away.
- Open all doors and windows. This helps air move.
- Use fans. They help push out bad air.
- Take breaks. Go outside to breathe fresh air.
Remember, safety gear and ventilation are crucial. They keep you safe while you work. Always prepare your space and wear your gear before starting.
Application Techniques
Let’s dive into the Application Techniques for a Polyurea Garage Floor Coating. These steps will ensure a smooth, durable finish.
Mixing The Polyurea Material
First, mix the polyurea material properly. This step is crucial. Use a power drill and mixing paddle. Ensure the mix is consistent. No lumps should remain. A well-mixed material leads to a better finish.
Applying Primer Coat
Next, apply the primer coat. Clean the floor first. Use a roller for an even application. Let the primer dry as per instructions. A solid primer foundation improves the final coat’s adherence.
Rolling On The Base Coat
Finally, roll on the base coat. Mix the base coat material again. Use a high-quality roller. Start from a corner and move out. Ensure even coverage across the floor. Let it dry before use. The base coat is key for durability.
- Mix the material thoroughly.
- Apply primer for better adherence.
- Roll on the base coat evenly.
Follow these steps for a long-lasting garage floor coating.
Detail Work
Detail work on a garage floor coating elevates the finish. It shows craftsmanship. It can even extend the life of the floor. Paying attention to edges, corners, and adding textures are key steps. Let’s dive into the specifics of these important tasks.
Handling Edges And Corners
Edges and corners need special care. Start with thorough cleaning. Use a brush to reach into crevices. Apply masking tape along the edges. This creates sharp lines. Ensure the polyurea coat gets into every nook. Use a smaller brush or roller for precision. Remove tape while the coating is wet. This prevents peeling.
Adding Color Flakes Or Antiskid Additives
Color flakes enhance the look. Antiskid additives improve safety. Scatter flakes evenly across the wet surface. Aim for full coverage. For additives, mix them into the polyurea. Apply with a roller. Spread uniformly for consistent texture. Check coverage before the coating dries. Touch up as needed.
| Step | Detail | Tips |
|---|---|---|
| 1. Clean | Clean edges, corners. | Use a brush. |
| 2. Tape | Mask edges for clean lines. | Remove tape while wet. |
| 3. Apply | Use smaller tools for edges. | Ensure no missed spots. |
| 4. Sprinkle | Evenly distribute color flakes. | Cover entire area. |
| 5. Mix & Roll | Combine additives with polyurea. | Apply for even texture. |
Curing And Drying Times
Understanding curing and drying times is crucial for a successful polyurea garage floor coating application. These processes affect the coating’s durability and performance. Let’s explore the ideal conditions and time management for applying polyurea layers effectively.
Ideal Conditions For Curing
- Temperature: Keep it between 70°F to 80°F.
- Humidity: Aim for less than 50%.
- Airflow: Ensure good ventilation.
- Avoid: Direct sunlight and moisture.
Under these conditions, polyurea cures best. It bonds strongly to the garage floor.
Time Management For Layers
- Apply base coat. Wait 4-6 hours.
- Check tackiness. If non-sticky, add next layer.
- For topcoat, wait 18-24 hours.
- Light foot traffic is okay after 24 hours.
- Wait 72 hours for heavy items.
Follow these steps for a robust garage floor. Remember, patience ensures a lasting finish.

Credit: www.garageflooringllc.com
Maintenance Tips
Maintaining your polyurea garage floor coating is key for longevity. Simple practices can keep it looking fresh. Regular cleaning and periodic checks for repairs can extend its life. Start with these tips to preserve your floor’s appearance and durability.
Cleaning Tips For Polyurea Floors
Keep your polyurea floors sparkling with the right approach.
- Sweep regularly to remove dirt and debris.
- Use mild cleaners to avoid surface damage.
- Mop with microfiber for a streak-free finish.
- Avoid harsh chemicals that can harm the coating.
- Attend to spills quickly to prevent stains.
For tough stains, a gentle scrub with a soft brush works well. Ensure you rinse the area thoroughly after.
Long-term Care And Repair
Protect your floor’s integrity over the years.
- Inspect periodically for any signs of wear.
- Repair small chips to prevent further damage.
- Reapply topcoat when needed for extra protection.
- Avoid dragging heavy objects to prevent scratches.
- Use floor mats in high-traffic areas.
Professional resurfacing might be necessary for extensive damage. Regular care prevents costly repairs.
Common Mistakes To Avoid
When applying polyurea garage floor coating, precision matters. Certain errors can compromise the finish and durability. Avoid these common mistakes for a flawless result.
Incorrect Mixing Ratios
Properly mixing polyurea components is crucial for optimal performance. Incorrect ratios lead to poor curing and a weak floor coating. Follow these steps:
- Read manufacturer instructions carefully.
- Measure components accurately.
- Mix thoroughly for the recommended time.
Use a timer to ensure precise mixing. Label your materials to prevent confusion.
Applying Coats Too Thickly
Thick coats do not equal better protection. They can cause issues:
- Bubbles can form in the coating.
- Extended drying times may occur.
- Uneven surfaces are more likely.
Apply thin, even layers. Allow each coat to dry fully before adding another. Use a notched squeegee for uniform thickness.

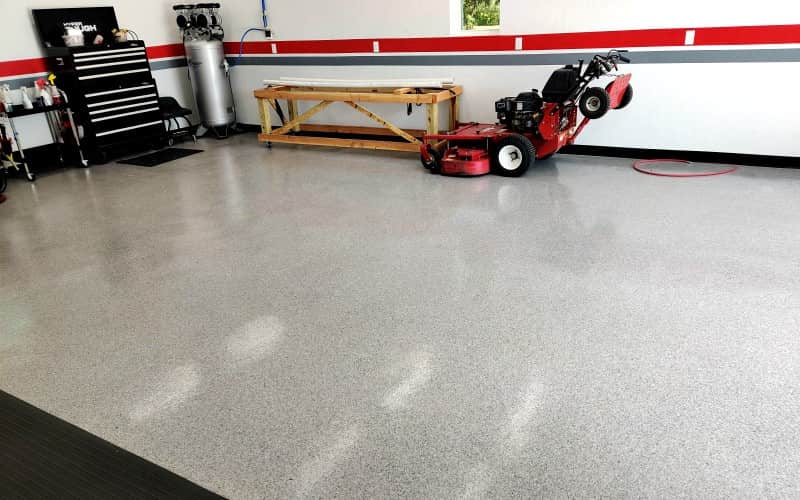
Credit: innovativeconcretecoatings.com
Frequently Asked Questions
What Is Polyurea Garage Floor Coating?
Polyurea is a durable, quick-curing protective coating for garage floors, offering superior resistance to stains, impacts, and chemicals.
How Long Does Polyurea Coating Last?
With proper application and maintenance, polyurea garage floor coating can last upwards of 20 years.
Can Polyurea Be Applied Diy?
Yes, polyurea kits are available for DIY enthusiasts, though professional application ensures best results and longevity.
What Are The Benefits Of Polyurea Coating?
Polyurea coating provides high durability, rapid curing time, and resistance to harsh chemicals, making it ideal for garage floors.
Is Polyurea Coating Better Than Epoxy?
Polyurea outperforms epoxy in flexibility, cure time, and temperature tolerance, making it a strong choice for garage flooring.
Conclusion
Embracing polyurea for your garage floor is a game-changer. With its robust protection and sleek finish, it’s an investment in durability and aesthetics. Remember, precise preparation and application are key to outstanding results. Ready to transform your space? Dive into the world of polyurea and enjoy a garage that’s both functional and stylish.