Gas stoves are the heart of many kitchens. They offer quick heat, easy control, and work during power outages. But have you ever noticed that your food is cooking unevenly or burning too fast? Maybe the flame is too high, too low, or even orange instead of blue.
These are signs you might need to adjust your gas stove’s flame. Most people don’t realize how much proper flame adjustment affects cooking and safety. If you want better results from your gas stove, knowing how to adjust the flame can make a huge difference.
This article will guide you through everything you need to know about adjusting the flame on a gas stove. We’ll cover why adjustment matters, the tools you’ll need, step-by-step instructions, troubleshooting, safety tips, and even what different flame colors mean.
Whether you’re a home cook, a renter, or just want to save gas, you’ll find practical advice and real examples here.
Why Flame Adjustment On A Gas Stove Matters
Many people overlook the importance of flame adjustment. However, an incorrect flame can cause several issues:
- Uneven Cooking: If the flame is too low or uneven, your food might cook only in the center or burn on the sides. Some dishes, like pancakes or delicate sauces, are especially sensitive to uneven heat.
- Gas Wastage: A flame that’s too high wastes energy and can increase your gas bill. If you notice your kitchen getting hotter than usual or your bills creeping up, your flame could be the reason.
- Safety Risks: An orange or yellow flame signals incomplete combustion, which can produce carbon monoxide—a dangerous, odorless gas. Carbon monoxide can make you feel dizzy or sick and is especially dangerous in closed spaces.
- Appliance Damage: Continually using a poorly adjusted flame can damage your cookware and the stove itself. Black soot on your pans or burners is a warning sign.
- Taste and Texture: Over- or under-cooked food can ruin flavors and textures. For example, rice may stay hard in the center, or meats can dry out.
Surprisingly, even new stoves may need adjustments due to factory settings, gas pressure differences, or altitude. For instance, a stove set up for sea level might not work perfectly in a high mountain city.
Understanding Gas Stove Flame Basics
Before adjusting anything, it’s important to recognize what a proper flame looks like and what different colors mean.
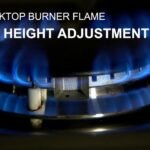
- Blue Flame: This is ideal. A strong, steady blue flame means complete combustion and maximum efficiency. The blue color comes from gas burning at the right air-to-gas ratio.
- Yellow or Orange Flame: Indicates incomplete combustion, which can be unsafe. You might also notice soot or black marks on pans.
- Flickering or Noisy Flame: May mean too much air or gas is being supplied. A hissing or “blowing” sound often means the air shutter is open too wide.
- Small or Weak Flame: Usually a sign of blocked burners or low gas pressure. Food will take much longer to cook and heat won’t spread well.
A healthy flame should be sharp, blue, and stable—not too high, not too low. The inner blue cone should be visible, and the flame should not lift off the burner.
Example: Good Vs. Bad Flame
| Flame Color | What It Means | Action Needed |
|---|---|---|
| Blue | Complete combustion, efficient heat | None |
| Yellow/Orange | Incomplete combustion, possible carbon monoxide | Adjust air/gas mix |
| Red/Soothy | Gas impurities or poor air supply | Clean burner/adjust air |
A little yellow tip at the very end of the flame can be normal on some stoves, especially on high settings, but most of the flame should be blue.

Credit: www.searshomeservices.com
Tools You’ll Need For Adjusting The Flame
You don’t need special equipment, but having the right tools makes the job safer and easier:
- Small screwdriver (usually flat-head): Used for turning adjustment screws. Some stoves need a Phillips screwdriver instead, so check your user manual.
- Soft brush for cleaning: An old toothbrush works well for clearing burner holes.
- Flashlight (to see adjustment screws): Helps you see inside tight spaces, especially under the cooktop.
- Protective gloves: Prevent burns and protect your hands from sharp edges.
- User manual (for your stove model): Details on where adjustment screws and air shutters are located, and any special instructions.
Some modern gas stoves have adjustment screws in different places, so always check your manual first. If you don’t have a manual, most brands offer PDFs online.
Safety Precautions Before You Start
Gas is flammable. Safety must be your top priority:
- Turn off all burners before you start. Double-check by turning the control knobs to “off.”
- Work in a well-ventilated area. Open windows or turn on the kitchen exhaust. This protects you from gas buildup.
- Don’t use matches or lighters near the stove while adjusting. Even a small spark can cause a fire if gas is present.
- Check for gas leaks. If you smell gas, stop immediately and call a professional. You can use a mix of soap and water to check connections—if you see bubbles, there’s a leak.
- Let the stove cool before touching any parts. Burners and grates stay hot for a long time.
Many injuries happen because people skip these steps. Take a minute to be safe—it can prevent serious accidents.
Step-by-step Guide To Adjusting The Flame
Adjusting a gas stove flame is not complicated, but the process must be done carefully. Here’s how to do it:
1. Identify The Adjustment Screw
The flame adjustment screw is usually located near the burner control knob or underneath the stove top. You may need to remove the knob or lift the burner grate to see it. Some stoves have a small hole next to the knob for this purpose.
- For older models, the screw is often under the knob itself. Pull the knob straight off; you may need to wiggle it gently.
- For newer models, it may be inside a small hole near the knob shaft. Shine a flashlight to see inside.
Some adjustment screws are recessed and need a longer screwdriver. If you can’t find the screw, your user manual will show you the exact location.
2. Clean The Burner
Before making adjustments, ensure the burner ports (where the flame comes out) are clean. Dirt, grease, or food can block the gas flow.
- Remove the burner cap by lifting it straight up.
- Use a soft brush to clean around the holes. Check for any debris stuck inside.
- Wipe any residue from the burner surface. A damp cloth can help, but make sure the burner is dry before reassembling.
Cleaning is essential. Even a small blockage can change the flame color and shape. If you see spider webs or insects (common in stoves not used often), clear these out too.
3. Turn On The Burner
Light the burner you want to adjust. Set it to the lowest setting and observe the flame.
- A good low flame should be small, steady, and blue. It should not flicker or go out easily.
- If the flame goes out or is too high, adjustment is needed. Watch how the flame reacts as you move the knob.
If the burner doesn’t light, double-check that everything is dry and assembled correctly.
4. Adjust The Flame
Insert the screwdriver into the adjustment screw. Turn slightly:
- Clockwise to decrease the flame. This reduces the gas flow.
- Counterclockwise to increase the flame. This lets in more gas.
Make small turns and watch the flame after each adjustment. It’s best to adjust with the burner on the lowest setting so you can see how low the flame can go without going out.
If you turn too far, the flame might go out completely. Simply turn back a bit and relight the burner.
5. Test High And Low Settings
After adjusting the low setting, turn the knob to high.
- The flame should be strong, blue, and not flicker or make noise. It should cover the burner evenly.
- If it’s too high or yellow, adjust again. A noisy, “blowing” flame means too much air.
Cycle between low and high settings a few times. Fine-tune as needed. Some stoves have separate adjustment screws for high and low—if so, adjust both.
6. Repeat For Other Burners
Each burner may need its own adjustment. Repeat the steps for every burner.
Don’t assume all burners behave the same—sometimes only one is off. Take your time to check each one.
7. Reassemble And Test
Replace any removed parts (knobs, grates, burner caps). Turn on the burners and test with a pot or pan to see if heat distribution is even.
Try cooking something simple, like boiling water or making an omelet, to check real-world performance.
Common Problems And How To Fix Them
Sometimes, you’ll face issues that simple adjustments won’t solve. Here are common problems and solutions:
Burner Won’t Light Or Flame Is Very Weak
- Possible Cause: Blocked burner ports or low gas pressure. Sometimes, the igniter is dirty or misaligned.
- Solution: Clean the burner thoroughly. Check for kinks in the gas line. For electronic ignition, make sure the igniter clicks and sparks.
Flame Is Too High Even At Low Setting
- Possible Cause: Adjustment screw too loose or high gas pressure. Sometimes, a worn-out knob can slip.
- Solution: Tighten the adjustment screw carefully. If this doesn’t help, the gas regulator may need service.
Flame Flickers Or Makes Noise
- Possible Cause: Too much air in the mix. A “lifting” flame can blow itself out.
- Solution: Check the air shutter (usually under the burner). Adjust to reduce air flow. If you see the flame pulling away from the burner, close the shutter slightly.
Yellow Or Orange Flame
- Possible Cause: Incomplete combustion, dirty burner, or wrong air/gas ratio. High humidity can sometimes cause a temporary yellow tip.
- Solution: Clean the burner. Adjust the air shutter for more air. If the problem returns after cleaning, check for gas impurities.
Gas Smell Or Hissing Noise
- Possible Cause: Gas leak.
- Solution: Turn off the stove and call a professional immediately. Do not use the stove until it’s been checked.
| Problem | Common Cause | Solution |
|---|---|---|
| Weak Flame | Dirty burners, low pressure | Clean, check gas supply |
| Flickering Flame | Too much air | Adjust air shutter |
| Yellow Flame | Poor combustion | Increase air, clean burner |
If a problem keeps coming back, it’s a sign you need expert help.
When To Call A Professional
Not all problems can be fixed at home. If you notice any of the following, call a certified gas technician:
- Persistent yellow/orange flames after cleaning and adjustment.
- Gas leaks or strong gas odor.
- No improvement after multiple adjustments.
- Damaged burner parts or control knobs.
- Unusual noises like loud hissing, which may signal a regulator issue.
Trying to fix complex problems yourself can be dangerous. Safety should always come first. Certified technicians have special tools to measure gas pressure and check for leaks.
Special Considerations For Different Stove Types
Not all gas stoves are the same. Here’s what you need to know:
Freestanding Vs. Built-in Gas Stoves
- Freestanding stoves usually have easier access to adjustment screws. You can often reach everything from the front.
- Built-in stoves may require removing panels or more steps to reach adjustments. Sometimes, you’ll need to lift the cooktop or remove screws.
Lpg Vs. Natural Gas Stoves
- LPG stoves operate at higher pressure and may need different adjustments. The orifices (small holes where gas comes out) may be sized differently.
- Always check your stove’s rating plate and manual before adjusting. Using the wrong settings can cause poor performance or safety issues.
Electronic Ignition Stoves
- Some modern stoves use electronic ignition and have hidden adjustment screws. These may be behind panels or inside the body of the stove.
- If you’re unsure where to find these, refer to your user manual or manufacturer’s website. Never force parts open—some designs are not meant to be user-serviced.
Main Differences By Stove Type
| Stove Type | Adjustment Access | Gas Type | Special Note |
|---|---|---|---|
| Freestanding | Front or under knob | LPG/Natural Gas | Easy access |
| Built-in | May require removing top | LPG/Natural Gas | More complex |
| Electronic Ignition | Inside panel | LPG/Natural Gas | Check manual |
Always match your adjustments to the stove’s design—forcing the wrong method can cause damage.
How Often Should You Adjust The Flame?
Adjusting the flame is not a one-time task. You should check your stove flame:
- Every 6 months for heavy use. If you cook daily, grime can build up quickly.
- After cleaning burners or moving the stove. Moving can shake loose connections.
- If you change gas type (e.g., from LPG to natural gas). Different gases require different settings.
- Whenever you notice a color change or uneven cooking. Don’t ignore these signs.
Many people forget this simple maintenance, but it keeps your stove efficient and safe. Mark your calendar, or set a reminder on your phone.
Tips For Better Gas Stove Performance
Beyond adjustment, there are ways to keep your gas stove working at its best:
- Clean burners regularly. Food spills and grease block ports quickly. A monthly wipe-down prevents buildup.
- Use the right cookware. Flat-bottom pans distribute heat evenly. Warped or very thin pans can cause food to burn in spots.
- Don’t overcrowd burners. This can block airflow and reduce performance. Give each pot or pan space for the flame to spread.
- Check for leaks. Use soapy water on connections—bubbles mean a leak. Do this especially after moving the stove.
- Inspect the flame color every time you cook. Make it a habit to glance at the flame before starting.
Also, avoid using oversized pots that cover the burner completely; this traps heat and can affect combustion.
Insights Beginners Often Miss
Here are two important points most people overlook:
- Altitude affects flame: If you live at a high altitude, less oxygen can make the flame weaker or more yellow. You may need to adjust the air shutter more often. Some manufacturers sell special kits for high-altitude use.
- Gas pressure varies: In many places, home gas pressure can change during the day, especially in older neighborhoods. If your stove works well in the morning but not at night, this could be why. Installing a pressure regulator can help.
Another insight: Using very small pots on large burners wastes energy and can cause the flame to wrap around the sides, burning handles or scorching pot edges.
Understanding these factors helps you troubleshoot better and avoid unnecessary repairs.
What If The Flame Still Isn’t Right?
If you’ve tried everything and the flame is still not perfect, consider these advanced checks:
- Check the gas regulator: Sometimes, the pressure regulator (usually where the gas line connects to the stove) fails or gets stuck. A faulty regulator can cause weak or uneven flames.
- Inspect the air shutter: This is a small metal plate near the burner base. Adjusting it changes how much air mixes with the gas. Too little air causes yellow flames; too much makes flames noisy.
- Replace old burners: Over time, burners corrode or warp. Replacement can restore proper flame shape and size.
Don’t force parts if they seem stuck—this can break your stove. If in doubt, call a technician.
Importance Of Regular Maintenance
Regular maintenance is key for both performance and safety. Set reminders on your phone or calendar to check your stove every few months. A well-maintained stove:
- Lasts longer
- Uses less gas
- Cooks food more evenly
- Reduces safety risks
Many gas companies and appliance stores offer annual checks—use this service if you’re unsure. Maintenance is cheaper than repairs and helps avoid accidents.
Environmental Impact Of Proper Flame Adjustment
A properly adjusted flame does more than improve cooking—it’s better for the environment. Blue flames mean efficient gas use, which means:
- Lower carbon emissions
- Less wasted energy
- Reduced household costs
According to the U.S. Department of Energy, stoves with improper flame adjustment can use up to 15% more gas. Over time, this adds up. Imagine saving that much gas every year just by turning a small screw.
If everyone adjusted their stoves, the combined effect would be huge—less pollution, cleaner air, and lower energy bills for millions of homes.

Credit: www.lg.com
When Upgrading Or Replacing Makes Sense
Sometimes, older stoves can’t be adjusted to modern standards. Consider replacing your stove if:
- It’s more than 15 years old
- You notice persistent problems
- Replacement parts are no longer available
Modern stoves are safer, more efficient, and often have better adjustment features. Many new models have sealed burners, automatic cut-off, and easy-access screws.
If you’re upgrading, check for stoves with clear flame adjustment instructions, and consider energy efficiency ratings.
Useful Resources
For more technical details, you can visit the Wikipedia Gas Stove page. It covers gas types, combustion chemistry, and more.

Credit: www.youtube.com
Frequently Asked Questions
What Color Should The Flame On My Gas Stove Be?
The ideal flame is blue with a sharp, steady shape. This means the gas is burning efficiently and safely. Yellow or orange flames signal incomplete combustion and should be corrected.
Is It Safe To Adjust My Gas Stove’s Flame Myself?
Yes, in most cases. If you follow safety steps—like turning off burners, ventilating the area, and checking for leaks—it’s safe for most people. If you smell gas or feel unsure, call a professional.
Why Does My Stove Flame Turn Yellow Sometimes?
A yellow flame usually means not enough air is mixing with the gas or the burner is dirty. Try cleaning the burner and adjusting the air shutter to let in more air.
How Do I Know If My Stove Needs A Professional Check?
If you smell gas, see persistent yellow/orange flames after adjustments, or the stove isn’t heating properly, call a certified technician. Don’t ignore strong gas odors or unusual noises.
Can Adjusting The Flame Save Money?
Absolutely. A properly adjusted flame uses less gas—up to 15% less according to energy agencies. This saves on your gas bill and helps the environment.
Gas stoves are great tools, but they need the right care to give their best performance. By learning how to adjust the flame, you improve cooking, save money, and keep your home safe. Remember to check your flame regularly, clean your burners, and don’t hesitate to call for help if something feels wrong.
Happy cooking!