To fix a leaking frost-free hydrant, start by checking the anti-siphon portion of the valve, as leaks often come from this area. If the fitting is worn out, you may need to replace the entire frost-proof faucet.
Additionally, check the O-ring on the check assembly, as a worn-out O-ring can also cause leaks. If necessary, replace the plunger or the entire stem assembly. Remember to turn off the water supply before making any repairs and check for leaks after reassembling the hydrant.
Regular maintenance and prompt repairs can help prevent further damage and ensure the proper functioning of your frost-free hydrant.
Identifying The Leak Source
Common Causes Of Leaks
Leaking frost-free hydrants can be caused by various factors, including worn-out O-rings, damaged valves, or loose fittings. Common causes of leaks also include a faulty anti-siphon valve, damaged rod, or a worn-out check assembly. Identifying these common causes is crucial in effectively addressing the issue.
Tools Needed For Diagnosis
Proper diagnosis of a leaking frost-free hydrant requires specific tools such as a wrench, pliers, and a screwdriver. Additionally, a crescent wrench, pipe wrench, and packing nut wrench are essential for thorough diagnosis. These tools enable the identification of the leak source and aid in the subsequent repair process.
Initial Steps Before Repair
Before attempting to repair a leaking frost-free hydrant, it’s crucial to take some initial steps to ensure safety and efficiency. These preliminary actions not only help in identifying the issue but also contribute to a smooth repair process. The following sections outline the essential initial steps before delving into the repair of a leaking frost-free hydrant.
Shutting Off The Water Supply
To begin the repair process, it’s imperative to shut off the water supply leading to the frost-free hydrant. Locate the main water shut-off valve and turn it clockwise to stop the flow of water. This action prevents any further leakage and provides a safe environment for the repair work to commence.
Safety Precautions
- Wear protective gloves and safety goggles to shield yourself from any potential hazards.
- Ensure the area around the hydrant is clear of any obstructions to facilitate easy access during the repair.
- Use appropriate tools and equipment, following the manufacturer’s guidelines and safety instructions.
- Be cautious of any electrical components in the vicinity of the repair area to prevent any accidents.
Disassembling The Hydrant
When it comes to fixing a leaking frost-free hydrant, one of the first steps is to disassemble the hydrant. This process involves removing the head and inspecting for any damage that may be causing the leak. By following these steps, you can identify the issue and take the necessary steps to fix it.
Removing The Head
To begin disassembling the hydrant, start by removing the head. This is the part of the hydrant that controls the flow of water. In order to remove the head, follow these steps:
- Turn off the water supply to the hydrant.
- Locate the setscrew or packing nut on the hydrant head.
- Using a wrench, loosen the setscrew or packing nut.
- Gently pull the head away from the hydrant.
Inspecting For Damage
Once you have successfully removed the head, the next step is to inspect it for any signs of damage. This is important as the leak may be caused by a damaged component. Here’s what you need to do:
- Check the O-ring on the head for any cracks or wear.
- Inspect the stem assembly for any signs of corrosion or damage.
- Examine the check assembly for any worn-out parts.
If you notice any damage during the inspection, it is recommended to replace the damaged parts to ensure a proper fix. This may involve getting a new plunger or replacing the entire stem assembly.
By disassembling the hydrant and inspecting for damage, you can identify the cause of the leak and take the necessary steps to fix it. Remember to handle each component with care and ensure you have the appropriate replacement parts on hand.
Credit: www.familyhandyman.com
Replacing Faulty Components
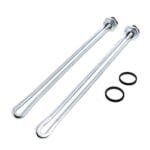
If you have a leaking frost-free hydrant, one of the most effective ways to fix the issue is by replacing faulty components. There are two key components that are commonly responsible for leaks in frost-free hydrants: O-rings and seals, and the plunger and valve assembly.
O-rings And Seals
O-rings and seals play a crucial role in preventing leaks in a frost-free hydrant. Over time, these components can become worn out or damaged, leading to water leakage. To replace the O-rings and seals, follow these steps:
- Turn off the water supply to the hydrant.
- Locate the access point for the O-rings and seals. This is typically located near the top of the hydrant.
- Remove the old O-rings and seals using a suitable tool, such as a screwdriver or pliers.
- Install the new O-rings and seals in their place, ensuring a tight and secure fit.
- Turn on the water supply and check for any remaining leaks. If the hydrant is still leaking, proceed to the next step.
Plunger And Valve Assembly
The plunger and valve assembly is another common source of leaks in frost-free hydrants. If the plunger or valve is faulty or damaged, it may need to be replaced. Here’s how you can replace the plunger and valve assembly:
- Turn off the water supply to the hydrant.
- Remove the handle of the hydrant by unscrewing it.
- Take out the plunger and valve assembly from the hydrant body.
- Inspect the plunger and valve for any signs of damage or wear. If necessary, replace them with new ones.
- Reassemble the plunger and valve assembly back into the hydrant body.
- Securely screw the handle back onto the hydrant.
- Turn on the water supply and check for any remaining leaks. If the hydrant is still leaking, it may be necessary to seek professional assistance or consider replacing the entire hydrant.
By replacing faulty components such as O-rings and seals, and the plunger and valve assembly, you can effectively fix a leaking frost-free hydrant and ensure its proper functionality. Remember to always follow the manufacturer’s instructions and exercise caution when working with water and plumbing systems.
Adjustments To Stop Leaks
To stop a leaking frost-free hydrant, you can adjust the packing nut to fix the leak. Tighten the packing nut using a wrench to prevent leaks and ensure the hydrant functions properly. Regular maintenance and adjustments can help extend the life of the hydrant and prevent water wastage.
Adjustments to Stop Leaks
If you notice that your frost-free hydrant is leaking, it’s important to take action as soon as possible to prevent water damage and high utility bills. Fortunately, in many cases, the issue can be resolved with some simple adjustments. Here are some adjustments to consider if you need to stop leaks in your frost-free hydrant.
Packing Nut Adjustment
The packing nut is located just below the handle of the hydrant and is responsible for sealing the valve stem. If the packing nut is too loose, water can leak out around the valve stem. To adjust the packing nut, you’ll need to turn off the water supply to the hydrant and remove the handle. Then, use a wrench to tighten the packing nut slightly. Be careful not to overtighten the nut, as this can damage the hydrant.
Rod and Linkage Settings
The rod and linkage settings control the length of the hydrant stem and the position of the plunger. If these settings are incorrect, water can leak out of the hydrant. To adjust the rod and linkage settings, you’ll need to remove the head of the hydrant and locate the rod and linkage assembly. Use a wrench to adjust the length of the rod and the position of the plunger until they are properly aligned. Then, reattach the head of the hydrant and turn the water supply back on.
By making these simple adjustments, you can stop leaks in your frost-free hydrant and prevent costly water damage. If you’re unsure about how to make these adjustments, it may be best to consult a professional plumber.
Reassembling The Hydrant
To fix a leaking frost-free hydrant, you can follow these steps to reassemble the hydrant. Identify the hydrant, remove the head from the standpipe, install a new rubber, reattach the hydrant head, remove the handle, install new O-rings, and adjust the handle.
This can help stop the leak and prevent further damage.
Reassembling the Hydrant:
After replacing any worn out or damaged components, the next step is to reassemble the hydrant. This process involves securing components and ensuring proper alignment. Let’s take a closer look at each step.
Securing Components:
First, make sure all components are properly secured. Tighten any screws or bolts that may have come loose during disassembly. Be careful not to overtighten, as this can cause damage to the hydrant.
Ensuring Proper Alignment:
Next, ensure that all components are properly aligned. This includes the handle, rod, and head assembly. If any of these parts are misaligned, it can cause the hydrant to leak or not function properly. Use a level to ensure that the hydrant is installed straight and level.
Once you have secured all components and ensured proper alignment, it’s time to test the hydrant for leaks. Turn on the water supply and check for any signs of leakage. If the hydrant is still leaking, you may need to disassemble and reassemble it again to ensure that all components are properly installed.
In conclusion, reassembling a frost-free hydrant after repairing a leak is a simple process that can be done by most homeowners with basic plumbing knowledge. With proper care and maintenance, your hydrant should provide years of trouble-free service.
Testing For Success
When it comes to fixing a leaking frost-free hydrant, testing is an essential step to ensure success. By conducting thorough water pressure checks and leak monitoring, you can identify the source of the leak and take appropriate measures to fix it.
Water Pressure Checks
One of the first steps in testing for a leaking frost-free hydrant is to check the water pressure. This can be done using a pressure gauge that attaches to the hydrant. Simply connect the gauge and open the hydrant valve to allow water to flow. The gauge will provide a reading of the water pressure, which should be within the recommended range.
If the water pressure is too high, it can put excessive strain on the hydrant and cause leaks. In this case, you may need to install a pressure regulator to reduce the pressure and prevent future leaks.
Leak Monitoring
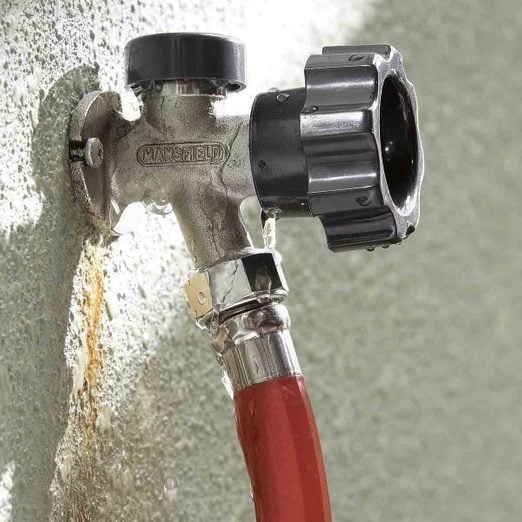
Another important aspect of testing for a leaking frost-free hydrant is leak monitoring. This involves closely inspecting the hydrant for any signs of leaks, such as dripping or pooling water. It’s important to check both the hydrant itself and the surrounding area for any indications of a leak.
If you notice any leaks, it’s crucial to determine the source of the problem. This may involve disassembling the hydrant to inspect the internal components for damage or wear. Common areas where leaks can occur include the anti-siphon portion of the valve or a worn-out O-ring on the check assembly.
Once you have identified the source of the leak, you can take appropriate steps to fix it. This may involve replacing the damaged components or even the entire stem assembly if necessary.
By conducting thorough water pressure checks and leak monitoring, you can effectively test for a leaking frost-free hydrant and take the necessary measures to fix it. This will ensure the proper functioning of your hydrant and prevent any further leaks or damage.
:max_bytes(150000):strip_icc()/red-water-hydrant-92168594-f26f456e7ead4f0b95f789ae0ed174a3.jpg)
Credit: www.thespruce.com
Preventative Maintenance Tips
Proper maintenance is crucial to prevent a leaking frost-free hydrant and ensure its longevity. By following these preventative maintenance tips, you can keep your hydrant in excellent working condition and avoid costly repairs.
Seasonal Inspections
Regular inspections are essential to identify any potential issues with your frost-free hydrant. Perform these inspections at the beginning and end of each season to catch problems early. Here’s what to check during your seasonal inspections:
- Inspect the hydrant for any visible cracks or leaks.
- Check the handle and make sure it moves smoothly without any resistance.
- Examine the packing nut and ensure it is tight and secure.
- Inspect the anti-siphon valve for any signs of damage or wear.
- Verify that the drain hole at the bottom of the hydrant is clear and free from debris.
Longevity Practices
To extend the lifespan of your frost-free hydrant and prevent leaks, incorporate these longevity practices into your maintenance routine:
- Regularly lubricate the moving parts of the hydrant, such as the handle and stem, with a silicone-based lubricant.
- Keep the area around the hydrant clear of dirt, debris, and vegetation to prevent clogs and obstructions.
- During winter months, insulate the hydrant with a foam cover or wrap to protect it from freezing temperatures.
- Avoid excessive force when operating the handle, as it can cause damage to the internal components.
- If you notice any signs of a leak, such as reduced water pressure or pooling water around the hydrant, address the issue promptly to prevent further damage.
By following these preventative maintenance tips and conducting regular inspections, you can ensure the longevity of your frost-free hydrant and minimize the risk of leaks. Remember to always refer to the manufacturer’s guidelines for specific maintenance instructions related to your hydrant model.
When To Call A Professional
If you encounter complex issues or are unsure about your abilities to fix a leaking frost free hydrant, it’s crucial to know when to call a professional. While many minor issues can be resolved with some DIY knowledge, there are situations where seeking the expertise of a qualified plumber is the best course of action.
Recognizing Complex Issues
Some leaks may be indicative of more complex underlying problems that require specialized knowledge and tools to address effectively. If you notice unusual sounds, excessive water flow, or persistent leaks despite your attempts at repair, it may be time to consult a professional. Additionally, if the hydrant is old and has not been serviced for a long time, it could have multiple issues that need professional attention.
Finding A Qualified Plumber
When seeking a plumber, it is essential to verify their credentials and ensure they are experienced in repairing frost free hydrants. Look for licensed and insured professionals who have a track record of successfully addressing similar issues. Additionally, seek recommendations from friends, family, or online reviews to find a reputable plumber who can effectively resolve your hydrant leakage problems.
Cost Considerations For Repairs
When it comes to fixing a leaking frost-free hydrant, cost considerations are important. Leaks in the anti-siphon portion of the valve may require a new frost-proof faucet, while worn-out O-rings on the check assembly can be fixed by replacing the plunger or the entire stem assembly if necessary.
Diy Vs Professional Expenses
When it comes to fixing a leaking frost-free hydrant, homeowners often weigh the costs of DIY repairs versus hiring a professional. DIY repairs can be cost-effective, but it’s essential to consider the expenses associated with professional services.
Budgeting For Future Maintenance
Planning for future maintenance is crucial when addressing a leaking frost-free hydrant. Budgeting for ongoing upkeep and potential repairs can help homeowners avoid unexpected expenses and ensure the longevity of their plumbing system.
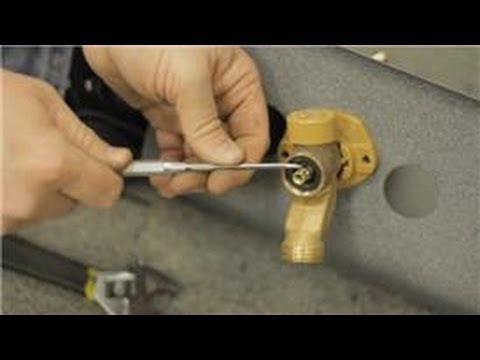
Credit: m.youtube.com
Frequently Asked Questions
How To Stop A Frost-free Hydrant From Leaking?
To stop a frost-free hydrant from leaking, you may need to replace the anti-siphon portion of the valve or the worn-out O-ring on the check assembly. If these components are damaged, it’s best to replace the entire stem assembly. Ensure the head is tightened and facing the desired direction, and check for leaks after turning the water back on.
If the problem persists, consider replacing the yard hydrant. Remember to turn off the water supply and remove any attached hoses before making any repairs.
Why Is My Frost Free Tap Leaking?
If your frost-free tap is leaking, it may be due to a faulty anti-siphon valve. This component can wear out over time and require replacement of the entire faucet. Check the anti-siphon valve and replace if necessary to fix the leak.
How Much Does It Cost To Fix A Water Hydrant?
The cost to fix a water hydrant varies, depending on the extent of the damage and the parts needed.
What Causes A Water Hydrant To Leak?
Leaking hydrants are often caused by a worn-out O-ring on the check assembly. This can happen over time or if the faucet is left on for a long period. To fix the leak, you may need a new plunger or to replace the entire stem assembly.
How Can I Identify A Leaking Frost-free Hydrant?
If water is seeping from the base or around the handle, it’s a sign of a leaking frost-free hydrant.
Conclusion
Fixing a leaking frost-free hydrant is a task that can be accomplished with the right tools and knowledge. It’s important to identify the source of the leak and determine whether a simple repair or a replacement is necessary. By following the steps outlined in this post, you can save money on costly repairs and ensure that your hydrant is functioning properly.
Remember to turn off the water supply before beginning any repairs and always take safety precautions when working with plumbing fixtures.