Your bathroom is supposed to be a place of relaxation and peace. But when your faucet starts leaking at the base, it can quickly turn into a source of frustration.
Every drop is a reminder of wasted water and potential damage. You find yourself wondering if it’s a minor glitch or a sign of something more serious. The tiny puddles around your faucet can lead to bigger problems if left unaddressed.
You might be tempted to ignore it, but doing so could cost you more in the long run. Imagine the relief of a quick fix, saving both your wallet and your sanity. This article is here to guide you through understanding why your bathroom faucet is leaking at the base and how you can tackle it with ease. By the end, you’ll be equipped with the knowledge to solve the issue and restore tranquility to your bathroom. Dive in to reclaim your space from unwanted drips!
Identify The Cause
Dealing with a bathroom faucet leaking at its base can be frustrating, especially when you’re unsure where the problem originates. Identifying the cause is crucial for a quick fix and to prevent further damage. Understanding common leak sources and conducting a thorough visual inspection can save you time and money.
Common Leak Sources
Leaking faucets often stem from a few typical culprits. Loose connections are a frequent issue. Check if the nuts and bolts beneath the sink are tightly secured.
Another source can be worn-out washers or seals. These small rubber pieces can erode over time, leading to leaks. Replacing them is often an inexpensive and quick solution.
Sometimes, the faucet’s cartridge or valve itself might be the problem. If your faucet is older, these components might need replacing due to wear and tear.
Visual Inspection Tips
A detailed visual inspection can help pinpoint the issue. Start by drying the area around the base of the faucet, then turn the faucet on. Watch closely for any water seeping out.
Use a flashlight to check for drips or moisture beneath the sink. This can help you spot leaks that might be hidden from plain sight.
Take a moment to check the surrounding area for any signs of water damage. Discolored surfaces or mold can indicate a long-standing leak.
What do you do when the leak seems elusive? Consider whether the issue might be internal, requiring a deeper look into the faucet’s mechanics.
Don’t underestimate the power of a visual inspection—it can often reveal more than expected and guide you to a straightforward solution.
Have you ever fixed a leak by simply tightening a bolt? This might be the perfect time to share your experience and learn from others who’ve tackled similar issues.
Credit: solutions.moen.com
Gather Necessary Tools
Dealing with a bathroom faucet leaking at its base can be frustrating, but gathering the right tools is the first step toward fixing the issue. Without the proper tools, you might find yourself at a standstill, unable to proceed with the repair. So, before you roll up your sleeves and dive into the task, ensure you have everything you need at your fingertips. This preparation stage is crucial in saving time and ensuring a smooth repair process.
Basic Tool List
Start by assembling a basic set of tools that you likely already have at home. A wrench is essential for loosening and tightening nuts and bolts on the faucet. A screwdriver will help you remove any screws holding parts together. You might also need pliers to grip and twist components that are difficult to reach. Having a flashlight handy can illuminate the under-sink area, making it easier to spot the source of the leak.
These tools are your first line of defense. They are common and versatile, often used in various DIY projects. If you’re missing any, borrow or purchase them before starting. Trust me, nothing is more frustrating than getting halfway through a task and realizing you lack a crucial tool.
Specialized Tools
Depending on the faucet model, you may need specialized tools. Consider a basin wrench for reaching tight spots. This tool is designed for work in confined spaces, making it ideal for faucet repairs. A plumber’s tape might be necessary to seal connections and prevent future leaks. If you’re dealing with particularly stubborn parts, a penetrating oil can help loosen them.
These specialized tools may not be in your toolbox yet, but they can make a world of difference in efficiency. Don’t overlook their importance. If you’ve ever struggled with a repair due to inaccessible parts, you’ll appreciate how these tools can simplify the process.
Before you begin, ask yourself: do you have everything you need? By gathering both basic and specialized tools, you’ll be well-prepared to tackle the leaking faucet with confidence. Remember, preparation is half the battle.
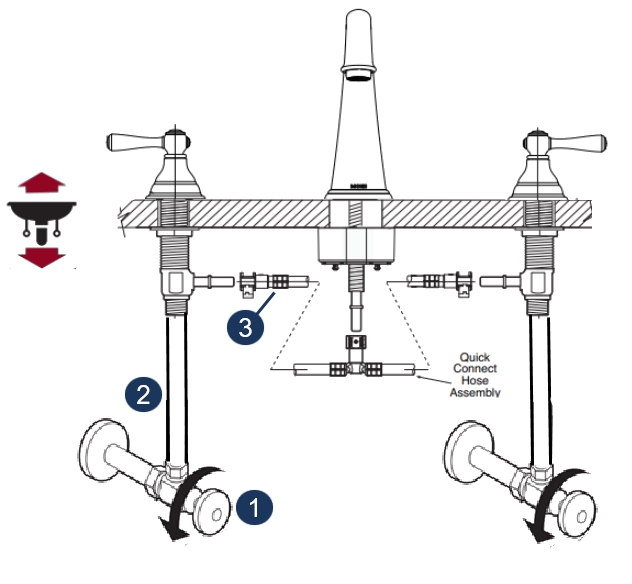
Turn Off Water Supply
Is your bathroom faucet leaking at the base? It’s important to fix it. The first step is to turn off the water supply. This will stop water flow and prevent further damage. It also makes repair easier and safer. Follow the steps below to turn off your water supply.
Locate Shutoff Valves
Find the shutoff valves under the sink. They are usually near the wall. You might see two valves: one for hot water, one for cold. Turn both valves clockwise to stop the water. If your sink has no valves, turn off the main water supply.
Safety Precautions
Before touching the valves, ensure your hands are dry. Water and electricity don’t mix. Wear rubber gloves for added safety. Ensure the area is well-lit. Use a flashlight if needed. Keep a towel handy to wipe any spills.
Disassemble The Faucet
Water pooling around your faucet base? Time to take it apart. Start by turning off the water supply. Carefully remove the faucet handle and check for worn seals or gaskets. Replacing these can stop the leak effectively.
Disassembling a bathroom faucet may sound daunting, but it’s simpler than you think. A leaking faucet base can be an annoying issue, and taking it apart is often the first step towards a solution. With a few tools and a bit of patience, you can tackle this task and restore your faucet to full functionality.Remove Handles
Start by turning off the water supply to prevent any unwanted water flow. If you’ve ever wrestled with a stubborn faucet handle, you’ll know it’s not always straightforward. Locate the screw that holds the handle in place—typically found under a cap or at the back. Use a screwdriver to remove it, and gently lift the handle off. If it’s stuck, try a bit of white vinegar to loosen any mineral buildup. Have you ever tried fixing something only to realize you lack the right tool? Make sure you have a variety of screwdrivers handy.Access Internal Components
Once the handles are off, you’ll see the nuts and screws that secure the faucet’s internal components. Carefully loosen and remove these using a wrench. Remember, small parts can easily get lost, so place them in a container or on a cloth. Pay attention to the arrangement of each part. Consider snapping a quick photo with your phone—it’s a lifesaver if you forget the correct order during reassembly. Have you ever had a moment where you thought, “I wish I’d taken a picture”? This simple step can save you from future headaches. Tackling a leaking faucet can be a rewarding experience. You not only save money but also gain the satisfaction of fixing things yourself. Next time you face a similar problem, will you be ready to dive in with confidence?Inspect And Replace Seals
A leaky bathroom faucet often results from worn seals at the base. Inspect the seals regularly for damage. Replace any faulty seals to prevent further leaks and maintain a dry, efficient bathroom space.
A leaking bathroom faucet at the base can be more than just a minor annoyance; it can lead to higher water bills and water damage if not addressed promptly. One of the most common culprits behind this issue is worn seals. Inspecting and replacing these seals is a straightforward task that can save you a lot of hassle. In this section, you’ll learn how to identify worn seals and replace them effectively, ensuring your faucet is in top working condition.Identifying Worn Seals
Worn seals are often the reason behind a faucet leak. They can become brittle over time due to constant exposure to water and cleaning agents. Signs of a worn seal include water pooling around the base of the faucet and a persistent drip even when the faucet is off. To inspect the seals, you’ll need to disassemble the faucet. Don’t worry, it’s simpler than it sounds. You typically start by turning off the water supply and removing the handle. Once disassembled, look for rubber O-rings or gaskets. If they appear cracked or deformed, it’s time for a replacement.Seal Replacement Techniques
Replacing seals might sound daunting, but it’s quite manageable with the right tools and guidance. Start by purchasing the correct size and type of seals for your faucet model. A quick trip to your local hardware store or a glance online can provide what you need. Once you have the new seals, remove the old ones carefully, ensuring not to damage any surrounding components. Clean the area thoroughly to remove any debris or mineral buildup. Then, simply fit the new seals into place. Ensure they sit snugly and are properly aligned. Reassemble the faucet and turn the water supply back on. Check for leaks by turning the faucet on and off. Does the water still pool at the base? If not, congratulations! You’ve successfully tackled a common household issue. If it does, double-check the seal placement. Remember, practice makes perfect, and each DIY task is a learning opportunity. Have you ever had to replace seals on your faucet? What tips would you share with others facing the same issue?
Credit: www.youtube.com
Reassemble The Faucet
Fixing a bathroom faucet leaking at its base might seem tricky, but it’s manageable with careful reassembly. Disassemble the faucet, inspect seals and washers, then reassemble to ensure a tight fit. Proper alignment and securing of parts can prevent leaks effectively.
When fixing a bathroom faucet leaking at the base, reassembling the faucet correctly is crucial. Many face this problem after initial repairs. Proper reassembly ensures no further leaks and a smooth operation. It is important to follow the steps carefully. Each part must fit well to function properly. Let’s explore the key aspects of reassembling your faucet.Ensure Proper Alignment
Alignment is essential for a leak-free faucet. Start by placing the parts in their right positions. Check the handles and spout alignment. Misalignment can cause stress on the components. This leads to further leaks or damage. Use the manufacturer’s guide if unsure. Every part has a specific place and direction. Align them carefully to ensure proper function.Tightening Procedures
Tightening is a critical step in reassembly. Use the correct tools for each part. Overtightening can damage the threads or seals. Loose parts can cause leaks. Begin by hand-tightening the components. Use a wrench for final adjustments. Ensure no part feels loose or wobbly. Check all connections twice. Proper tightening ensures a secure, leak-free faucet.Test For Leaks
A bathroom faucet leaking at the base can waste water and increase bills. Regular checks help spot leaks early. Tightening connections might solve the issue, ensuring efficient water use.
Testing for leaks in your bathroom faucet is essential. It’s a straightforward process that ensures your plumbing system runs smoothly. By identifying leaks early, you can prevent water damage and save on your water bill.Gradual Water Pressure Restoration
Start by turning off the water supply to your faucet. This step is crucial because it prevents further leaking while you test. Once the water is off, slowly restore the water pressure. Open the valve gradually and observe the base of the faucet. Does water seep out as the pressure builds? If yes, you likely have a leak that needs fixing.Check For Continuous Leaks
Next, watch the faucet closely for continuous leaks. Even after the water pressure stabilizes, a steady drip signals a persistent issue. This is where you need to be attentive. Sometimes leaks aren’t obvious right away. They can appear as a slow drip or a slight puddle around the base. To make sure, dry the area and wait. Check again after a few minutes. Is the area wet again? If so, it’s time to repair the faucet. Consider how often you use the faucet. Frequent use can wear out seals and washers. These components might need replacing. Are you prepared to tackle these repairs yourself, or will you call a plumber? Testing for leaks isn’t just about spotting water. It’s about understanding the health of your plumbing. Detecting a leak early saves you time, money, and the headache of major repairs later.Prevent Future Leaks
A leaking bathroom faucet can cause frustration and water waste. Preventing future leaks is essential for maintaining an efficient bathroom. Regular maintenance and attention to potential issues can help you avoid costly repairs. By being proactive, you can ensure your bathroom faucet remains in top condition.
Regular Maintenance Tips
Regularly clean your faucet to prevent mineral buildup. Use a soft cloth and mild cleaner. Check for loose or worn parts every few months. Tighten any loose screws or fittings. Replace washers or seals if they appear damaged. Lubricate moving parts with plumber’s grease to ensure smooth operation.
Signs Of Potential Issues
Be alert to signs of potential faucet problems. Dripping water is a clear indicator of an issue. Check for water pooling around the faucet base. This could signal a worn-out seal. Listen for unusual sounds like squeaking or grinding. These noises may suggest internal wear. Address these signs promptly to prevent bigger problems.

Credit: www.rbrohant.com
Frequently Asked Questions
Why Is My Bathroom Faucet Leaking At The Base?
A worn-out O-ring or washer often causes leaks at the base. Check these parts first.
How Can I Fix A Leaking Faucet Base?
Turn off the water supply. Then, replace the O-ring or washer. Reassemble the faucet.
What Tools Do I Need To Repair A Faucet Leak?
You’ll need a wrench, screwdriver, and replacement washers or O-rings. These are basic plumbing tools.
Can A Leaking Faucet Increase My Water Bill?
Yes, even small leaks can waste water. This can lead to higher water bills over time.
How Often Should I Check My Bathroom Faucet For Leaks?
Check every six months. Regular checks help catch leaks early and prevent bigger issues.
Conclusion
Fixing a leaking bathroom faucet saves water and money. Start by identifying the problem. Tighten any loose parts. Replace worn-out washers or seals. Clean mineral buildup for smoother operation. Seek professional help if the leak persists. Regular maintenance prevents future leaks.
A few simple steps can make a big difference. Keep your bathroom functioning efficiently. Enjoy a drip-free environment. Save resources and reduce water bills. A small effort today avoids bigger issues tomorrow. Tackle leaks promptly for peace of mind. Your bathroom stays in top shape with little care.