To remove a generator from an engine shaft, first, disconnect the power source. Then, unscrew the bolts securing the generator to the shaft.
Removing a generator from an engine shaft may seem daunting, but it’s a straightforward process with the right tools and safety precautions. This task is crucial for maintenance, repairs, or upgrades, ensuring your machinery runs efficiently and safely. It involves disconnecting the generator from its power source, which is essential to prevent any accidental starts or electrical hazards.
Next, you’ll need to carefully unscrew or unbolt the generator from the engine shaft. This step requires attention to detail and patience, as the components must be handled gently to avoid damage. Proper disassembly not only extends the lifespan of your equipment but also maintains its performance. By following these steps, you can successfully detach a generator, making it ready for whatever service or replacement it needs.
Introduction To Generator Removal
Removing a generator from an engine shaft can seem daunting. Yet, with the right approach, it’s a manageable task. This process requires careful planning and execution to ensure safety and prevent damage. Whether you’re a seasoned mechanic or a DIY enthusiast, understanding the steps involved is crucial for a successful removal.
Safety First: Preparing For The Task
Before starting, prioritize safety. Disconnect the battery to avoid electrical shocks. Wear protective gear like gloves and goggles. Ensure the engine has cooled down to prevent burns. Secure the work area to avoid accidents. Safety steps prevent injuries and make the job smoother.
Tools And Materials Needed
- Wrench set – For bolt removal.
- Screwdrivers – To loosen components.
- Puller tool – Essential for shaft detachment.
- Hammer – For gentle taps.
- Penetrating oil – Eases disassembly.
- Marker – To mark positions.
- Clean rags – For cleanup.
Having the correct tools and materials on hand simplifies the task. It ensures the generator comes off smoothly and without damage. Prepare these items before starting.

Credit: www.ifixit.com
Identifying The Generator Type
Before removing a generator from an engine shaft, it’s essential to identify the generator type. Knowing the type helps plan the removal process accurately. This step ensures the right tools and methods are in use. Look for a nameplate or model number on the generator for specifics.
Brushless Vs. Brushed Generators
Brushless and brushed generators differ in design and operation. Brushless models are modern with fewer parts to wear out. They usually last longer. Brushed generators have brushes that make direct contact with the commutator. These brushes require regular maintenance.
- Brushless Generators: No brushes, less maintenance.
- Brushed Generators: Brushes present, more maintenance.
Understanding Coupling Mechanisms
Different generators use various coupling mechanisms to attach to the engine shaft. These mechanisms can be bolts, welds, or keyed slots. Look closely at the generator’s attachment point. Identify the coupling type before proceeding with removal.
| Coupling Type | Characteristics |
|---|---|
| Bolted | Secured with bolts, nuts. |
| Welded | Fused to shaft, needs cutting. |
| Keyed | Slotted attachment, uses a key. |
Check for securing methods like set screws or pins. They ensure the generator stays fixed to the shaft.
Cutting Power And Isolating The Generator
Before removing a generator from an engine shaft, safety comes first. Cutting power and isolating the generator are critical steps. This ensures no electrical accidents happen. Follow these steps to do it safely and efficiently.
Disconnecting The Battery
First, turn off the engine and ensure it’s cool. Find the battery. It’s usually near the engine. Use gloves for safety. Next, loosen the negative (-) terminal with a wrench. Remove the cable carefully. Do the same for the positive (+) terminal. This stops any power flow to the generator.
Securing The Engine
With the power off, secure the engine to prevent it from moving. Use blocks or clamps to keep it steady. This makes removing the generator safer and easier.
- Ensure the area is clean.
- Have all tools ready.
- Wear safety gear.
These steps create a safe environment for generator removal. Each action helps prevent accidents and damage.
Credit: m.youtube.com
Accessing The Generator Shaft
Accessing the generator shaft is a crucial step. It involves preparing the area around the generator. This ensures a safe removal process. Let’s dive into how to get the best access.
Removing Obstructions
Before accessing the shaft, clear all obstructions. This includes:
- Disconnect the battery.
- Remove any shields or covers.
- Clear debris and clean the area.
Positioning For Optimal Access
Position yourself and the tools for easy access. Follow these steps:
- Ensure the engine is cool.
- Secure the engine to prevent movement.
- Use proper lighting to see the shaft.
With obstructions removed and optimal positioning, the shaft is ready for removal.
Detaching The Generator
Detaching a generator from an engine shaft needs precision and care. This section guides you through the crucial steps. Follow these instructions for a safe and effective removal process.
Loosening Couplings And Bolts
Start by powering off the engine completely. Ensure all electrical connections to the generator are disconnected. Locate the couplings and bolts that secure the generator to the engine shaft.
Use the right tools for loosening. A wrench or socket set usually works well. Turn the bolts counterclockwise to loosen them gradually. Avoid rushing this step to prevent damage.
Careful Handling Of The Generator
Once loose, handle the generator with care. It’s heavy and can cause injury if dropped. Use both hands and, if possible, get assistance to steady the generator as you detach it.
Keep your feet clear from under the generator. Move it away from the engine shaft slowly. Place the generator on a stable, flat surface to avoid tilting or rolling.
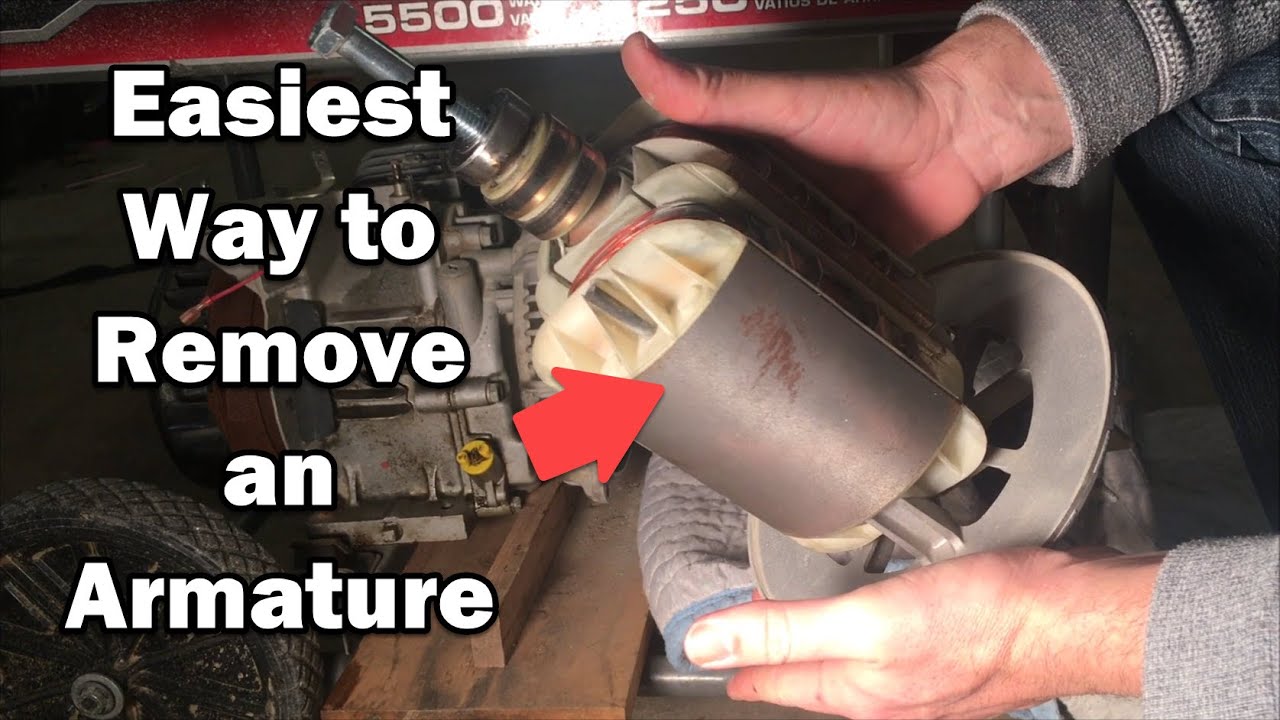
Removing The Generator From The Shaft
Today, we dive into Removing the Generator from the Shaft. This task can seem tough. Yet, with the right steps, it’s manageable. We will cover dealing with rust and using tools.
Dealing With Corrosion And Seizure
Generators often face rust and seizure. This makes removal hard. Let’s tackle this:
- Apply penetrating oil generously around the shaft area. Let it soak.
- Give it time, ideally overnight, for the oil to work.
- Tap gently around the shaft with a hammer. This helps break the rust.
These steps aid in loosening the generator for easier removal.
Using Pullers And Extractors
For stubborn cases, tools help. Pullers and extractors are key.
- Choose the right size of puller for your generator.
- Attach the puller’s arms firmly around the generator.
- Turn the puller’s center bolt. This pulls the generator off.
This method is effective for removing tightly-seized generators.
Remember: Safety first. Wear gloves and eye protection.
Post-removal Procedures
Once the generator is off the engine shaft, what’s next? It’s time for post-removal checks and maintenance. This ensures everything runs smoothly when you reinstall or replace the generator. Let’s dive into the essential steps for inspecting and maintaining the shaft and generator.
Inspecting The Shaft And Generator
After removing the generator, a thorough inspection is crucial.
- Check the shaft for wear and tear.
- Look for any signs of corrosion or damage.
- Ensure the keyway and threads are intact.
For the generator, inspect the mounting points and electrical connections. Any damage calls for immediate attention.
Cleaning And Maintenance Tips
Regular cleaning and maintenance keep components in top shape. Follow these tips:
- Clean both shaft and generator with a suitable solvent.
- Use a non-abrasive cloth to avoid scratching.
- Lubricate moving parts to prevent rust.
- Store the generator in a dry, clean place if not reinstalling immediately.
Proper care extends the life of your engine and generator. Tackle any issues found during inspection before reassembly.
Credit: www.power-eng.com
Reassembly And Testing
Once the generator is detached from the engine shaft, the next steps are vital. Reassembly and testing ensure everything runs smoothly. This guide highlights the key phases for reassembling the generator and conducting tests.
Realigning The Generator
Proper alignment is crucial for efficient operation. Follow these steps:
- Position the generator on the engine shaft.
- Use a straight edge tool to check alignment.
- Adjust the generator position as needed.
- Tighten all bolts to secure the generator.
Conducting Operational Tests
After reassembly, performing tests is essential. This confirms the generator works correctly.
- Connect the generator to a power source.
- Turn on the generator and observe it starts smoothly.
- Check for unusual noises or vibrations.
- Use a multimeter to measure output voltage.
- Ensure the voltage matches the generator’s specifications.
Frequently Asked Questions
What Tools Are Needed To Remove A Generator Shaft?
To remove a generator shaft, you’ll typically need a gear puller, wrench set, hammer, and safety gloves.
Can I Remove A Generator Shaft Myself?
Yes, with the proper tools and safety precautions, you can remove a generator shaft yourself.
How To Prevent Shaft Damage During Removal?
Use a gear puller and follow the manufacturer’s instructions to prevent shaft damage during removal.
What Safety Measures Should I Take?
Always wear protective gloves and eyewear, and ensure the generator is powered off before starting.
How Long Does Shaft Removal Take?
The time it takes can vary, but with the right tools, it typically takes about an hour.
Conclusion
Removing a generator from an engine shaft needn’t be a daunting task. With the right tools and a step-by-step approach, you can tackle this project efficiently. Remember to prioritize safety and double-check your work. For more DIY tips and engine maintenance advice, keep following our blog.
Your engine’s longevity depends on proper care—start with mastering the basics today.